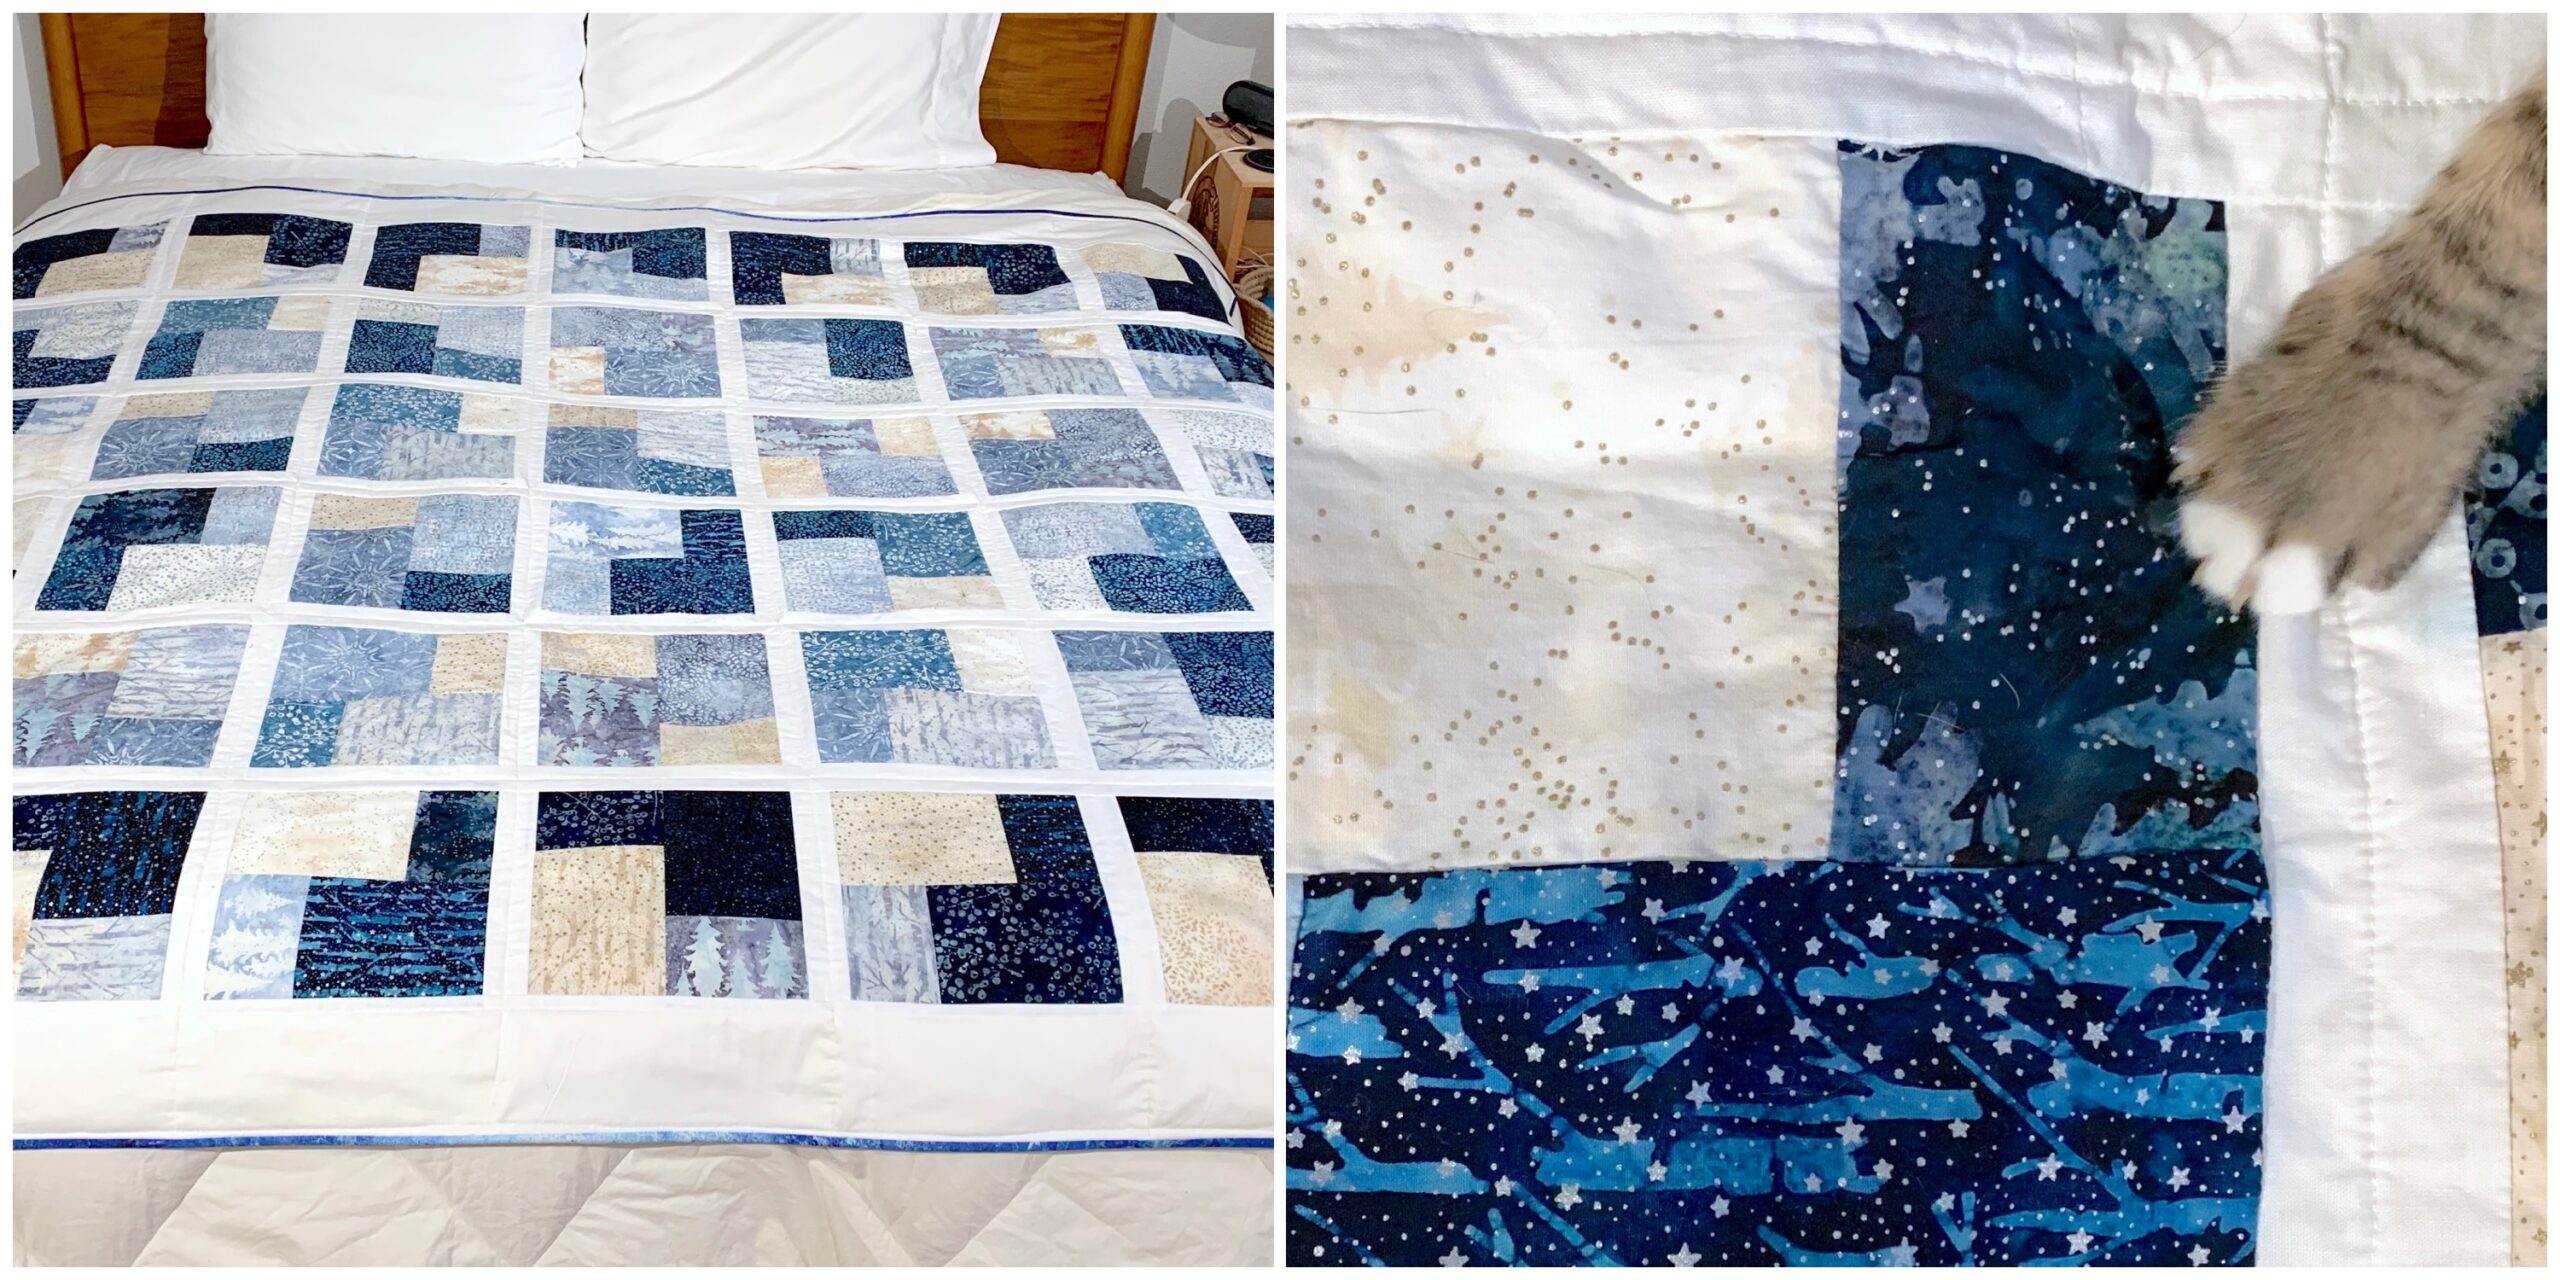
I have a few layer cake precut sets on hand and I’m always looking for a design to use with them. I really like this design from Sewing Studio. It looks good and it uses every bit of one standard layer cake precut set (no waste).
I used the “Magical Winter” layer cake set from Robert Kaufman, which I purchased from https://modernquiltco.com/ Each piece in the set has either gold or silver sparkles, which I really like.
Finished size of the quilt I made is 71-1/2 inches by 82-1/2 inches, and it’s 6 blocks by 7 blocks.
Here are the steps I did:
Unwrap one layer cake precut set.
Cut one 3-1/2 strip off each layer cake piece. Lay the pieces to the side in the order you cut them.
Turn over one stack (doesn’t matter which one) to disorganize the colors.
Sew one 3-1/2 strip to one 6-1/2 inch strip for each strip in the stacks.
Press seams to either side.
Cut each square in half across the seam. Each piece will be 5 inches wide.
Once again, turn over one stack to disorganize the colors.
Sew one from each stack to one from the other stack with the smaller blocks in opposite corners.
Press seams to either side.
Lay blocks out alternating between vertical and horizontal within each row and row by row.
Add 2 inch (cut width) vertical sashing between the blocks in each row.
Stitch blocks of each row together.
Add 2 inch (cut width) horizontal sashing to the bottom of each row except for the bottom row.
Stitch the rows together. Finished size so far is 62-1/2 inches by 72-1/2 inches.
Add a 5 inch (cut size) border to the sides and then to the top and bottom.
Assemble and quilt sandwich (top, batting, and backing).
Add binding. I used 8 2-1/2 inch strips for my binding.
I’m ready to try making another quilted jacket. I plan to make the following changes:
Create blocks and surround them with solid fabric for each piece instead of cutting from an already made quilt.
Add side pockets.
Add a floating lining.
Create “Fabric”
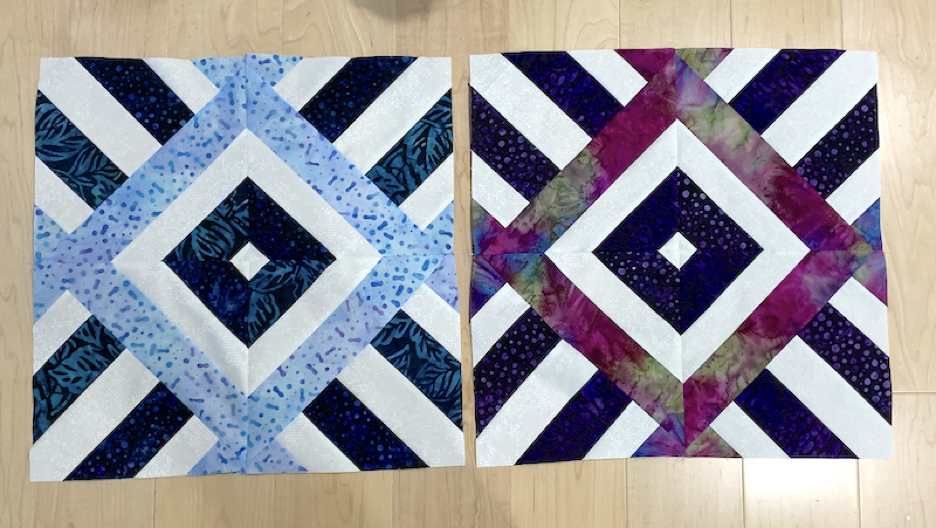
To create the “fabric” for this jacket, I pieced 4 blocks using the “Second Sunrise” design by Raymond Steeves at https://3dudesquiltingdesigns.com/ Each block ends up being about 18 inches by 18 inches.
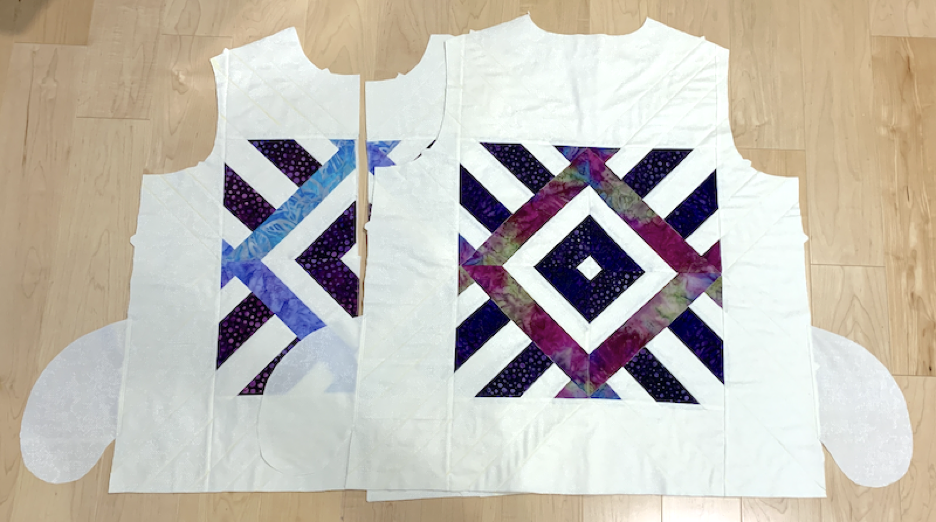
I figured one whole block for the back, one for each sleeve, and one block split across the front.
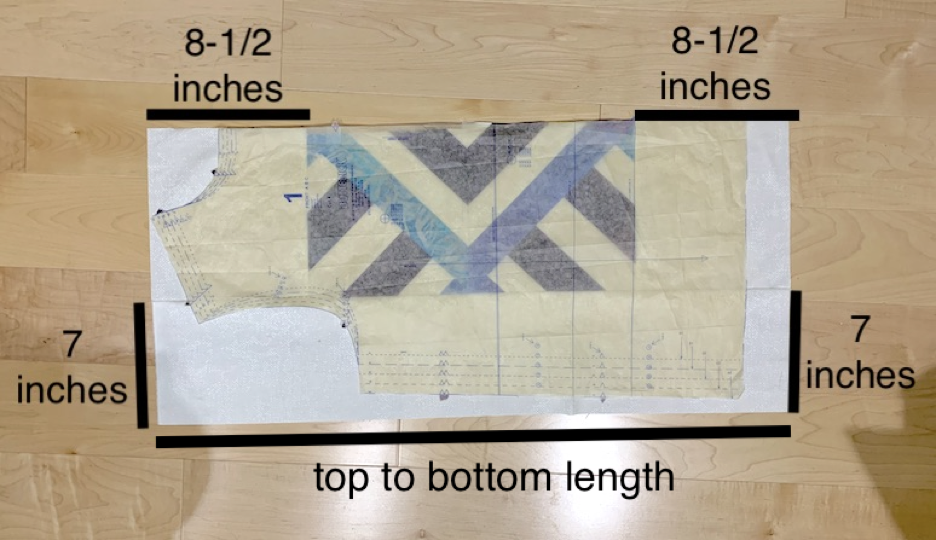
Then I compared the blocks to the jacket pattern pieces and figured out how much to add to each block to make it big enough to cut the piece out. For example, here is what I added for each front piece:
Quilt the Pieces
Then I tried to decide whether to quilt the pieces as rectangles or cut them out first and then quilt them. I decided it would probably be easier to quilt them as rectangles so I did that for each pattern piece, except for the pockets. I figured it would be cozy but too bulky to also quilt the pockets.
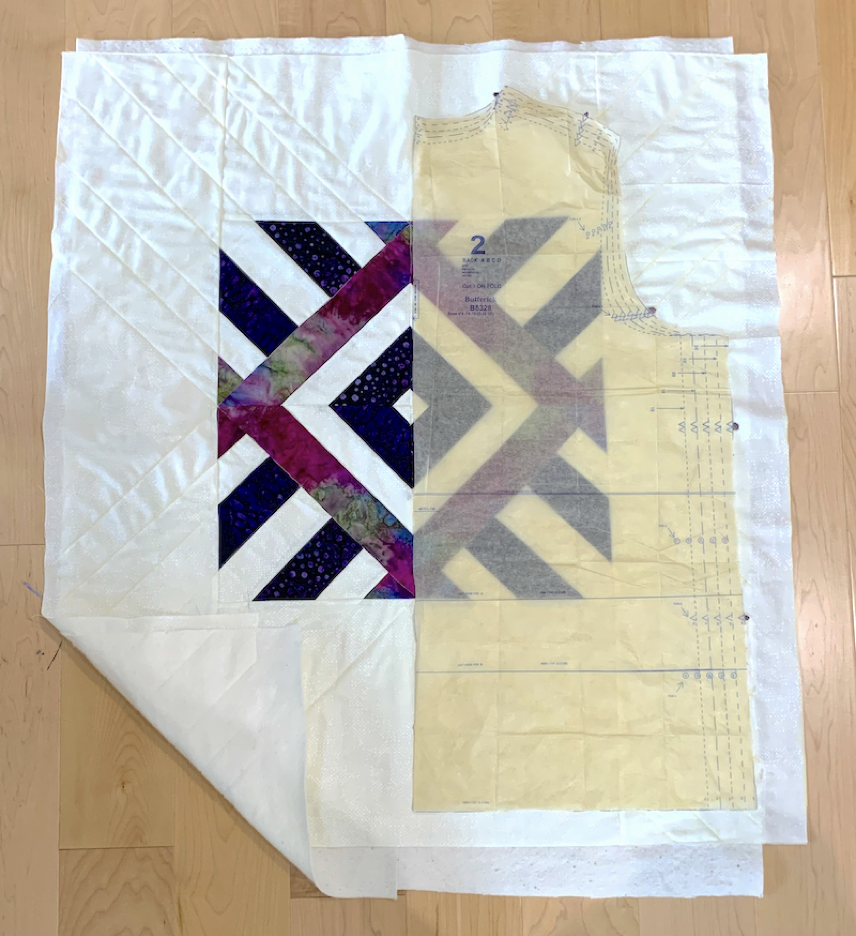
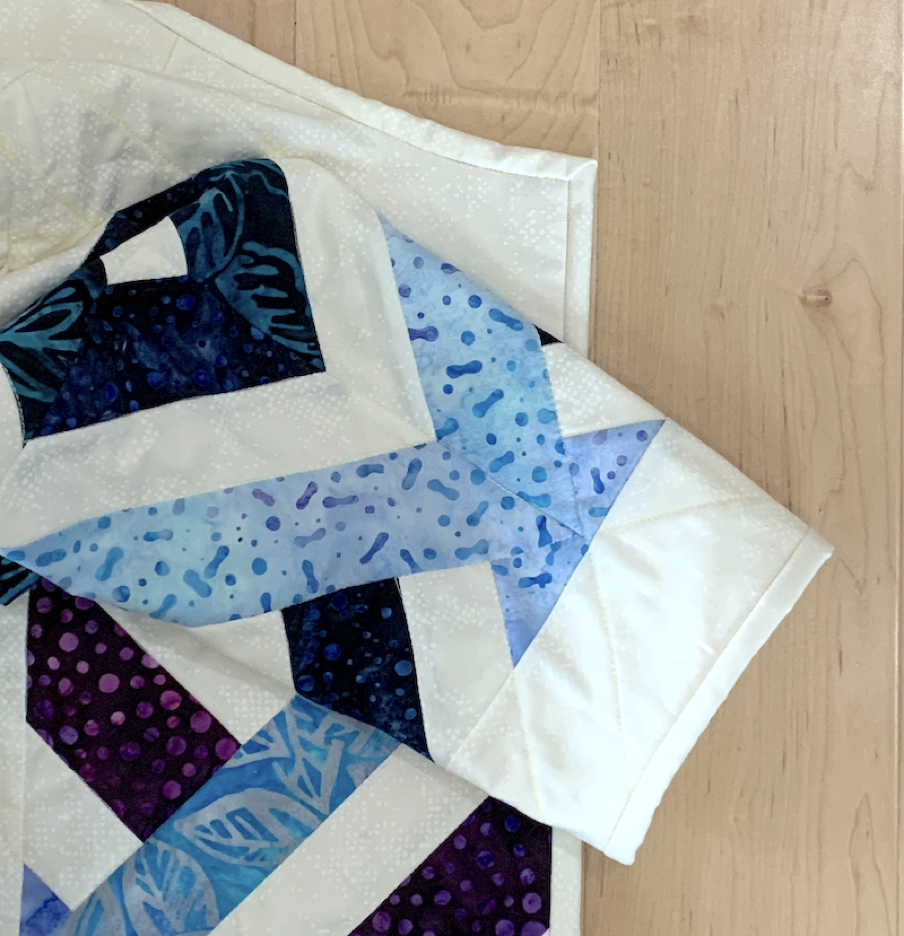
Here is how the back section looks after quilting with just batting. I included the pattern piece, which is meant to be on the fold, for comparison.
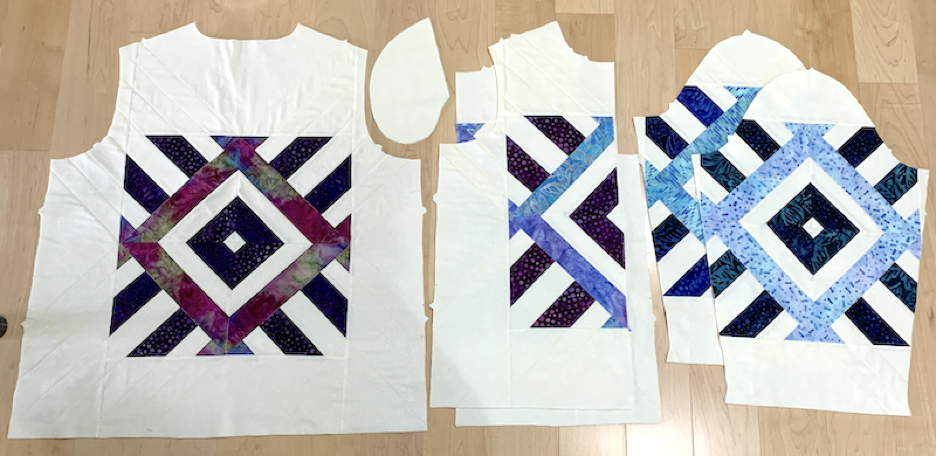
Cut Out the Pieces
Then I put the pattern pieces back on the quilted rectangles and cut out each piece.
Assemble the Shell and Lining
First I sewed the pockets onto the front and back side seams.
Next I sewed the shoulder seams, sleeves, and side seams (including the pockets) to create the outside shell.
Then I did the same for the lining except for the pockets, which I did not include inside the jacket as well.
Then I put on the lining, inside out, and put on the shell over it.
Then I took the shell/lining set off, pinned the exposed edges, and sewed them together.
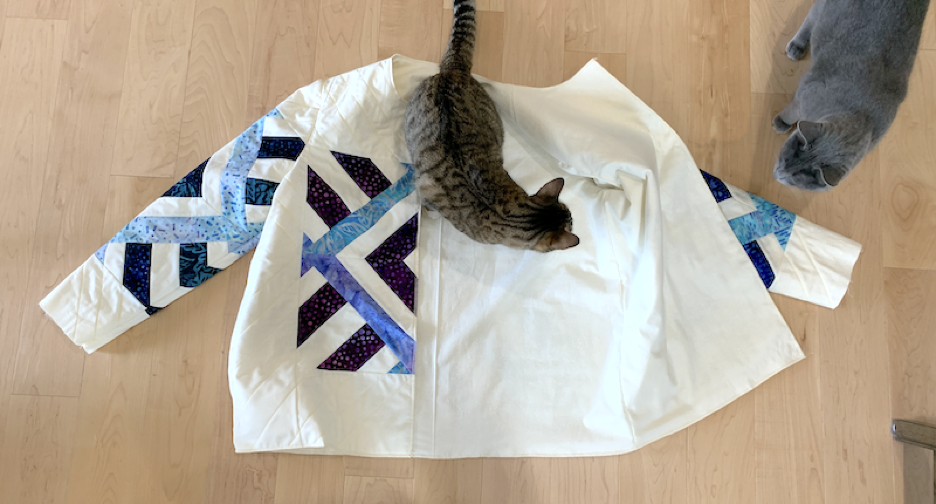
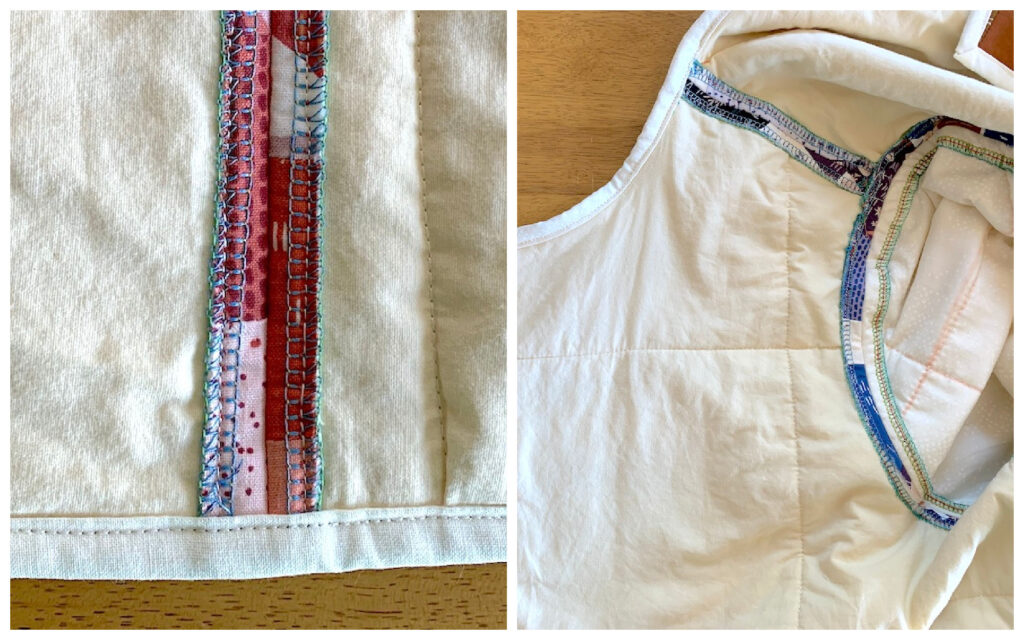
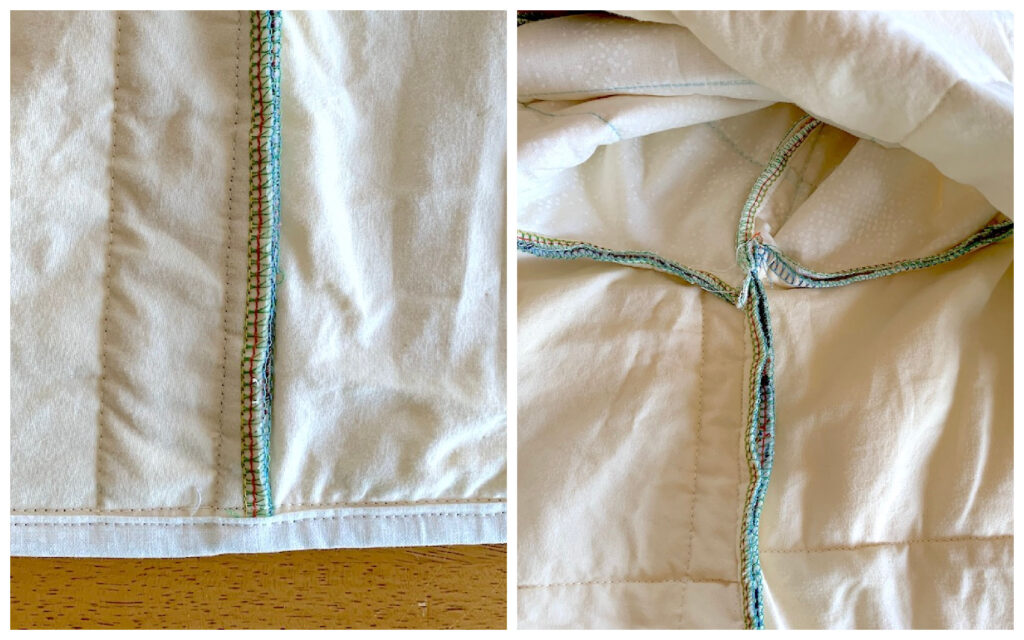
I probably didn’t need to but I serged the edges after that, to make a nice clean edge for the binding. Of course my cats came to check it out as soon as I put in on the floor for a photo.
Bind Exposed Edges
Finally I bound the exposed edges, including the body and sleeve hems, the same way I bind a quilt with one exception. I found out last time that the binding needs to be a bit wider so I cut it 3 inches wide instead of the 2-1/2 inches wide I usually do for binding.
That’s it! It was a bit more work than the first quilted jacket I made but the results are totally worth it to me. I love the tidy look and feel of the inside without any exposed seams and I love having pockets.
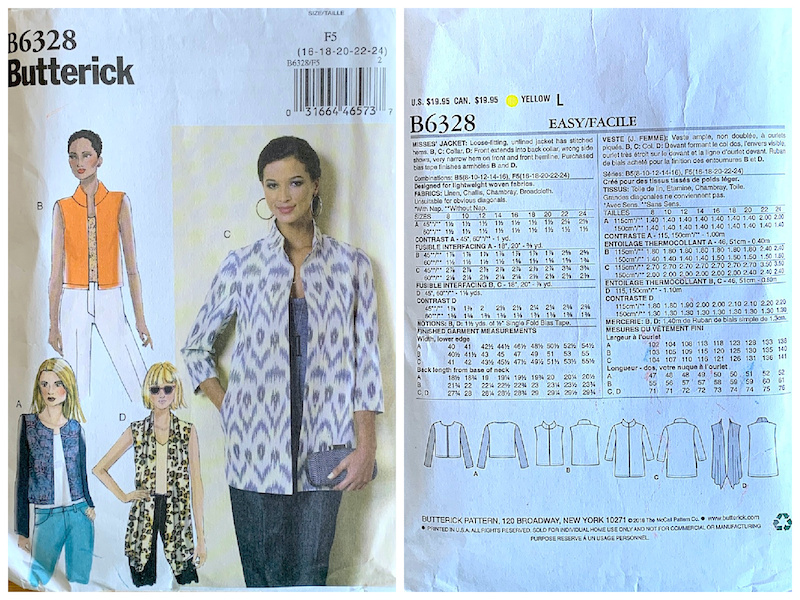
I’ve been wanting to make a quilted jacket for a while. I tried making my own pattern but found it difficult to draft the sleeve cap and I ended up buying this pattern.
You can see that the pattern has different lengths and neck styles. I used the sleeve and neck style from A and the length from C.
Since this was to be my first try at a quilted jacket I figured I wouldn’t use my favorite fabric or make a special quilt for it. I had a quilt top around that I never sandwiched and finished as a quilt because I didn’t like it enough to put in the time and materials at the time I made the top.
Now I went ahead and sandwiched the top and quilted it but did not add binding.
I created a full-size back pattern so I could see how it would lay on the quilt for cutting. And I created a second front pattern piece from the original for the same reason.
I laid the pattern pieces out on the quilt and found that I didn’t have enough area to also cut out the sleeves. That’s okay, for this first try I figured I would make them out of a solid cream fabric I had around, which I did.
I have been watching videos on youtube of how other people made quilted coats and here are some that I especially liked:
The first video in the above list was the push I finally needed to get a serger. I got the one she used in the video after reading reviews about it online and hearing that it is not terribly expensive, generally reliable, and has an easier to thread system than many other sergers. It arrived and I was afraid to set it up 🙂 I finally set it up the next day and did some practicing.
Then I serged around all the jacket pieces I had cut out: back, two front pieces, and two sleeve pieces. It’s kind of fun once you get the hang of it!
I sewed the shoulder seams on the front and back pieces, right sides together. Then I decided to topstitch the serged seam layers to make them lay flat. It was easy on the shoulder seams because they are straight and short.
I often like to sew the sleeve in before sewing the side seams on my garment body and on the sleeves. I find it’s much easier for me to navigate the complex curves that way. I sewed the first sleeve on and tried to topstitch the serged seam layers but it was much harder because of the curves. Hmmm. I decided to not do that on the second sleeve and see how it feels to wear and how it looks.
Then I sewed the sleeve and side seam next to the attached sleeve. Easy peasy. Topstitching the serged seam layers not so easy. Perhaps this wasn’t such a great idea after all.
I tried on the jacket and, other than the sleeves being too long, I really liked how the result looked and felt.
So I attached the second sleeve and sewed the long seam along the sleeve and side it was attached to. I did not topstitch the serger layers.
I tried the garment on again and I like it better without the topstitching. Well that simplifies things.
Next I marked the sleeve length I wanted and trimmed off the extra. Then I cut a 2-1/2 wide inch strip to bind the sleeve bottoms, the same way I do for a quilt.
I tried the jacket on again to see whether I wanted to make any adjustments on the front edges. I think it’s fine the way it is. It’s comfortable to sit down in and I could add buttons later if I wanted to.
I learned another lesson on the next step. I cut 2-1/2 wide inch strips for binding for the neck, front, and bottom edges but I should have cut 3 wide inch strips. I sewed about a 3/8 inch seam instead of a 1/4 inch seam to make sure none of the serging would show but then I didn’t have enough on the other side to sew the binding down without catching it on the front. Oh well. Lesson learned and it doesn’t look bad, just not my favorite look for binding.
I can imagine so many wonderful quilt designs to use for future jackets! I do want to try one with a floating lining because I think that might feel better for wearing but that’s a project for later.
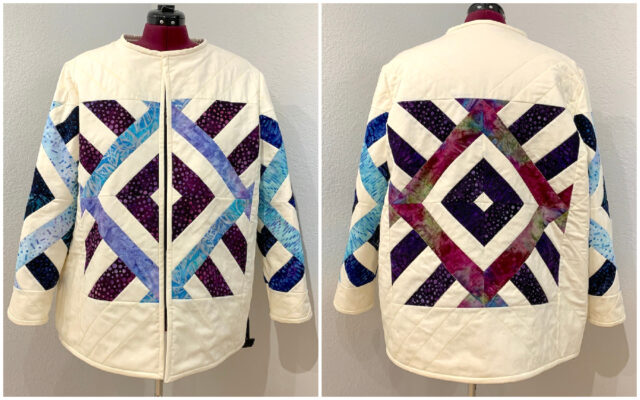
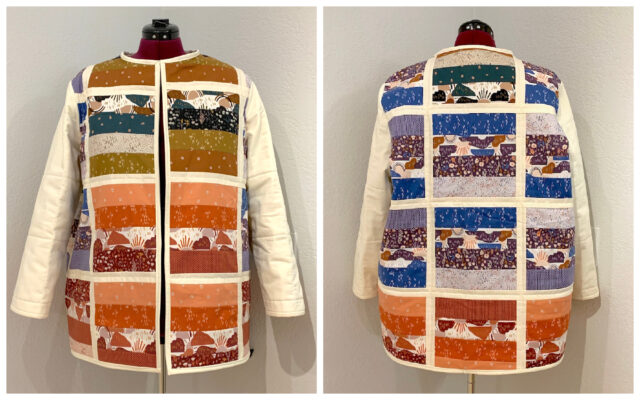
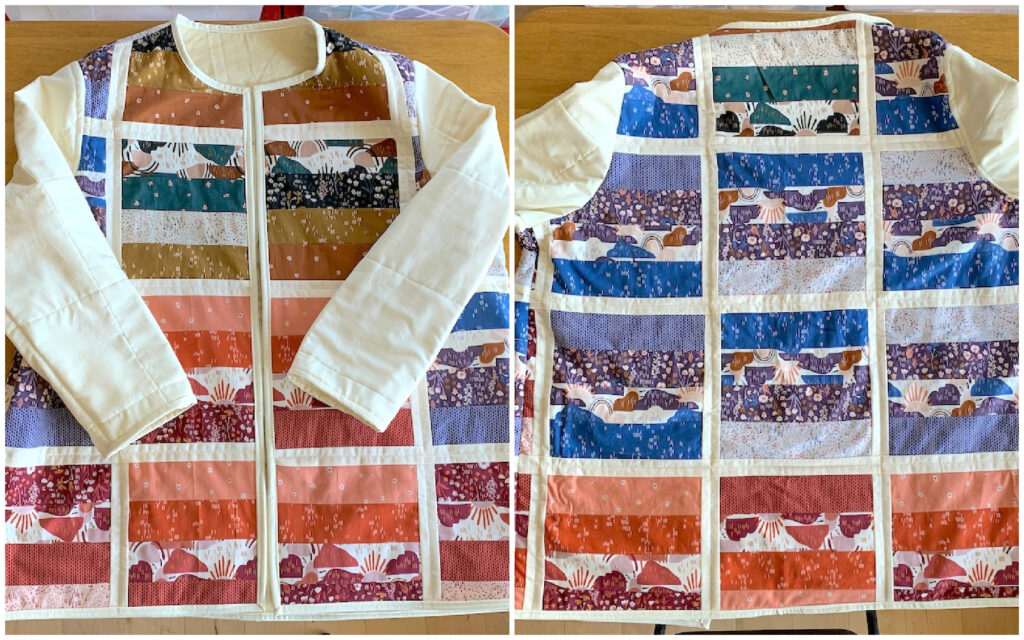
Here are some views of the outside and inside of the finished jacket.
Serged seams topstitched. Looks tidy on the inside but not so great on the outside and it feels a bit tight around the armhole for wearing.Serged seams not topstitched. Doesn’t look great on the inside but it looks better outside and feels better to wear.
Here is the second in my series of lessons for absolute beginner quiltmakers. I wish I had this information in one place when I first started making quilts! There are a number of different choices for nearly every technique I describe. These are my favorite techniques, including:
Folding your yardage
Using a rotary cutter
Chain piecing
Sandwiching your layers
Quilting your sandwich
Binding your quilt
Washing your quilt
Reference, including quilt sizes and yardage measurements
I have loved working with fabric since I took a sewing class in junior high school. At that time, I made everything from men’s shirts to ice skating dresses. Then I went off to college and didn’t have time to sew for a few years. I took a quilting class in 1982 but, for some reason, it didn’t stick. Then I took another quilting class in 2019 and this time it really stuck! I’ve been making quilts ever since, and loving it. I love the colors, the designs, and the satisfaction I get when I complete a new quilt.
People ask me what I do with all the quilts I make, which comes out to about one every two weeks. I keep my favorites, give many to family and friends, and donate the rest to people in need.
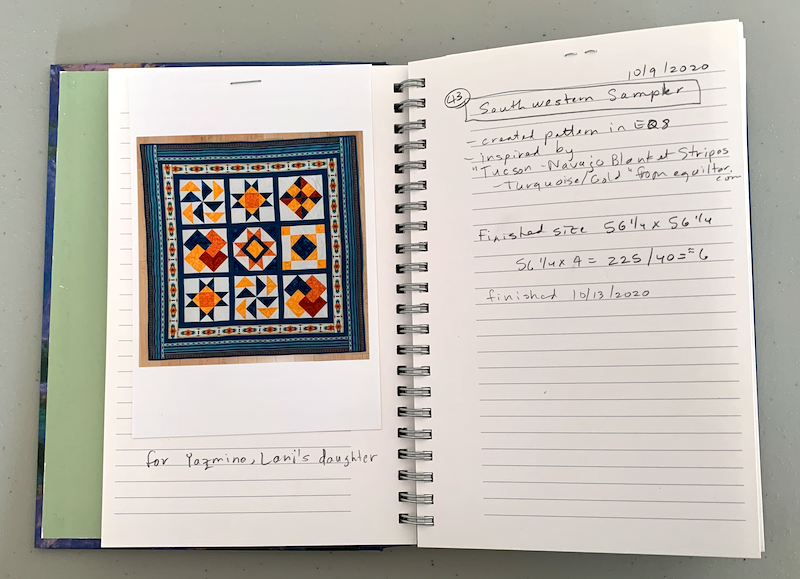
I started keeping a notebook in 2020. I wish I had started at the beginning of my quilting journey. In the notebook, I write the name of the pattern, if there is one, the name of the fabric, if known, and notes I take as I go. I also include a photo of the finished quilt. Since I give so many away, I like having a photo to remember quilts I have made but no longer have in our home. I also keep track of the number of the quilt, that is how many I’ve made up to that point. I have no idea why I do that but I do.
I notice that I like to write down everything I learn. I think that’s because I like organizing my thoughts into logical categories and also because I don’t want to have to remember everything. I especially like having project steps written down so I can go back to them later. I figured since I’m writing them down anyway, I might as well share them with others. Here is the Introduction I came up with for absolute beginners at making quilts.
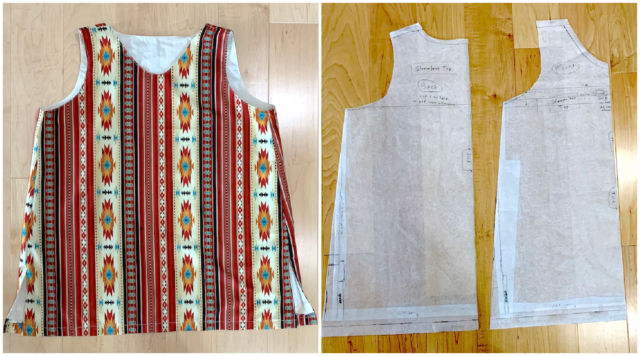
I showed you how I made a pattern for a sleeveless top in a previous blog post (https://quiltingbydiana.com/sewing-a-garment-for-the-first-time-in-over-30-years/). When I washed the completed top, I didn’t like the way the facings needed ironing to make them lay flat again. And I didn’t like seeing the exposed seams. So I decided to figure out how to make the top fully lined. To my surprise, not only did the lined top launder better and look better but it felt better to wear! I thought it would be too warm but, perhaps because I used all cotton fabric, it did not feel too warm at all.
One video I watched made all the difference for me in understanding the “burrito” method for sewing a lining into a sleeveless top. It was “Using The BURRITO METHOD To Create a Sleeveless Top” by Ellie and Mac Patterns. It’s at https://youtu.be/1_GmIQbijks I highly recommend you watch this video before trying the burrito technique.
The instructions below assume your top is tunic length. If it is shorter, and you don’t need vents for comfort (especially sitting down), then ignore the instructions about creating and finishing vent openings. The vents are closed but the bottom edge is hemmed but not connected. I find that it falls more nicely that way.
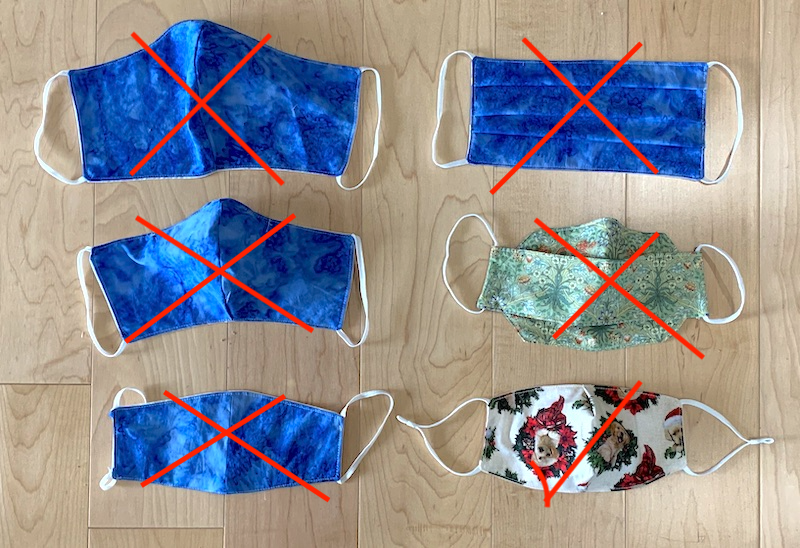
I’m still wearing a face mask everywhere I go. It’s a sign of the strange times we live in. I haven’t made a new face mask in months but I wanted to make one I found easier to put on (elastic instead of cloth ties) and I wanted to make a few for holiday gifts to go with the small tote bags I’ve been making (see https://quiltingbydiana.com/small-tote-bag-experiments-and-tutorial/ for details).
When I first started making face masks I bought two Accuquilt dies to make the cutting easier. One was in three pieces so it didn’t seem likely to be the simple design I was looking for. I tried the other one, first the outer layer and then, when that was way too big, the inner layer. Didn’t like the fit of that either. So I tried the center piece of the three piece design and that was way too small.
Next I started searching online for free designs I could try out. I tried three different designs before I found one I liked and that I could make using a simple technique. Here are the results of the experiments.
I tried the technique she described and it seemed more complicated than I needed. So I wrote up the technique I used for this design and pattern. There is a download link in the document window and below it.
Update 11/14/2021: I found that I really like using stabilizer instead of batting for these small tote bags so I updated the tutorial to reflect that.
I decided I wanted to make a smaller version of my full-size tote bag. Below are the results of the experiments I did, numbered as I went through them. The final bag is 8 inches tall by 7-1/2 inches wide by 4 inches deep. This compares to my larger tote bag which is 16 inches tall by 16 inches wide by 3 inches deep.
Experiment 1
I started with a 10 inch by 8 inch paper tote I had as a guide and used the same technique as I had used on my larger tote bag, just on a smaller scale.
I liked that the bag stood up on its own and keep its shape. I did not like:
The exposed seams. They stand out a lot more in the smaller tote.
The binding on the top. It seems like overkill on the smaller tote.
The straps were 4 layers of fabric (like double fold bias tape) but they still seemed floppy to me.
Experiment 2
Reduced the depth of the bag.
Used interfacing in the straps.
Used the inside out method for stitching the bag and lining together instead of quilting them together like I do in my larger tote bag.
Used batting on the outer body of the bag but no interfacing.
I liked the more streamlined inside (no exposed seams) and top (no binding). I did not like:
Because the batting was attached to the outside, the lining was floppy and didn’t look good.
Although the depth is better, the bag seems kind of tall to be a small tote bag.
Experiment 3
Decided to try all one piece instead of side and bottom panels.
Shortened the bag a bit.
Attached the batting to the lining instead of the body.
It was much easier to put the bag together without the side and bottom panels. And the lining looked much tidier. However…
I did not like the less structured look on the outside.
I prefer the look of the different color on the side panels.
Experiment 4
Went back to the side and bottom panels.
Made it a teeny bit shorter to make less fabric waste during cutting.
I am happy with the look and structure. However, it now seems too deep on the sides.
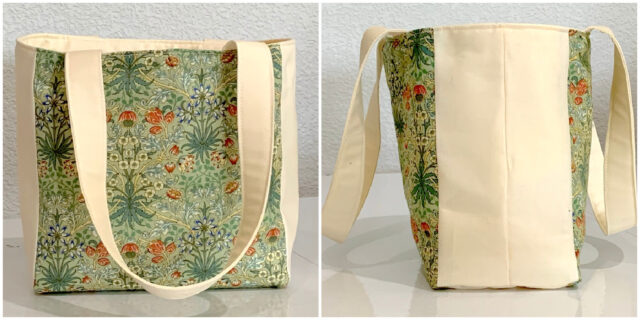
Experiment 5
Bingo! I realized that I didn’t need to change the height so it’s back up 1/2 inch taller and I reduced the depth a bit more. I am very happy with the look and feel of this bag.
I decided to change the name of my blog to Sewing by Diana since I’m going to be making lots of things besides quilts. I still love making quilts but have been feeling the need to make other things, like tote bags and clothing. Both quiltingbydiana.com and sewingbydiana.com will work to get there.
For my first experiment in making clothing, I decided to make a sleeveless top. Seemed like the simplest place to start.
Make a Pattern
The first thing I did was take a top that I know fits me and trace around it onto Swedish Tracing Paper. I saw this paper recommended in a video I watched and it is perfect for making your own patterns. It marks well, drapes well, and holds up even after multiple changes.
I folded the top in half, laid it down flat, and marked the bottom, sides, shoulder, and neckline for the front. Then I turned it over and did the same for the back.
Then I cut out the pattern I traced and wrote the piece type, the pattern name, how many to cut, and noted where to place on the fabric fold for cutting.
Try It Out
Then I tried making a sample garment to see whether it fit. Well, not so much 🙂. So I made some adjustments to the pattern and tried again. Much better this time although not perfect. I kept making adjustments on my pattern on my second sample garment until it fit reasonably well. I also added the neck and armhole facings to make sure they worked as I thought they would. Fortunately I did a lot of garment making when I was in my teens so I knew how things should go together.
Here is the second sample garment I made, with lots of experiments on it.
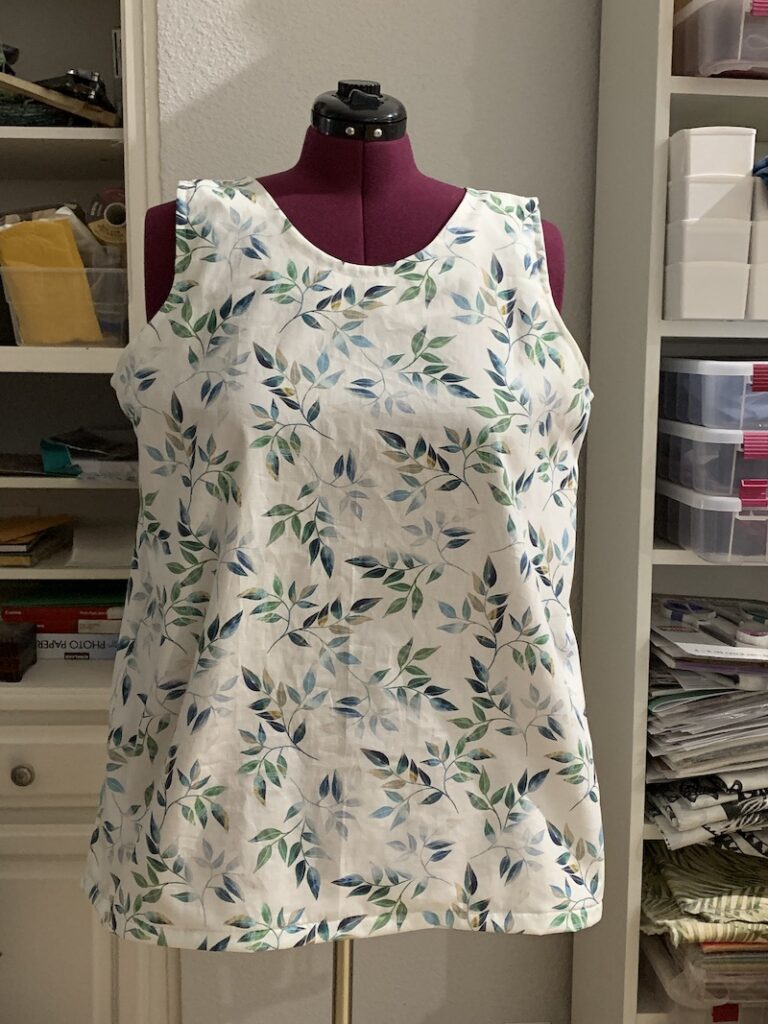
Use Fabric I Would Want to Wear
Once I was satisfied that I had made the adjustments to the pattern that I needed, I decided to try the pattern out with fabric I would want to wear. It came out pretty well but I decided that the side vents needed to be a bit longer for comfort, especially sitting down.
A More Interesting Design
I made the vent changes on the pattern and decided to try something more interesting.
I sewed 8 different 2-1/2 wide by width of fabric strips. I used the overlocking stitch on my sewing machine to sew them together and it worked really well. I didn’t want the seams to fray over time and I think this will definitely help.
I cut across the halfway point of the strips to make 2 equal sized sections, which I sewed together along the vertical direction of the strips.
On the front piece, I marked across the pattern at the bottom of the armhole on the pattern to mark a yoke.
I cut the panel I created using the pattern with the yoke folded down, allowing for a seam.
Next I cut a yoke piece using the top part of the pattern, allowing for a seam.
I did the same for the back of the top.
Finally put the top together the same way as before.
Here is what my front pattern ended up looking like with all the adjustments and the yoke marking.
And here are the facing pieces.
Overall I’m really happy with how this top came out. I’m definitely going to continue with garment making.
I’ve always enjoyed working with the Log Cabin block. It’s easy to make and you can create many different and interesting layouts with it. I had a few experiments I wanted to do.
Note: I updated the end of the post on 9/16/2021 to include a photo of the quilt with cornerstones.
Left or Right?
My first question for myself was, “Does it matter whether you add the strips to the left or to the right?” The answer is, it works both ways as long as you are consistent in the direction you choose. That is, if you pick adding your strips to the right, always add your strips to the right if you want the color layout to end up the way you intended.
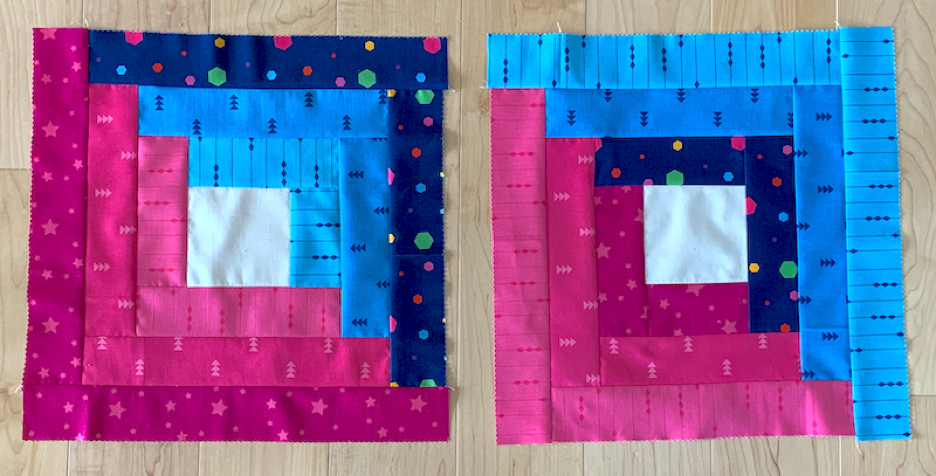
Dark Strips Inside or Outside?
I wondered whether I would prefer the darker (or more vivid) color strips on the outside, which is what I see in most Log Cabin designs, or on the inside of the block. I like both of these, but I think I slightly prefer the one on the left.
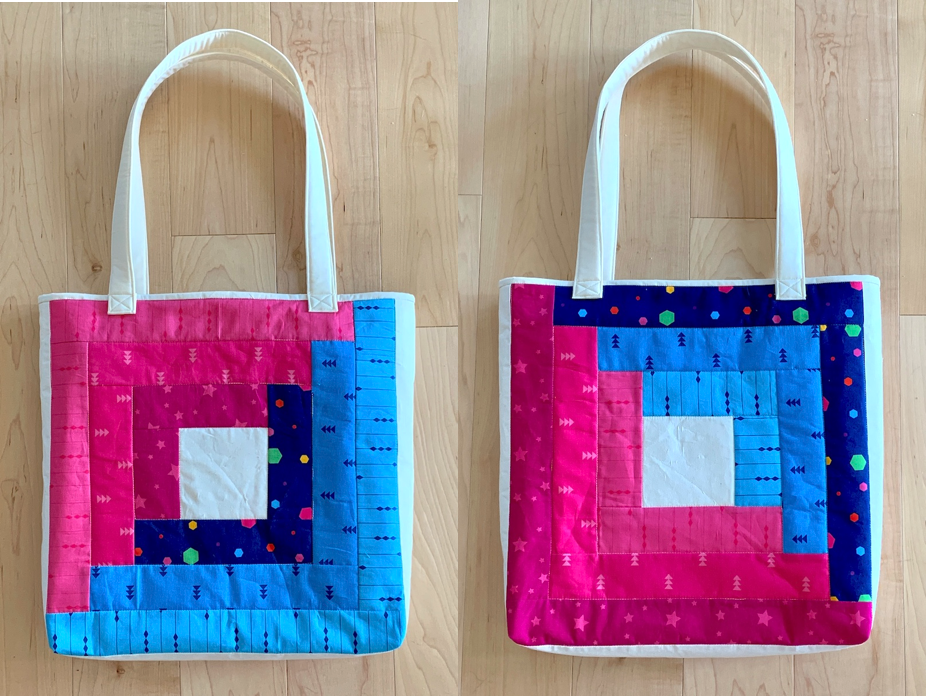
Tote Bag
It took exactly 6 jelly roll strips to make the two blocks I made and they are the perfect size for a tote bag 🙂. These photos show the two sides of the tote. Here you can tell that I added strips in opposite directions, making a left hand block and a right hand block.
I wondered what it would look like if I took one whole jelly roll, started at the center, and worked my way out until the entire jelly roll was used. Would I like the results? Would it look like a mishmash?
Here is what I did:
Laid the strips out in same-color sets of strips, in the order the strips came off the roll.
Picking a starting color for the center.
Changed colors, in order, each time I made a turn.
When I got to the point that strips were too short to make the length of a side, I stitched same color strips together.
When I got to the point where there wasn’t enough of a color to make the length of a side, I stitched the strip together with the next color.
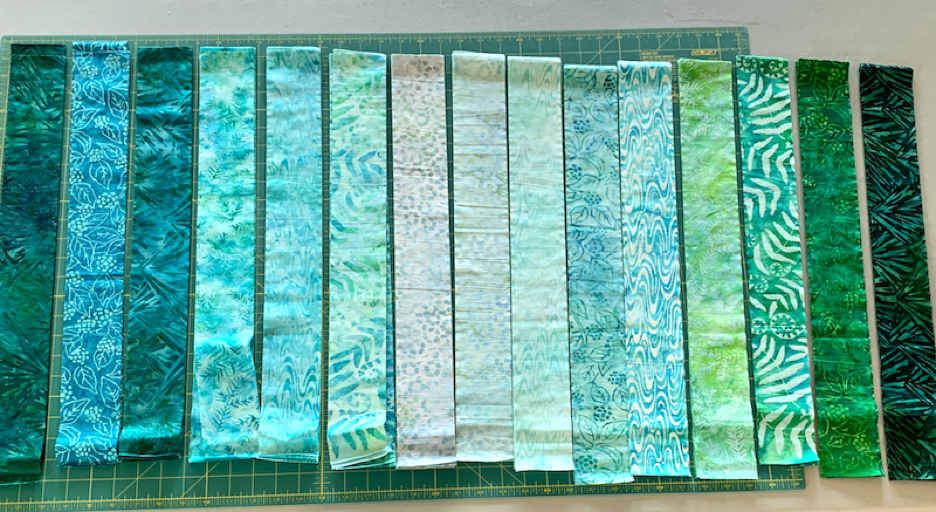
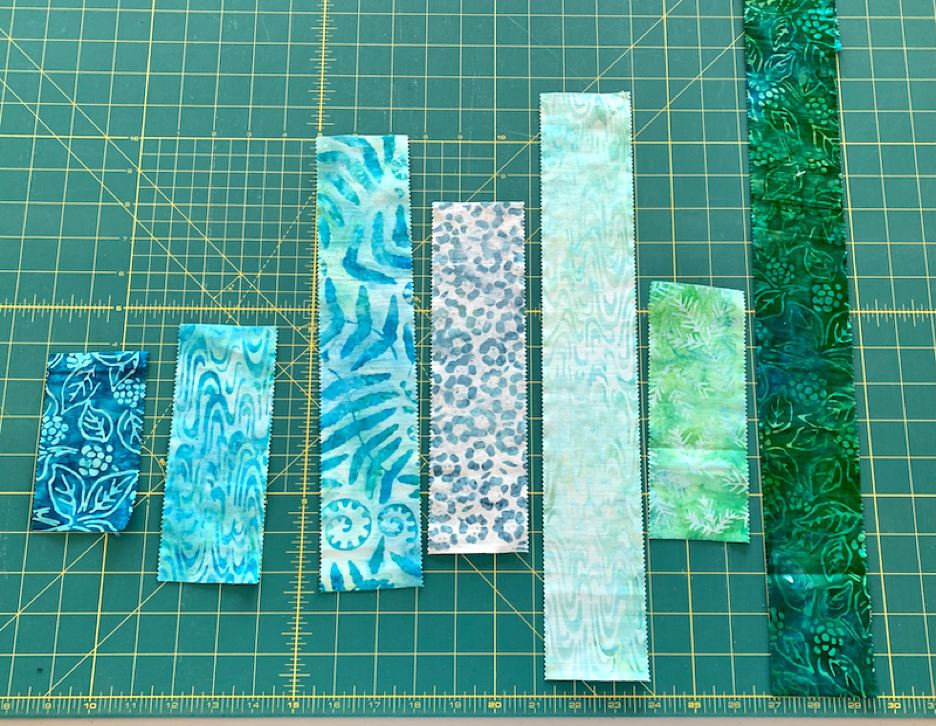
These are the strips I started out with (40 strips total, each 2-1/2 inches wide by 44 inches long):
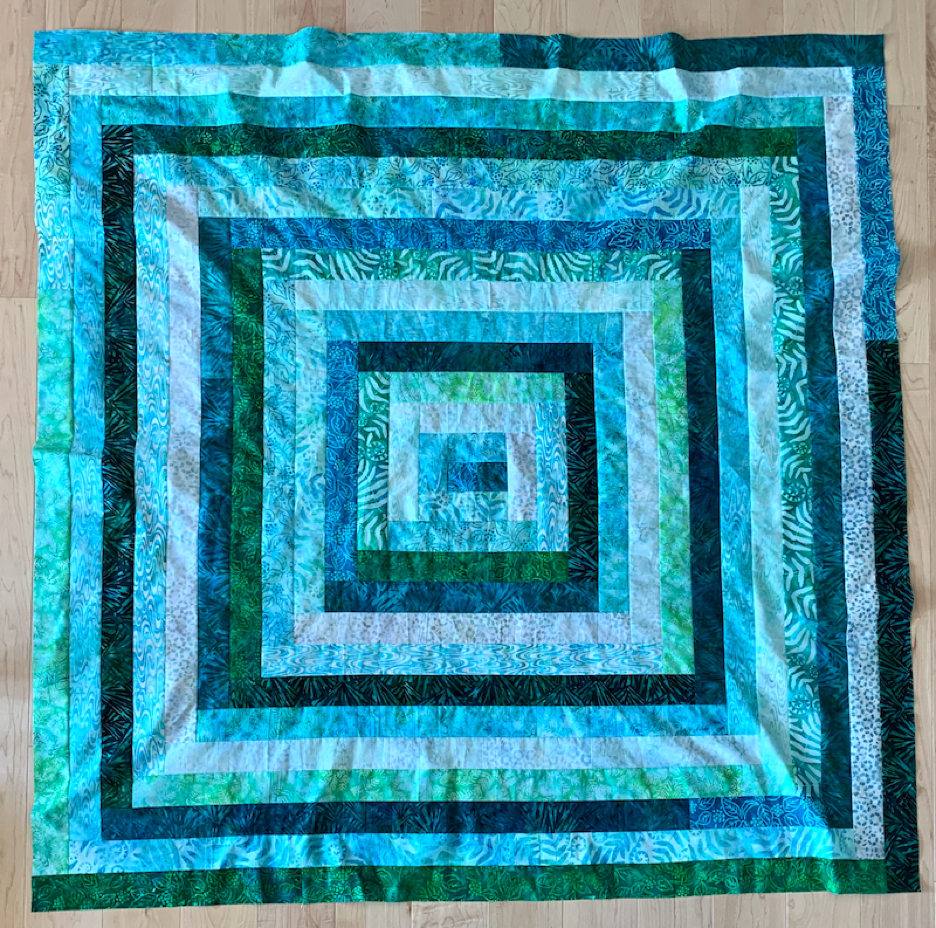
These are the strips I ended up with at the end:
The giant log cabin block ended up 59 inches by 59 inches in size. I rather like the way it came out.
I wanted my quilt to be about 69 inches by 69 inches so I added a 1 inch and a 4 inch border all the way around.
My daughter really likes this quilt and I happened to buy two of this jelly roll so I will be making one for her too. For hers, I plan to add a magenta square to the beginning of each new strip I make. Should be interesting!
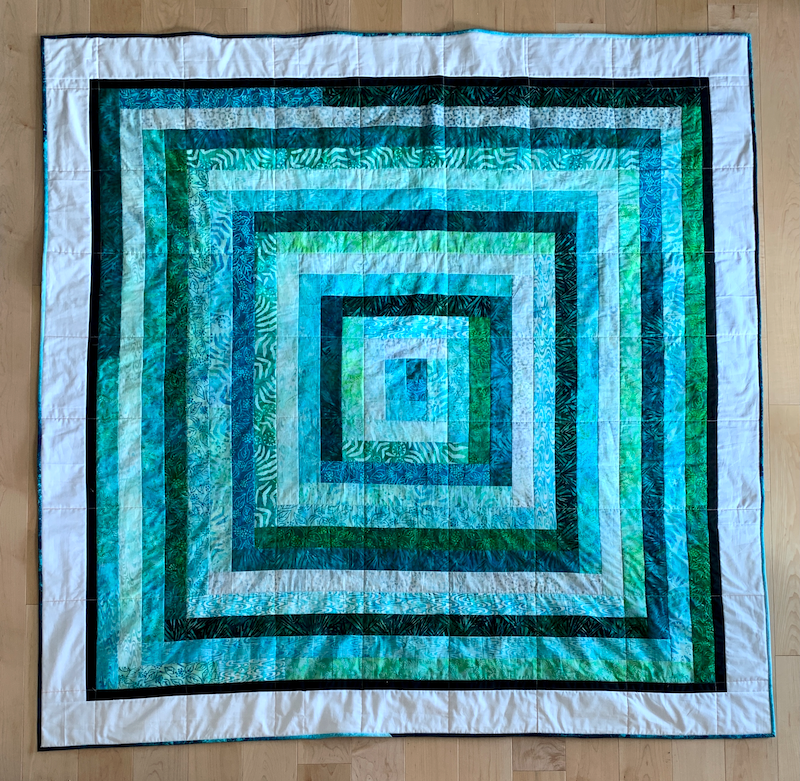
Update 9/16/2021: Here is the quilt I made for my daughter with cornerstones. I like it!