I’m ready to try making another quilted jacket. I plan to make the following changes:
Create blocks and surround them with solid fabric for each piece instead of cutting from an already made quilt.
Add side pockets.
Add a floating lining.
Create “Fabric”
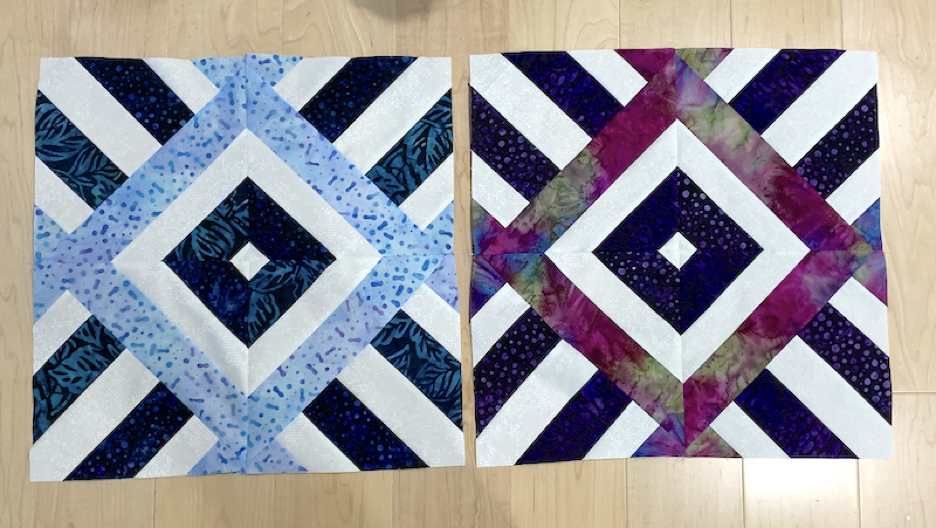
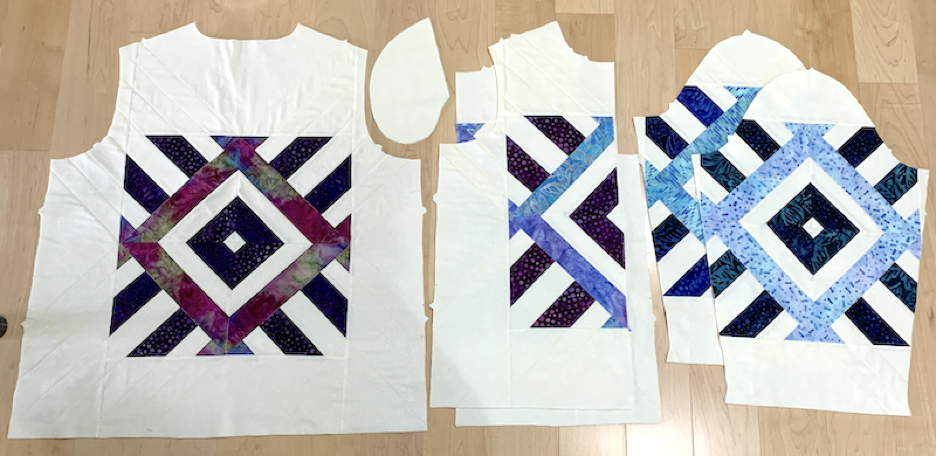
To create the “fabric” for this jacket, I pieced 4 blocks using the “Second Sunrise” design by Raymond Steeves at https://3dudesquiltingdesigns.com/ Each block ends up being about 18 inches by 18 inches.
I figured one whole block for the back, one for each sleeve, and one block split across the front.
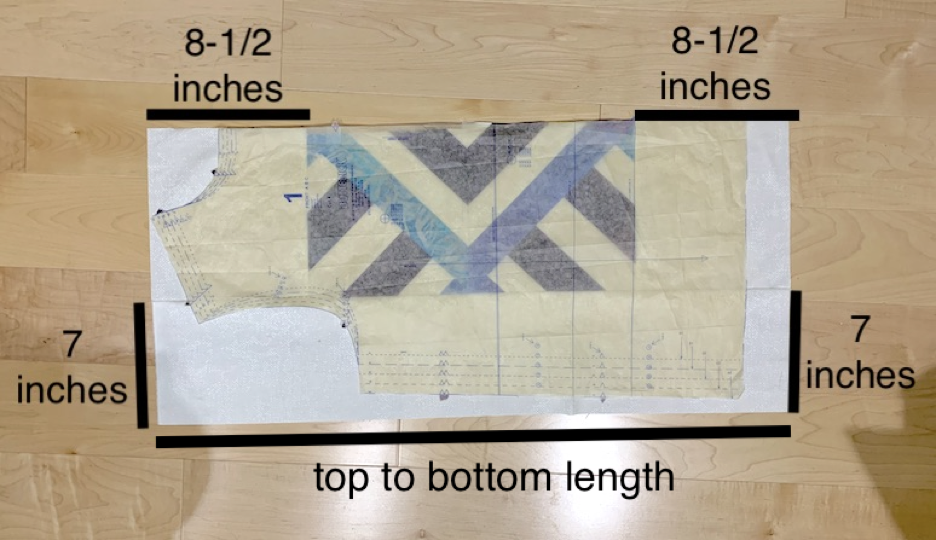
Then I compared the blocks to the jacket pattern pieces and figured out how much to add to each block to make it big enough to cut the piece out. For example, here is what I added for each front piece:
Quilt the Pieces
Then I tried to decide whether to quilt the pieces as rectangles or cut them out first and then quilt them. I decided it would probably be easier to quilt them as rectangles so I did that for each pattern piece, except for the pockets. I figured it would be cozy but too bulky to also quilt the pockets.
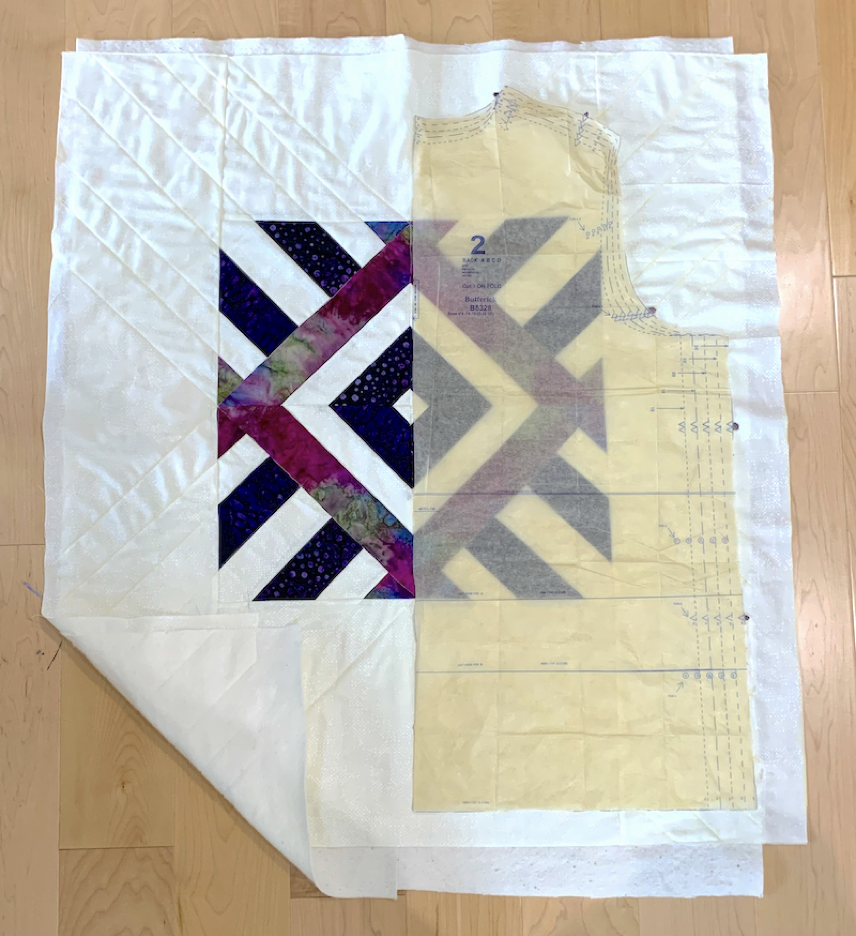
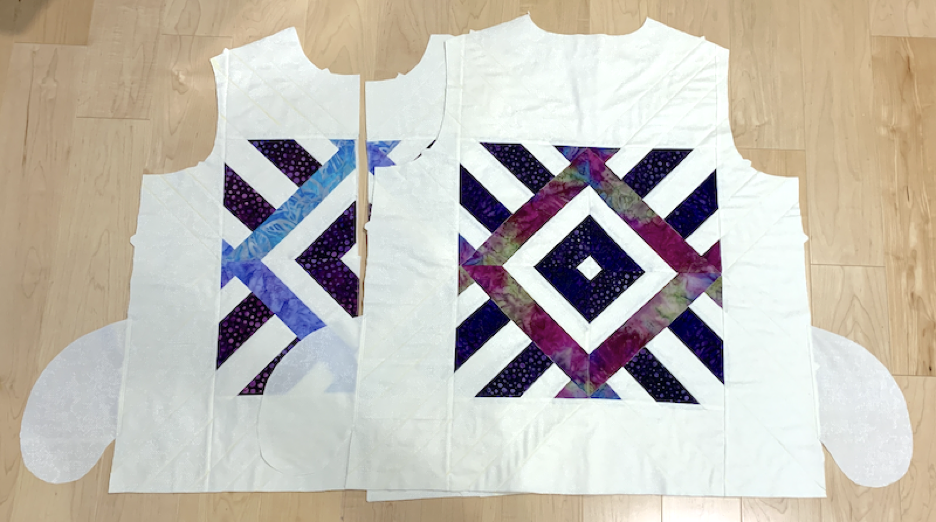
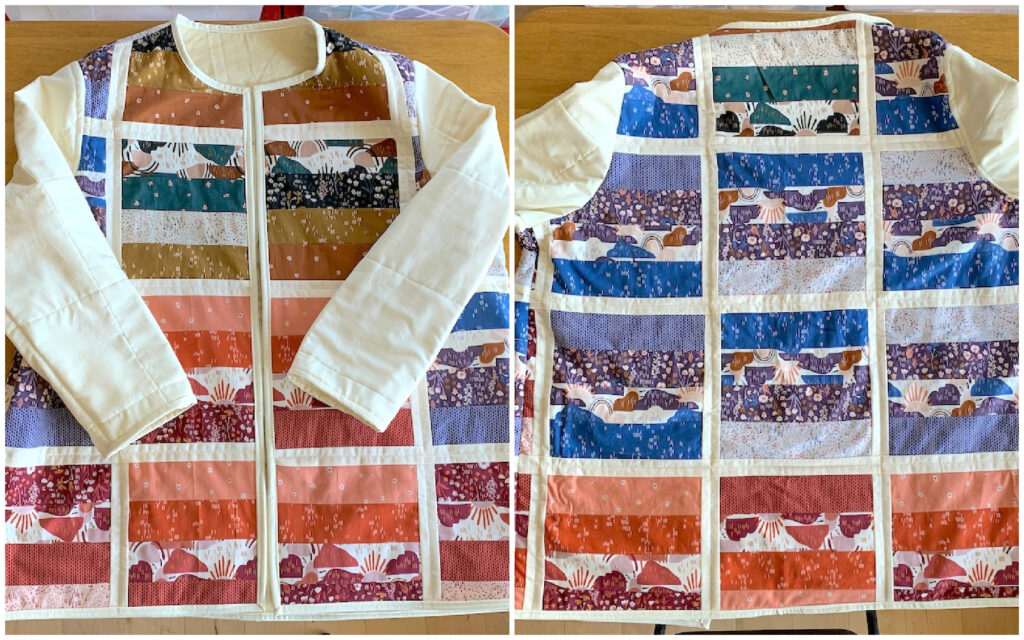
Here is how the back section looks after quilting with just batting. I included the pattern piece, which is meant to be on the fold, for comparison.
Cut Out the Pieces
Then I put the pattern pieces back on the quilted rectangles and cut out each piece.
Assemble the Shell and Lining
First I sewed the pockets onto the front and back side seams.
Next I sewed the shoulder seams, sleeves, and side seams (including the pockets) to create the outside shell.
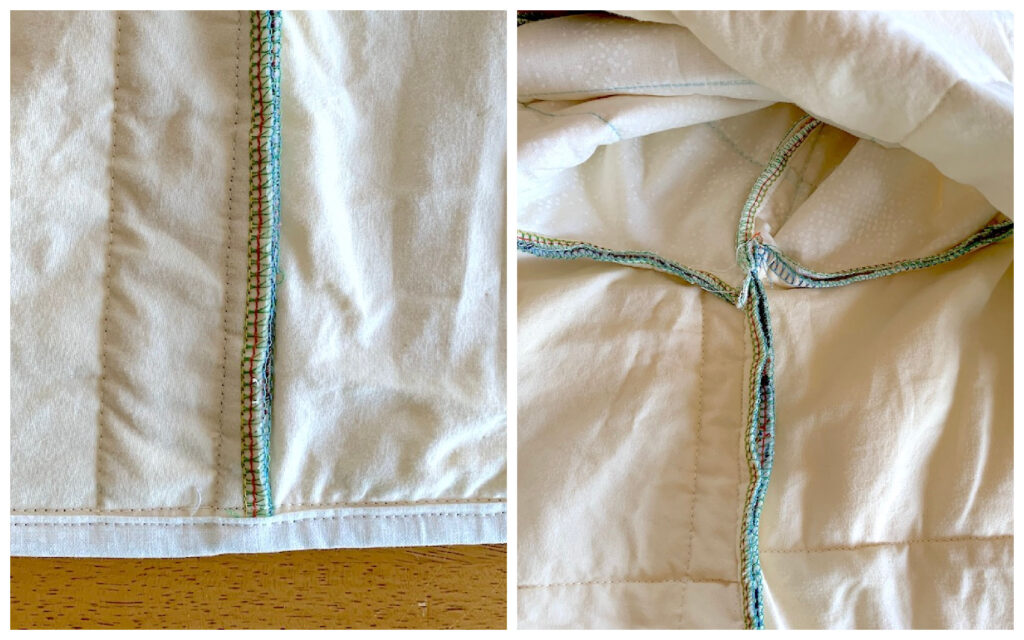
Then I did the same for the lining except for the pockets, which I did not include inside the jacket as well.
Then I put on the lining, inside out, and put on the shell over it.
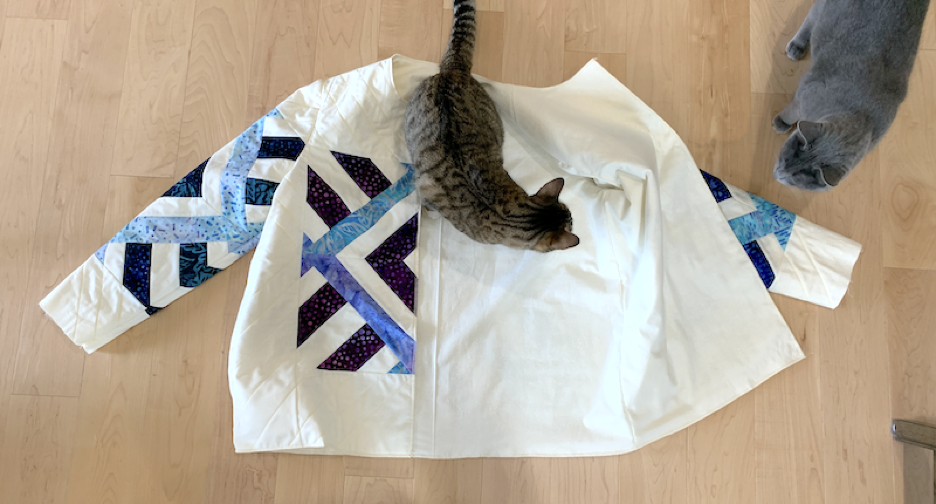
Then I took the shell/lining set off, pinned the exposed edges, and sewed them together.
I probably didn’t need to but I serged the edges after that, to make a nice clean edge for the binding. Of course my cats came to check it out as soon as I put in on the floor for a photo.
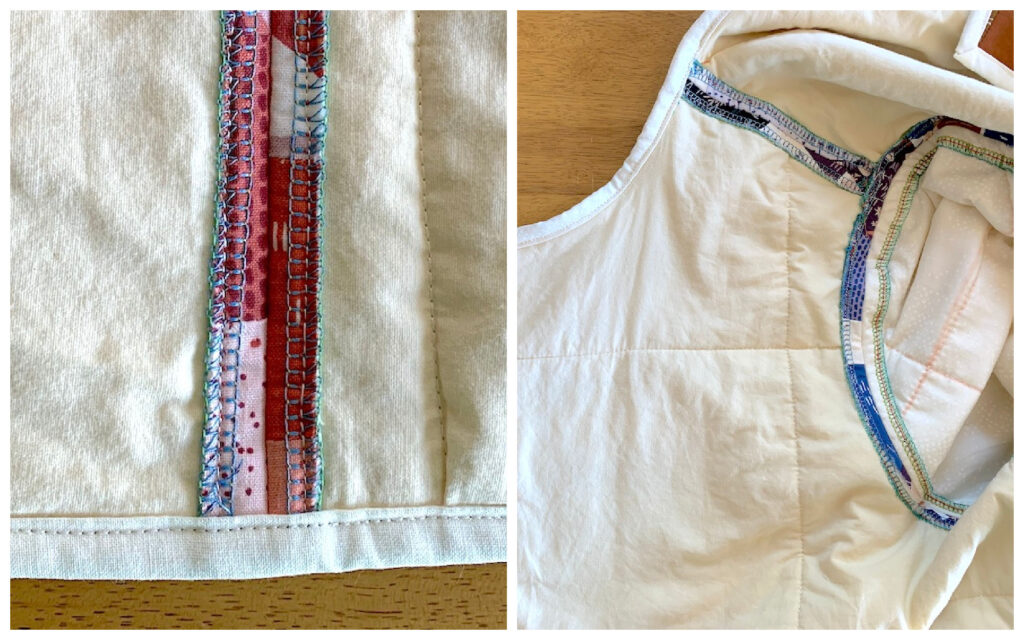
Bind Exposed Edges
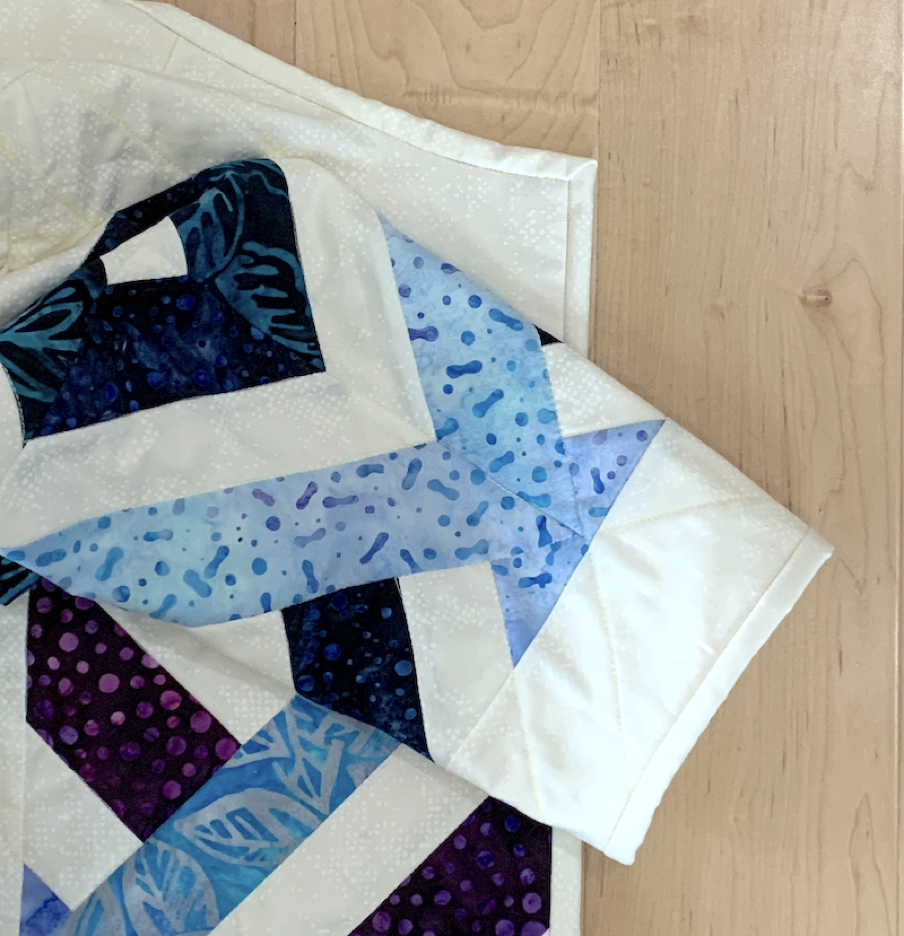
Finally I bound the exposed edges, including the body and sleeve hems, the same way I bind a quilt with one exception. I found out last time that the binding needs to be a bit wider so I cut it 3 inches wide instead of the 2-1/2 inches wide I usually do for binding.
That’s it! It was a bit more work than the first quilted jacket I made but the results are totally worth it to me. I love the tidy look and feel of the inside without any exposed seams and I love having pockets.
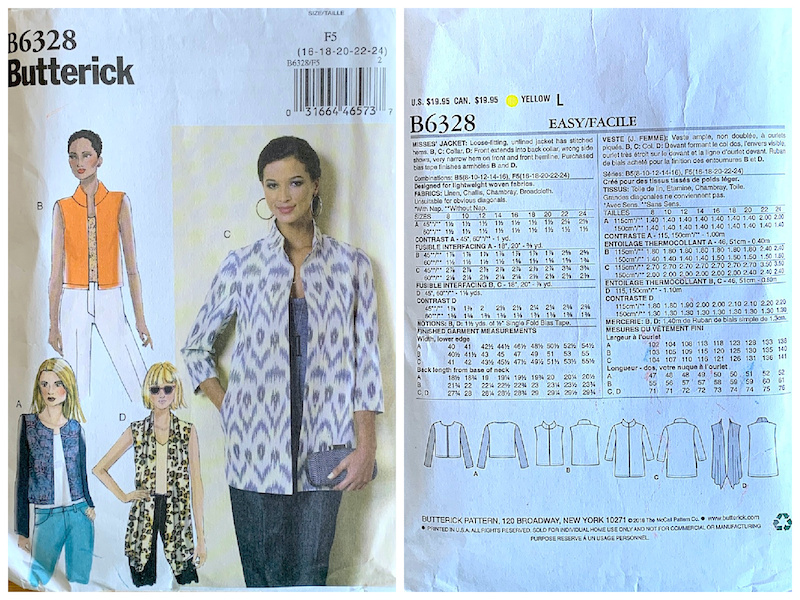
I’ve been wanting to make a quilted jacket for a while. I tried making my own pattern but found it difficult to draft the sleeve cap and I ended up buying this pattern.
You can see that the pattern has different lengths and neck styles. I used the sleeve and neck style from A and the length from C.
Since this was to be my first try at a quilted jacket I figured I wouldn’t use my favorite fabric or make a special quilt for it. I had a quilt top around that I never sandwiched and finished as a quilt because I didn’t like it enough to put in the time and materials at the time I made the top.
Now I went ahead and sandwiched the top and quilted it but did not add binding.
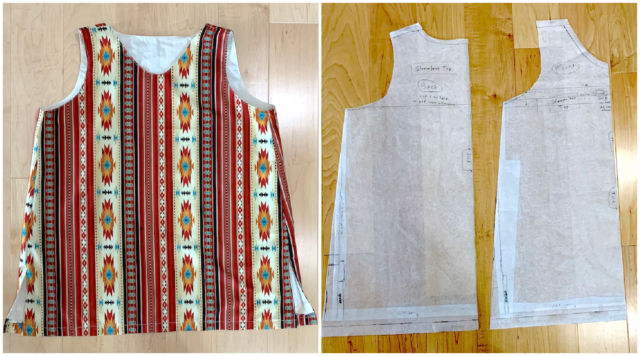
I created a full-size back pattern so I could see how it would lay on the quilt for cutting. And I created a second front pattern piece from the original for the same reason.
I laid the pattern pieces out on the quilt and found that I didn’t have enough area to also cut out the sleeves. That’s okay, for this first try I figured I would make them out of a solid cream fabric I had around, which I did.
I have been watching videos on youtube of how other people made quilted coats and here are some that I especially liked:
The first video in the above list was the push I finally needed to get a serger. I got the one she used in the video after reading reviews about it online and hearing that it is not terribly expensive, generally reliable, and has an easier to thread system than many other sergers. It arrived and I was afraid to set it up 🙂 I finally set it up the next day and did some practicing.
Then I serged around all the jacket pieces I had cut out: back, two front pieces, and two sleeve pieces. It’s kind of fun once you get the hang of it!
I sewed the shoulder seams on the front and back pieces, right sides together. Then I decided to topstitch the serged seam layers to make them lay flat. It was easy on the shoulder seams because they are straight and short.
I often like to sew the sleeve in before sewing the side seams on my garment body and on the sleeves. I find it’s much easier for me to navigate the complex curves that way. I sewed the first sleeve on and tried to topstitch the serged seam layers but it was much harder because of the curves. Hmmm. I decided to not do that on the second sleeve and see how it feels to wear and how it looks.
Then I sewed the sleeve and side seam next to the attached sleeve. Easy peasy. Topstitching the serged seam layers not so easy. Perhaps this wasn’t such a great idea after all.
I tried on the jacket and, other than the sleeves being too long, I really liked how the result looked and felt.
So I attached the second sleeve and sewed the long seam along the sleeve and side it was attached to. I did not topstitch the serger layers.
I tried the garment on again and I like it better without the topstitching. Well that simplifies things.
Next I marked the sleeve length I wanted and trimmed off the extra. Then I cut a 2-1/2 wide inch strip to bind the sleeve bottoms, the same way I do for a quilt.
I tried the jacket on again to see whether I wanted to make any adjustments on the front edges. I think it’s fine the way it is. It’s comfortable to sit down in and I could add buttons later if I wanted to.
I learned another lesson on the next step. I cut 2-1/2 wide inch strips for binding for the neck, front, and bottom edges but I should have cut 3 wide inch strips. I sewed about a 3/8 inch seam instead of a 1/4 inch seam to make sure none of the serging would show but then I didn’t have enough on the other side to sew the binding down without catching it on the front. Oh well. Lesson learned and it doesn’t look bad, just not my favorite look for binding.
I can imagine so many wonderful quilt designs to use for future jackets! I do want to try one with a floating lining because I think that might feel better for wearing but that’s a project for later.
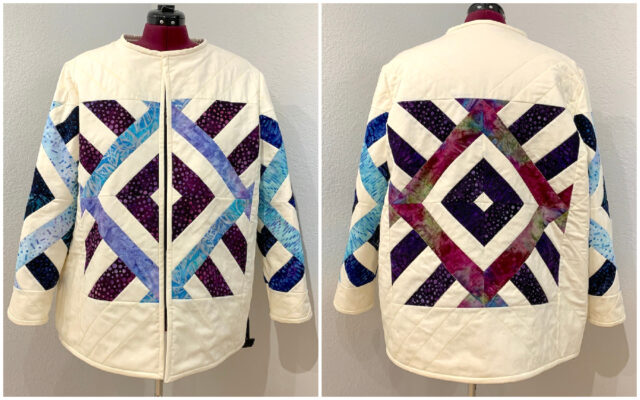
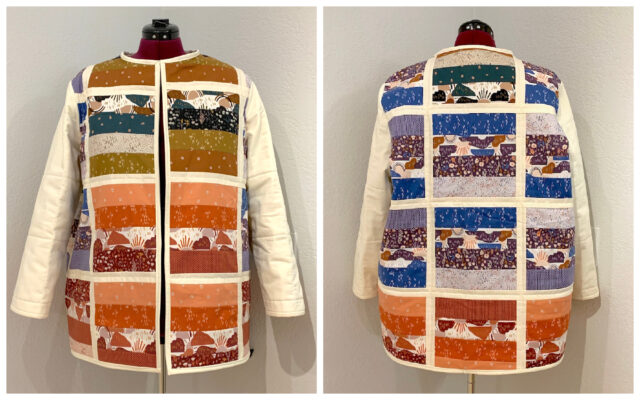
Here are some views of the outside and inside of the finished jacket.
Serged seams topstitched. Looks tidy on the inside but not so great on the outside and it feels a bit tight around the armhole for wearing.Serged seams not topstitched. Doesn’t look great on the inside but it looks better outside and feels better to wear.
I showed you how I made a pattern for a sleeveless top in a previous blog post (https://quiltingbydiana.com/sewing-a-garment-for-the-first-time-in-over-30-years/). When I washed the completed top, I didn’t like the way the facings needed ironing to make them lay flat again. And I didn’t like seeing the exposed seams. So I decided to figure out how to make the top fully lined. To my surprise, not only did the lined top launder better and look better but it felt better to wear! I thought it would be too warm but, perhaps because I used all cotton fabric, it did not feel too warm at all.
One video I watched made all the difference for me in understanding the “burrito” method for sewing a lining into a sleeveless top. It was “Using The BURRITO METHOD To Create a Sleeveless Top” by Ellie and Mac Patterns. It’s at https://youtu.be/1_GmIQbijks I highly recommend you watch this video before trying the burrito technique.
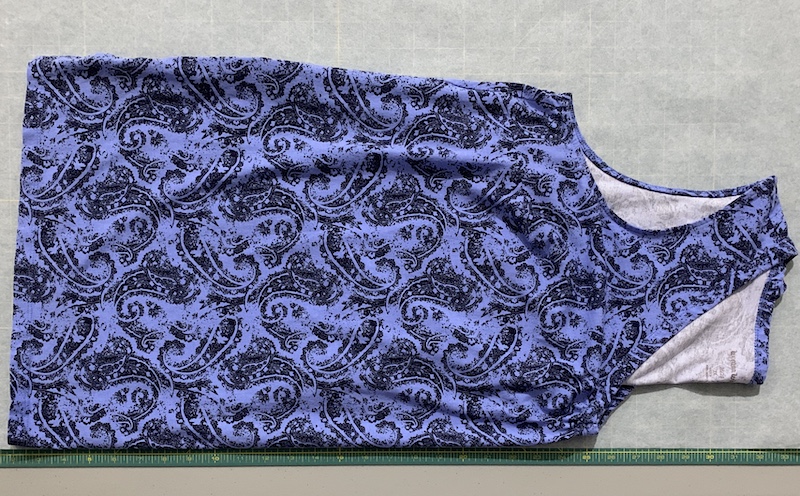
The instructions below assume your top is tunic length. If it is shorter, and you don’t need vents for comfort (especially sitting down), then ignore the instructions about creating and finishing vent openings. The vents are closed but the bottom edge is hemmed but not connected. I find that it falls more nicely that way.
Update 11/14/2021: I found that I really like using stabilizer instead of batting for these small tote bags so I updated the tutorial to reflect that.
I decided I wanted to make a smaller version of my full-size tote bag. Below are the results of the experiments I did, numbered as I went through them. The final bag is 8 inches tall by 7-1/2 inches wide by 4 inches deep. This compares to my larger tote bag which is 16 inches tall by 16 inches wide by 3 inches deep.
Experiment 1
I started with a 10 inch by 8 inch paper tote I had as a guide and used the same technique as I had used on my larger tote bag, just on a smaller scale.
I liked that the bag stood up on its own and keep its shape. I did not like:
The exposed seams. They stand out a lot more in the smaller tote.
The binding on the top. It seems like overkill on the smaller tote.
The straps were 4 layers of fabric (like double fold bias tape) but they still seemed floppy to me.
Experiment 2
Reduced the depth of the bag.
Used interfacing in the straps.
Used the inside out method for stitching the bag and lining together instead of quilting them together like I do in my larger tote bag.
Used batting on the outer body of the bag but no interfacing.
I liked the more streamlined inside (no exposed seams) and top (no binding). I did not like:
Because the batting was attached to the outside, the lining was floppy and didn’t look good.
Although the depth is better, the bag seems kind of tall to be a small tote bag.
Experiment 3
Decided to try all one piece instead of side and bottom panels.
Shortened the bag a bit.
Attached the batting to the lining instead of the body.
It was much easier to put the bag together without the side and bottom panels. And the lining looked much tidier. However…
I did not like the less structured look on the outside.
I prefer the look of the different color on the side panels.
Experiment 4
Went back to the side and bottom panels.
Made it a teeny bit shorter to make less fabric waste during cutting.
I am happy with the look and structure. However, it now seems too deep on the sides.
Experiment 5
Bingo! I realized that I didn’t need to change the height so it’s back up 1/2 inch taller and I reduced the depth a bit more. I am very happy with the look and feel of this bag.
I decided to change the name of my blog to Sewing by Diana since I’m going to be making lots of things besides quilts. I still love making quilts but have been feeling the need to make other things, like tote bags and clothing. Both quiltingbydiana.com and sewingbydiana.com will work to get there.
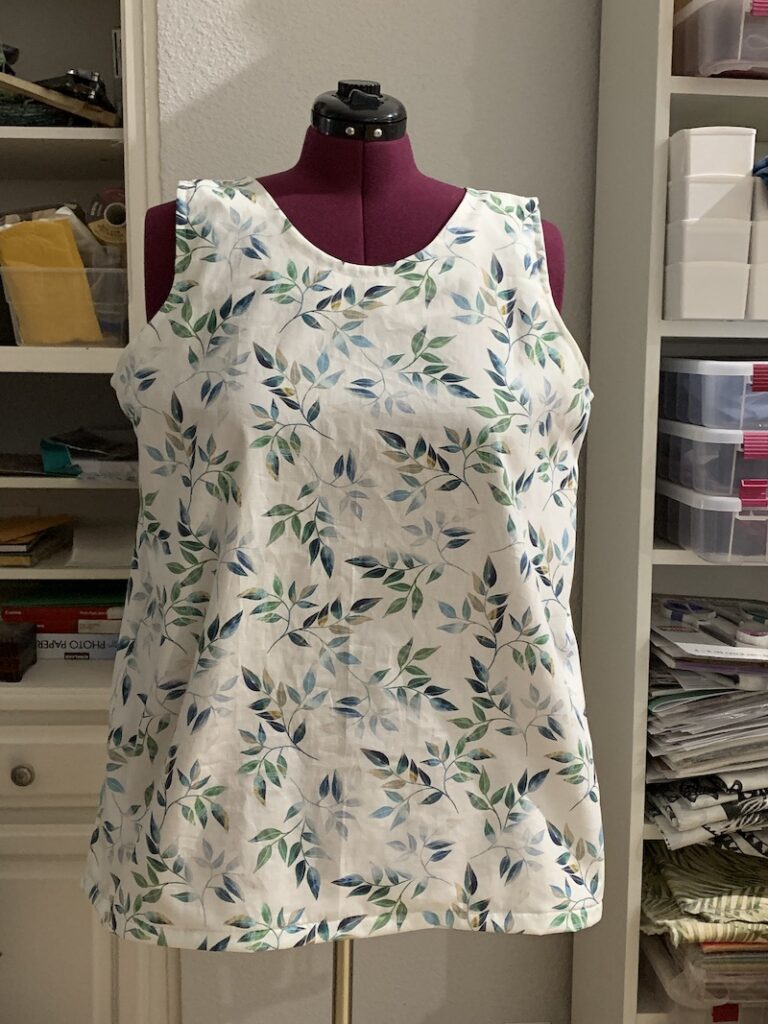
For my first experiment in making clothing, I decided to make a sleeveless top. Seemed like the simplest place to start.
Make a Pattern
The first thing I did was take a top that I know fits me and trace around it onto Swedish Tracing Paper. I saw this paper recommended in a video I watched and it is perfect for making your own patterns. It marks well, drapes well, and holds up even after multiple changes.
I folded the top in half, laid it down flat, and marked the bottom, sides, shoulder, and neckline for the front. Then I turned it over and did the same for the back.
Then I cut out the pattern I traced and wrote the piece type, the pattern name, how many to cut, and noted where to place on the fabric fold for cutting.
Try It Out
Then I tried making a sample garment to see whether it fit. Well, not so much 🙂. So I made some adjustments to the pattern and tried again. Much better this time although not perfect. I kept making adjustments on my pattern on my second sample garment until it fit reasonably well. I also added the neck and armhole facings to make sure they worked as I thought they would. Fortunately I did a lot of garment making when I was in my teens so I knew how things should go together.
Here is the second sample garment I made, with lots of experiments on it.
Use Fabric I Would Want to Wear
Once I was satisfied that I had made the adjustments to the pattern that I needed, I decided to try the pattern out with fabric I would want to wear. It came out pretty well but I decided that the side vents needed to be a bit longer for comfort, especially sitting down.
A More Interesting Design
I made the vent changes on the pattern and decided to try something more interesting.
I sewed 8 different 2-1/2 wide by width of fabric strips. I used the overlocking stitch on my sewing machine to sew them together and it worked really well. I didn’t want the seams to fray over time and I think this will definitely help.
I cut across the halfway point of the strips to make 2 equal sized sections, which I sewed together along the vertical direction of the strips.
On the front piece, I marked across the pattern at the bottom of the armhole on the pattern to mark a yoke.
I cut the panel I created using the pattern with the yoke folded down, allowing for a seam.
Next I cut a yoke piece using the top part of the pattern, allowing for a seam.
I did the same for the back of the top.
Finally put the top together the same way as before.
Here is what my front pattern ended up looking like with all the adjustments and the yoke marking.
And here are the facing pieces.
Overall I’m really happy with how this top came out. I’m definitely going to continue with garment making.
I’ve always enjoyed working with the Log Cabin block. It’s easy to make and you can create many different and interesting layouts with it. I had a few experiments I wanted to do.
Note: I updated the end of the post on 9/16/2021 to include a photo of the quilt with cornerstones.
Left or Right?
My first question for myself was, “Does it matter whether you add the strips to the left or to the right?” The answer is, it works both ways as long as you are consistent in the direction you choose. That is, if you pick adding your strips to the right, always add your strips to the right if you want the color layout to end up the way you intended.
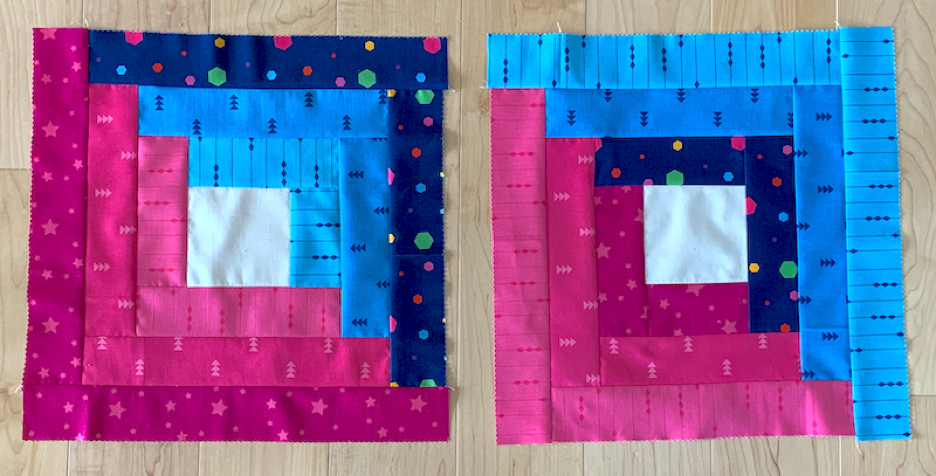
Dark Strips Inside or Outside?
I wondered whether I would prefer the darker (or more vivid) color strips on the outside, which is what I see in most Log Cabin designs, or on the inside of the block. I like both of these, but I think I slightly prefer the one on the left.
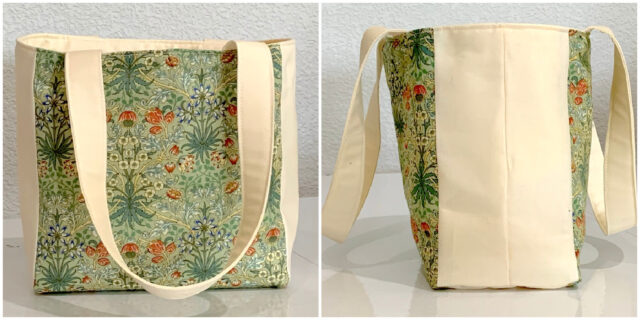
Tote Bag
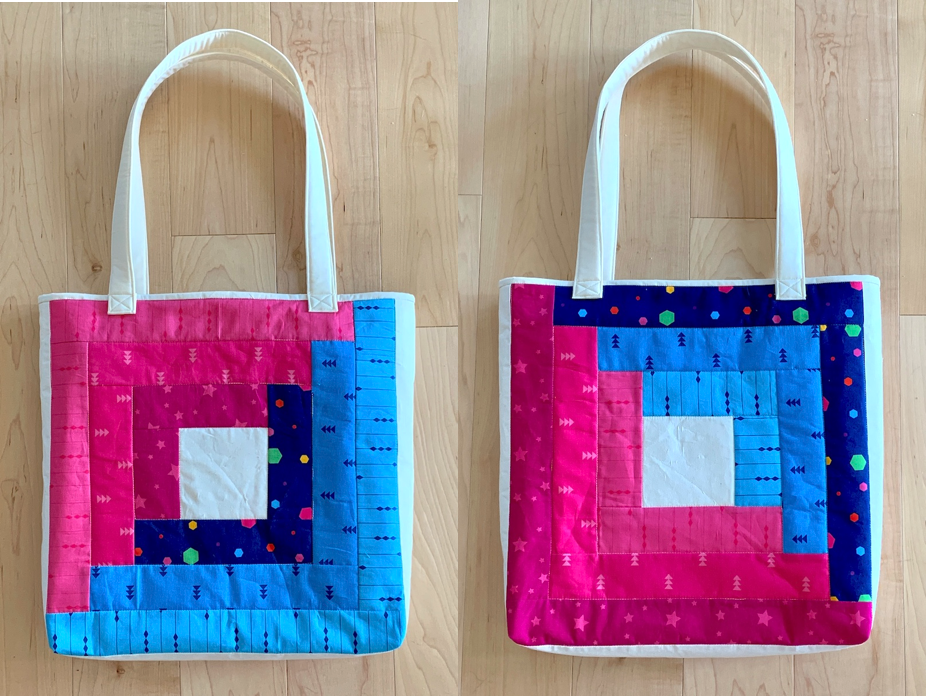
It took exactly 6 jelly roll strips to make the two blocks I made and they are the perfect size for a tote bag 🙂. These photos show the two sides of the tote. Here you can tell that I added strips in opposite directions, making a left hand block and a right hand block.
I wondered what it would look like if I took one whole jelly roll, started at the center, and worked my way out until the entire jelly roll was used. Would I like the results? Would it look like a mishmash?
Here is what I did:
Laid the strips out in same-color sets of strips, in the order the strips came off the roll.
Picking a starting color for the center.
Changed colors, in order, each time I made a turn.
When I got to the point that strips were too short to make the length of a side, I stitched same color strips together.
When I got to the point where there wasn’t enough of a color to make the length of a side, I stitched the strip together with the next color.
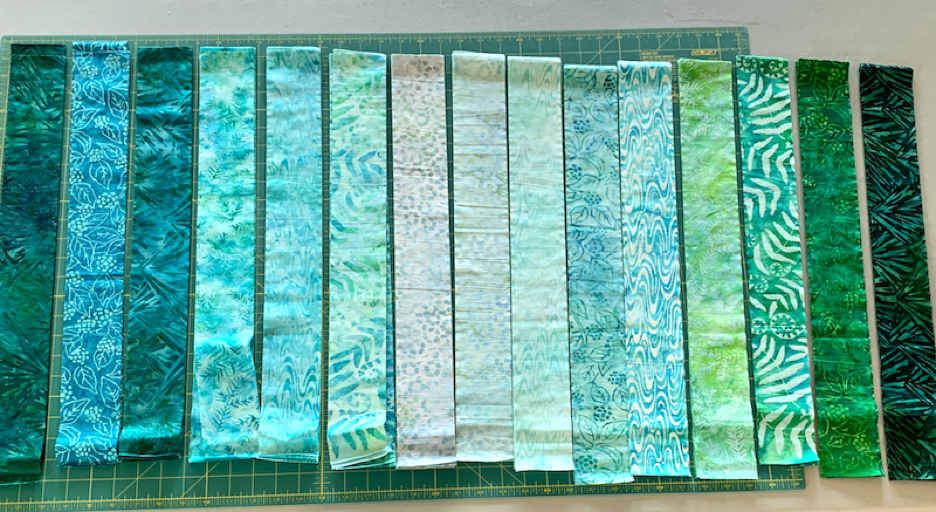
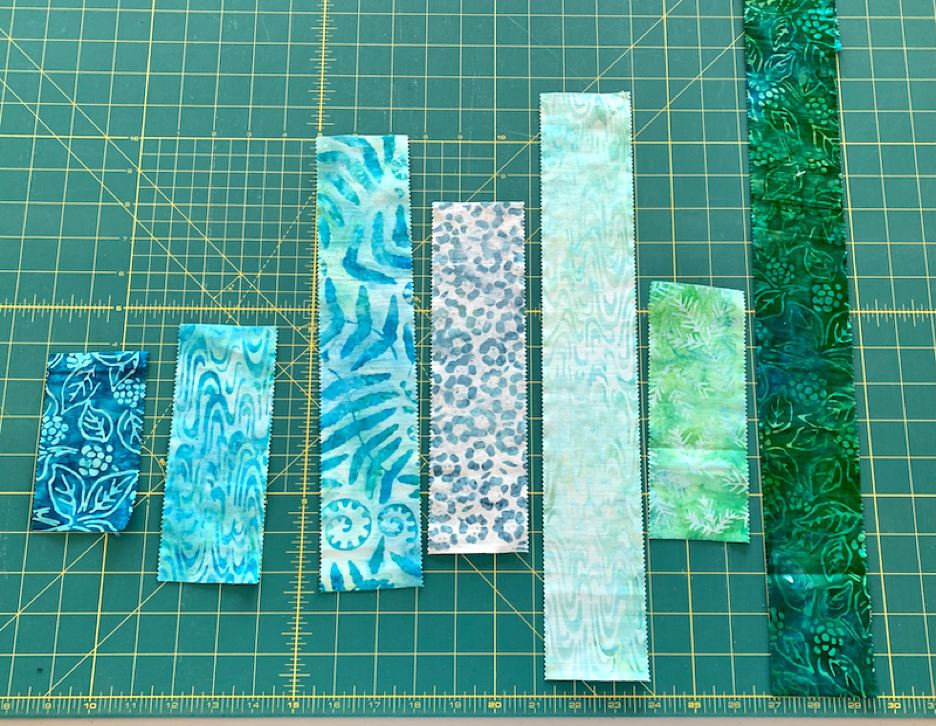
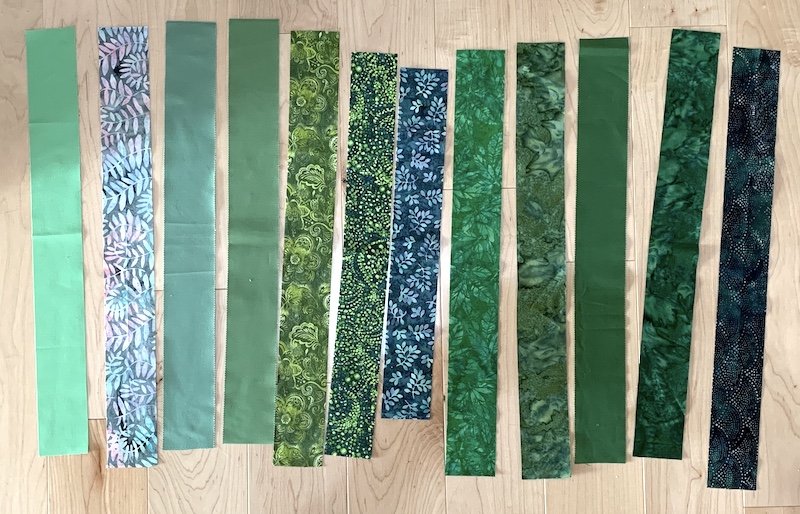
These are the strips I started out with (40 strips total, each 2-1/2 inches wide by 44 inches long):
These are the strips I ended up with at the end:
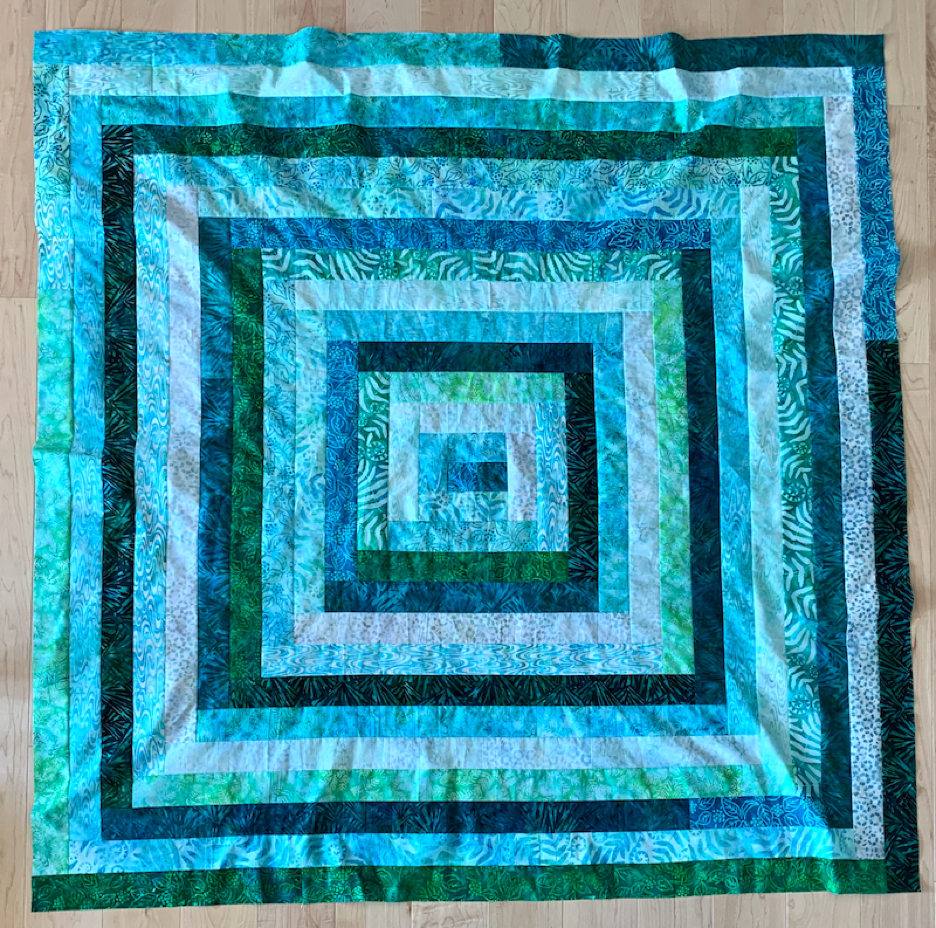
The giant log cabin block ended up 59 inches by 59 inches in size. I rather like the way it came out.
I wanted my quilt to be about 69 inches by 69 inches so I added a 1 inch and a 4 inch border all the way around.
My daughter really likes this quilt and I happened to buy two of this jelly roll so I will be making one for her too. For hers, I plan to add a magenta square to the beginning of each new strip I make. Should be interesting!
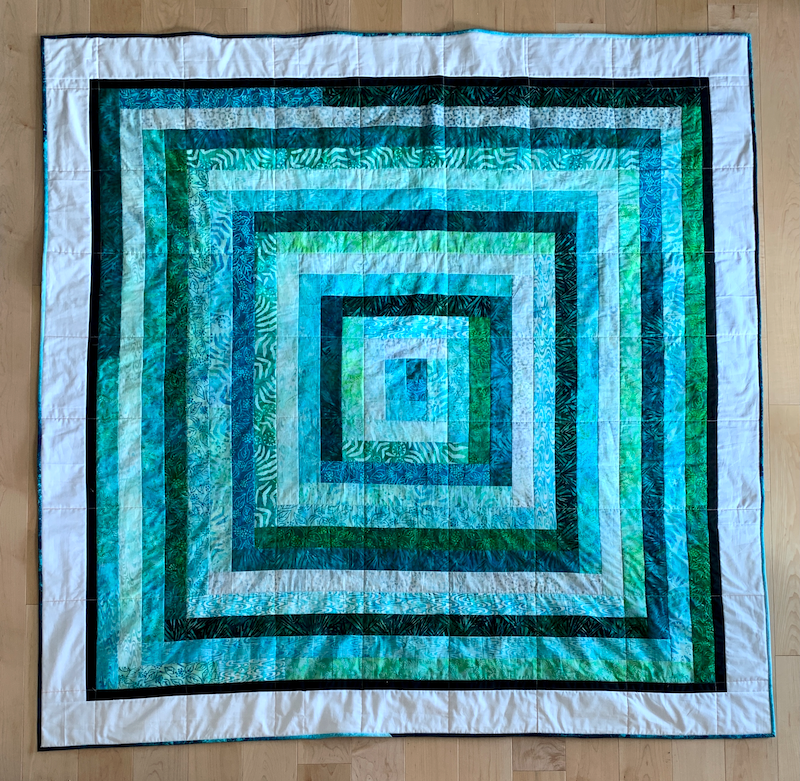
Update 9/16/2021: Here is the quilt I made for my daughter with cornerstones. I like it!
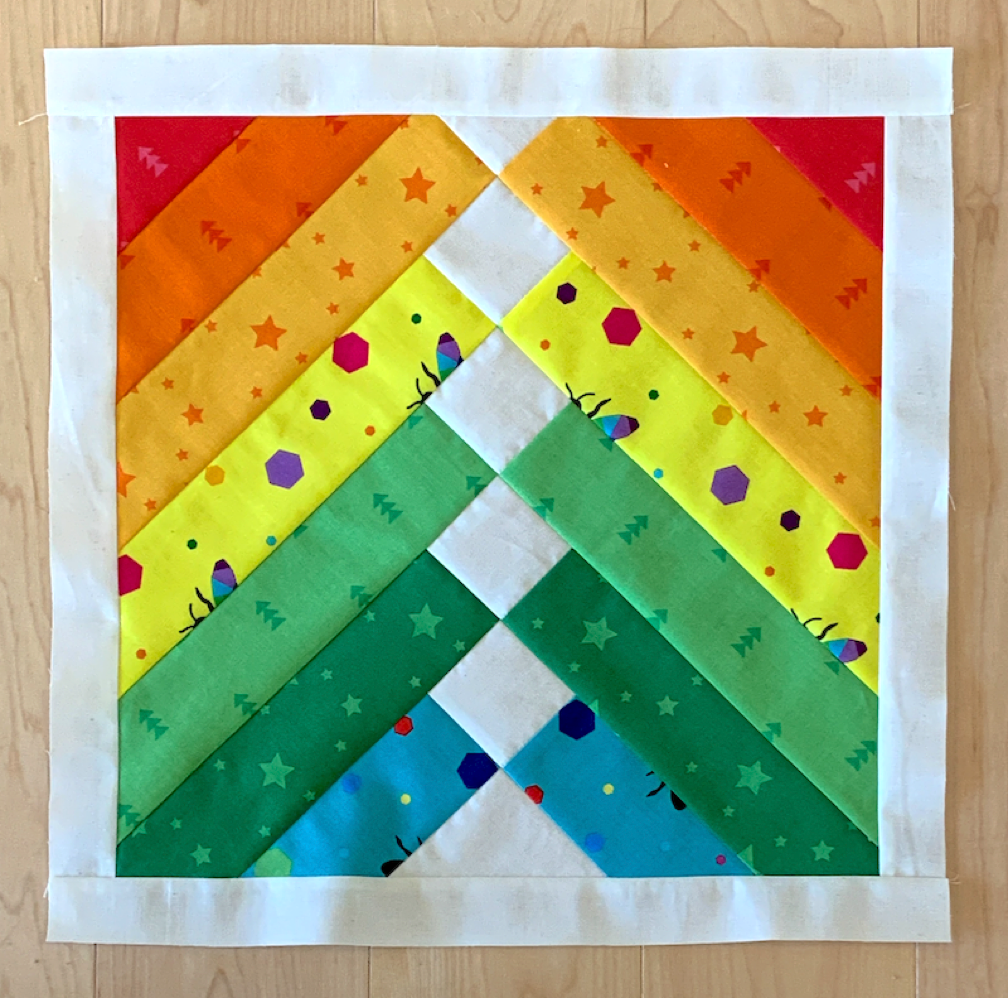
French Braid is one of my favorite patchwork designs to make and to look at. The look is meant to mimic the French Braid hairstyle, in which sections of hair are woven together from the crown of the head to the nape of the neck. This is one of those techniques that is easier to make than it looks.
Jelly roll strips (2-1/2 inches wide by width of fabric) are great for making French Braids. They are, of course, precut, and they also come in coordinating colors and designs.
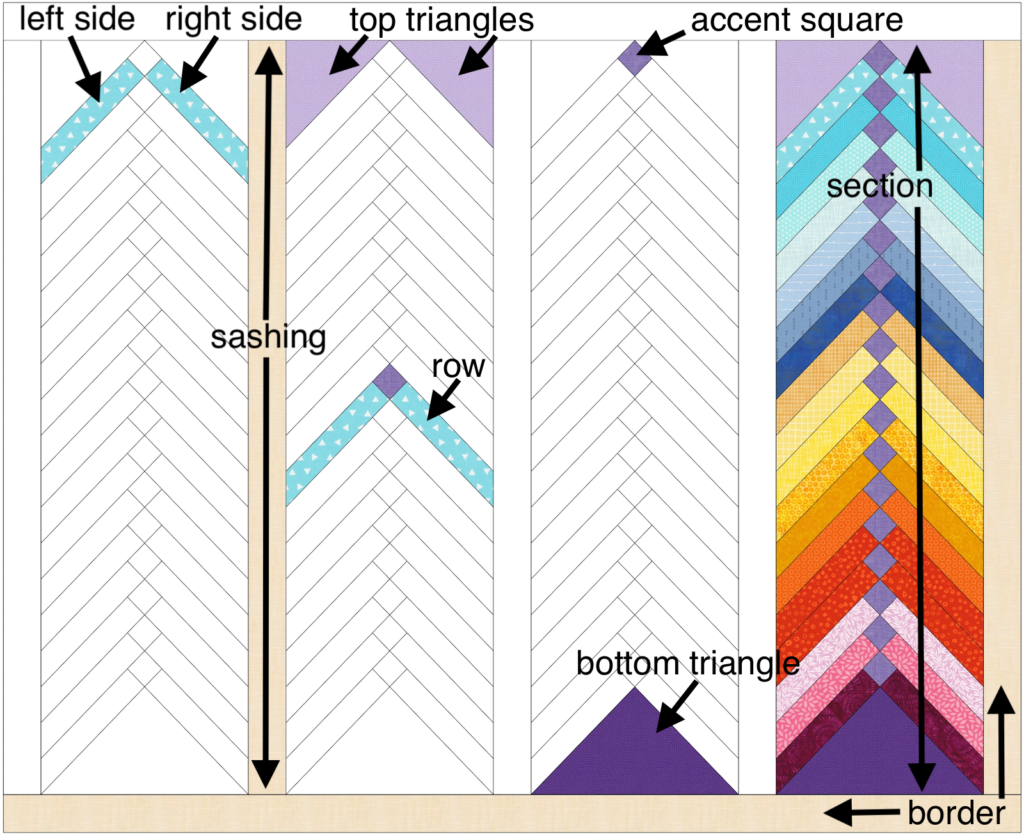
Here are the parts in a French Braid quilt. I won’t use all these parts for my block but I think it’s useful to see what they are first.
Prepare Fabric
Pick 6 different strips from your jelly roll or cut a strip, 2-1/2 inches wide by width of fabric from 6 different fabric colors and/or designs.
Cut 4 pieces from each jelly roll strip, each 10-1/2 inches long by 2-1/2 inches wide.
Lay the strips out in the order in which you want them to be in your braid. We will build the braid from the bottom up so lay the strips out accordingly.
I decided to use the same fabric for my bottom triangle and my accent squares but you can use different colors.
Cut one 11-1/2 inch by 11-1/2 inch square from your bottom triangle fabric.
Cut the square on the diagonal to make 2 half square triangles.
Cut one piece, 2-1/2 inches wide by width of fabric for the accent squares.
Cut the accent square strip into 2-1/2 inch by 2-1/2 inch squares.
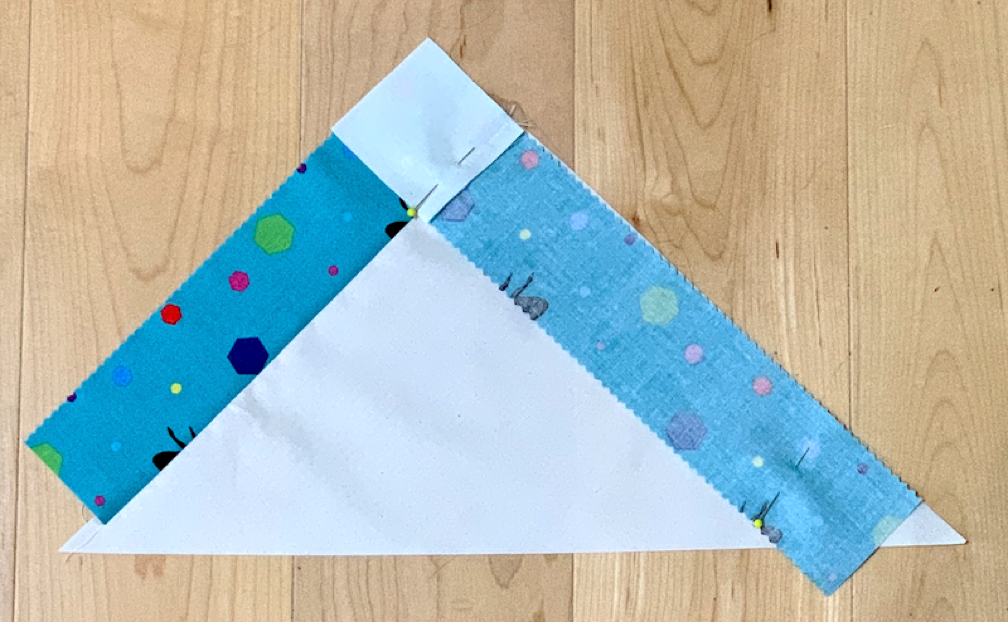
Make Braid
Right sides together, sew a side piece to the top left side of the bottom triangle.
2. Press towards the strips you just added.
3. Using another piece of the same fabric strip, sew an accent square to the end of the strip, with right sides together.
4. Press towards the strip you just added.
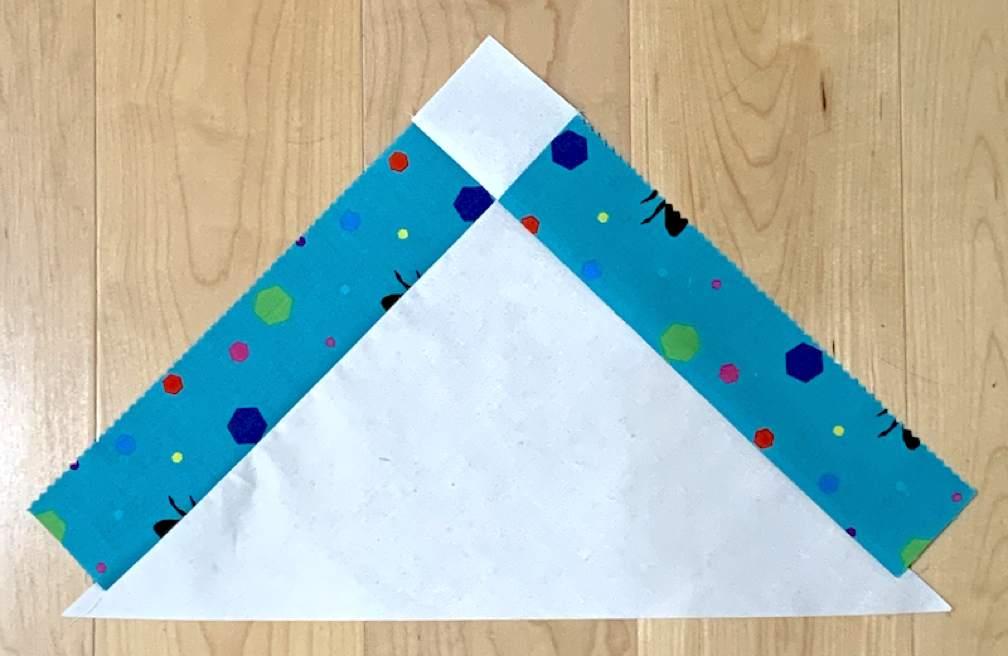
5. Right sides together, nest your seam and sew the accent piece/side piece combination to the right side of the bottom triangle.
6. Press towards the strip you just added.
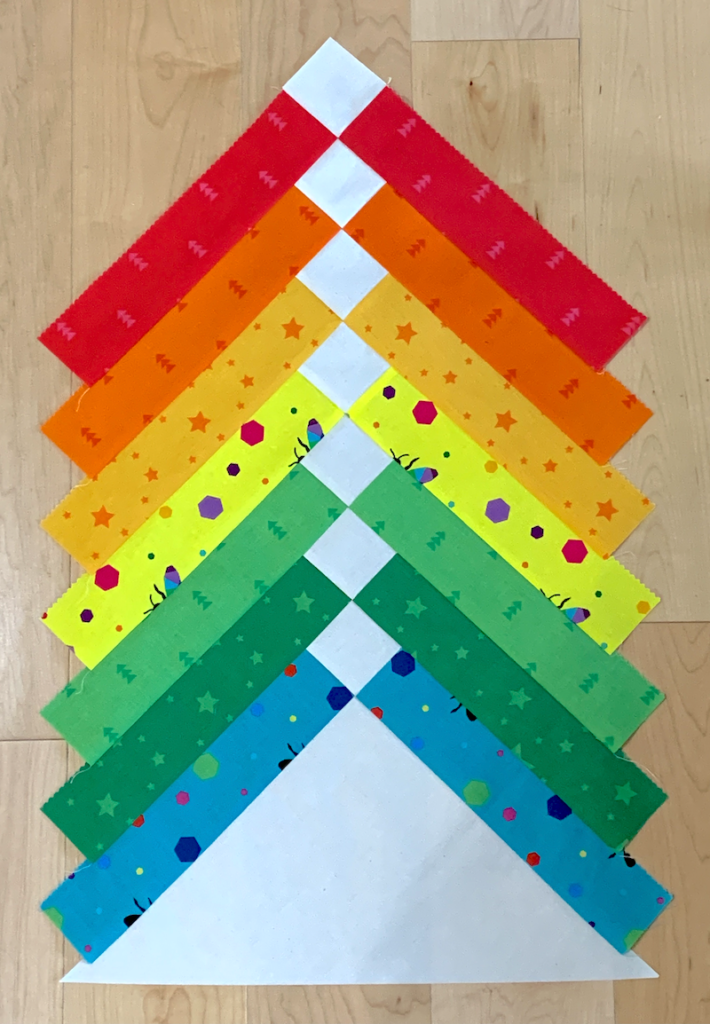
7. Repeat steps 1 through 6 to add rows to the braid segment until you have 7 rows total.
Note: It may seem tedious to press each time you add a strip and pin the seam on the accent square but the tidy results seem worth it to me.
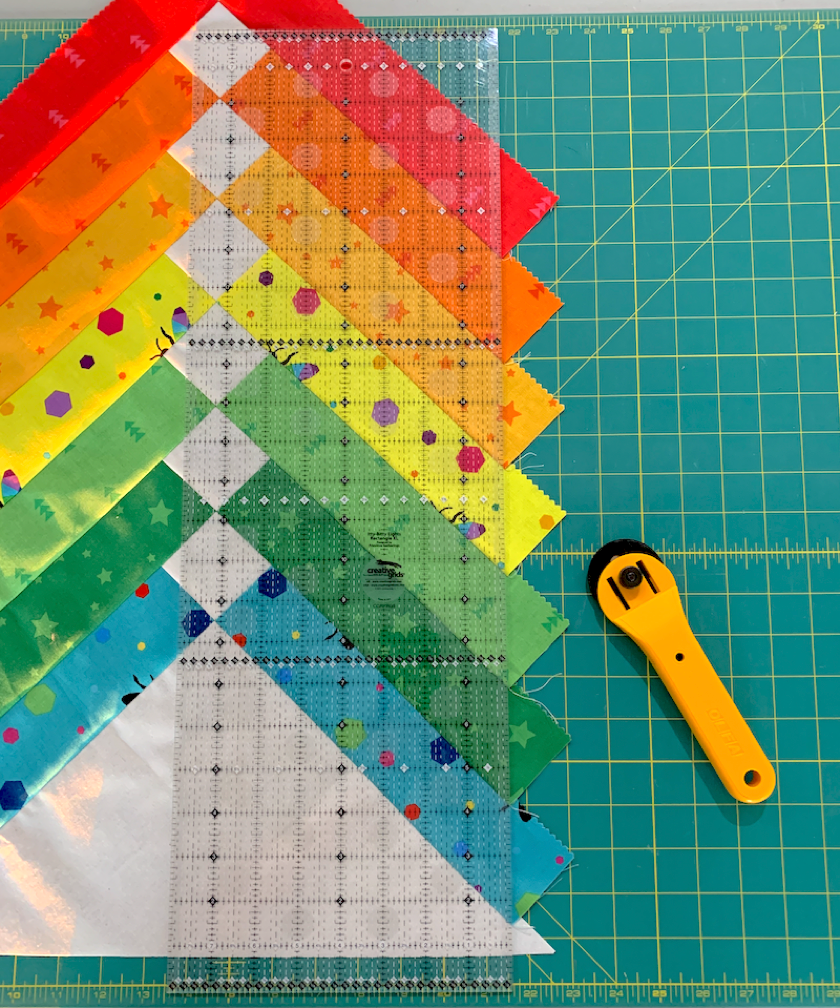
Trim to Size and Add Borders
Line a ruler up to as shown here and trim the edges from the right side of the block.
2. Flip and do the same for the other side of the block.
3. Trim across the top of the block as shown.
4. Trim across the bottom of the block so the block ends up 14-1/2 inches by 14-1/2 inches.
Cut two pieces, each 1-1/2 inches wide by 14-1/2 inches long for side borders.
Cut two pieces, each 1-1/2 inches wide by 16-1/2 inches wide for top and bottom borders.
Add side borders first and then top and bottom borders. You end up with a 16-1/2 inch by 16-1/2 inch block.
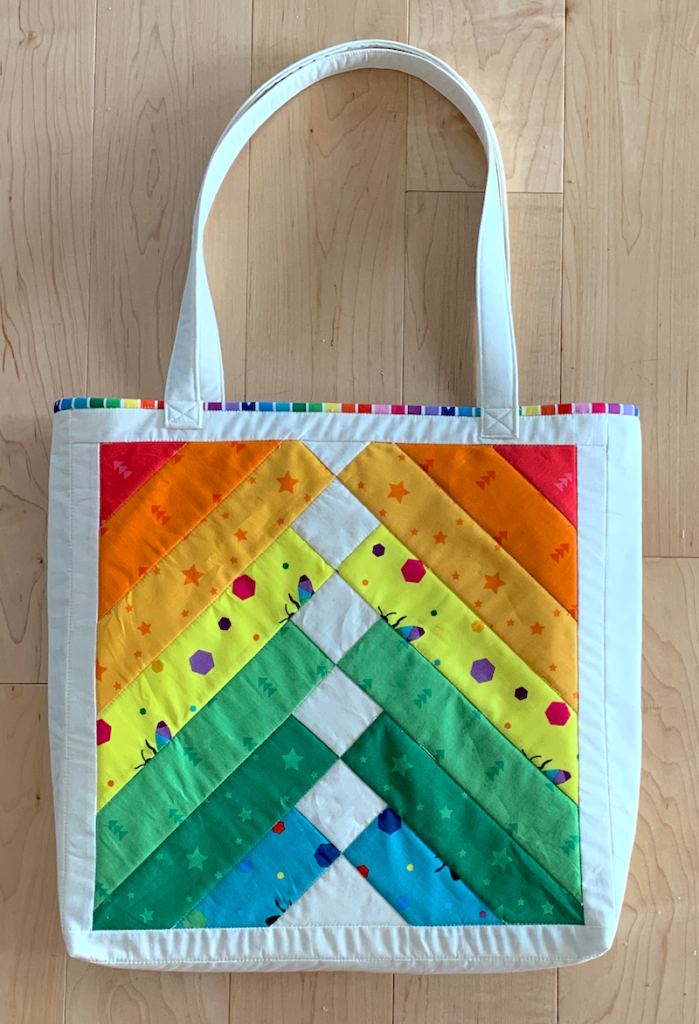
I made a second block, using the remaining pieces from the strips I cut for the first block. Then I made a tote bag! A full tutorial on how to construct the tote bag from the blocks you create is available at https://www.etsy.com/listing/1061546252/quilted-tote-bag-tutorial-pdf
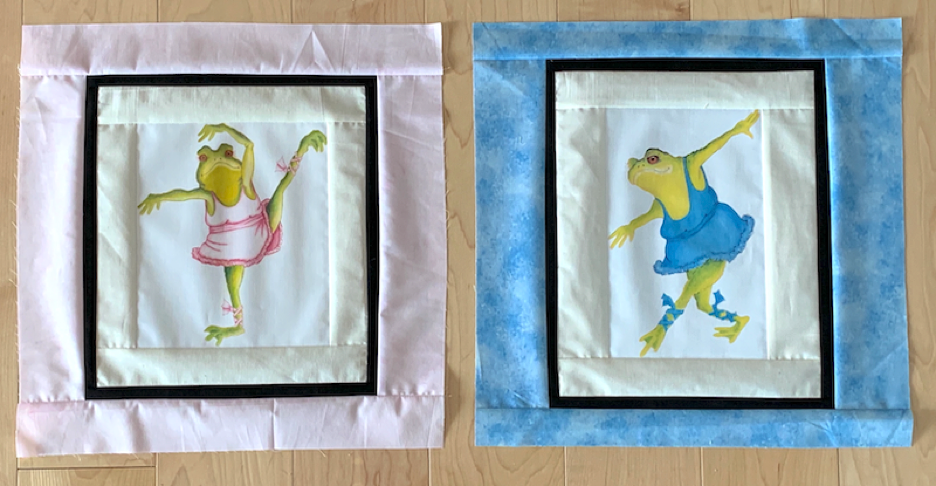
If you’ve ever looked at one of your own images (photos or artwork) or one you saw online and thought, “I wish I could print that and use it in a quilt block,” then this post is for you.
My friend Kristy Zgoda is an amazing artist in several mediums. She sent me two fabulous pieces of artwork and said I could print them onto fabric and use them to make a tote bag. Thank you Kristy! You can see her wonderful beadwork designs at https://www.etsy.com/shop/Kristyz.
I know of two methods for printing on fabric using a home printer. If you know of other methods, please tell me about them in the comments for this post. I will be using an inkjet printer.
Use a commercially available product, such as Colorfast White Printer Fabric by June Tailor, which is what I am going to try out for this project.
Use freezer paper and your own fabric. Search for “how to print on fabric” to find videos that show how to do this. I will try that technique out as well.
Use a Commercial Product
Note: The product I am using from June Tailor comes in 8-1/2 by 11 inch sheets.
You want to get the highest quality version of the image you can to get the best results for printing. Decide how big you want the printed image to be. For my tote bags, I’m aiming at a 16-1/2 inch square block. Since my images are not square, I know I will be adding one or more borders to pad out the size to make a 16-1/2 inch square block.
If you are using artwork, like I am, scan or take a picture of the image. Use the highest resolution you can.
If you don’t want the whole image, crop the image to include just the part you want.
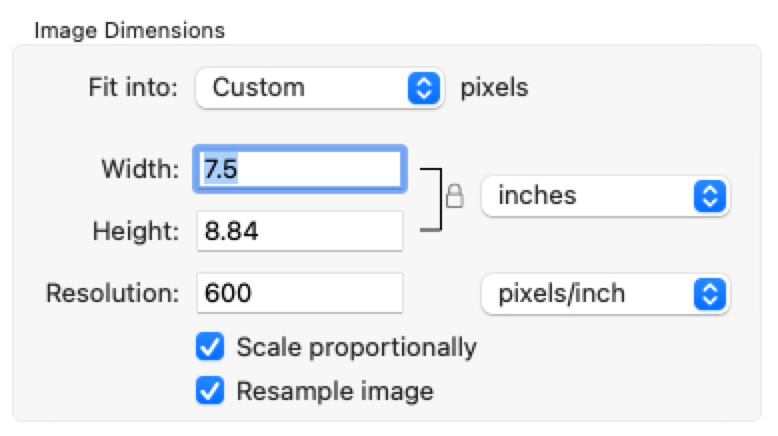
Since the fabric I’m printing on is 8-1/2 by 11 inches, I can’t print it any larger than that. I also can’t print all the way to the edges so I picked the widest I can print, 7-1/2 inches, keeping the resolution that I scanned with (600 DPI), and scaling proportionally.
Save your file and make a note of where you saved it.
Do a test print on paper to make sure your image looks the way you want it to and is the size you wanted. Note: Make sure you print at 100%.
Read the instructions that came with your printable fabric!
When you’re ready to print on fabric, make sure you know which side up the fabric sheet goes into your printer. There should be a symbol that shows which side up to put paper. I recommend that you take all paper out of your paper tray and only put one printable fabric sheet in the tray.
Print! The June Tailor fabric sheets instructions say to use “normal quality, plain paper” setting. That worked great for one image I printed but it was a bit faded on the second image I tried. So I tried again using “photo on matte paper” setting and the results were much better for the second image.
Let your printed fabric sit for at least the time designated in the product instructions.
When you’re ready to use your printed image, remove the backing.
Use Freezer Paper
Note: The reason you cut the fabric and paper larger than the target size is because if there is even a slight difference in size between the fabric and paper, you will end up with smudging when you print. I’m sure you can guess how I figured that out. And even with trimming down, sometimes I got smudges using freezer paper.
Note: Make sure you use freezer paper and not wax paper. Freezer paper is only coated on one side whereas wax paper is coated on both sides and it will definitely stick to your iron if you use wax paper.
Cut a piece of fabric that is 10 inches by 12-1/2 inches. Obviously you want a color that is light enough to allow the image you are printing to show well.
Iron the fabric so there are no wrinkles or creases.
Cut a piece of freezer paper to 9-1/2 by 12 inches.
Place your fabric on your ironing board, right side down if there is a right side.
Center the freezer paper on the fabric, shiny side down. The shiny side is where the adhesive is and it’s usually on the inner part of the roll.
Using no steam, iron the fabric and freezer paper together. Pay special attention to the corners. If you are have a problem in printing, it’s often in the corners.
Let your homemade printable fabric cool down for a minute or so.
Trim your printable fabric to 8-1/2 by 11 inches.
You have now created more or less the equivalent of the printable fabric you can purchase. Repeat steps 1 through 10 in the previous section (Use a Commercial Product) to print your image.
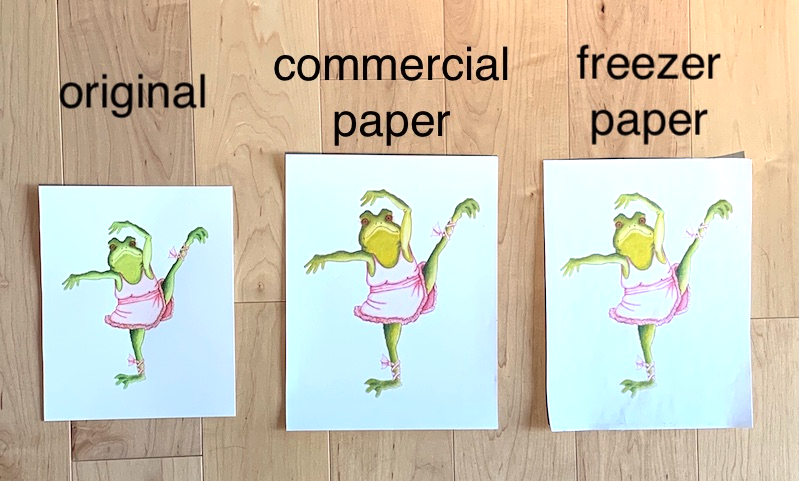
Results
Here are the results. Neither looks exactly like the original but they are both pretty good. In a pinch, I would use the freezer paper method but, truthfully, I prefer the convenience and results of the commercial product.
Treat the Fabric
If you plan to wash the project you make with your printed block, it may be a good idea to treat it with Retayne. A good video showing this is at https://youtu.be/o2UzbGLaBK4
The June Tailor commercial product I used says it is Colorfast, and in my previous experiences with the product, it mostly is colorfast. The images faded a bit but not much with washing.
Use the Printable Fabric
Trim your printed fabric to the size you want. Leave at least 1/2 inch around the edges of the image. I only left 3/8 inch and I ended up cutting off a bit of one edge of my image.
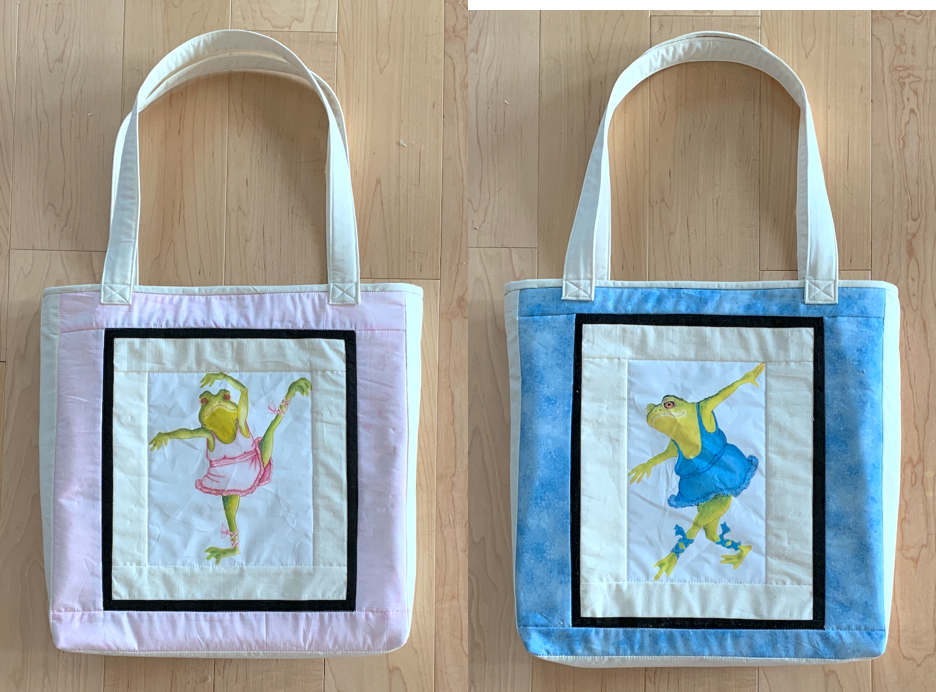
Time to make my tote bag! The borders around the images are going to be different sizes since the images themselves were not the same size (different width and height and not in the same proportions).
As I said earlier, I want my blocks to end up 16-1/2 inches square. I will write in detail in another blog post about how I calculate borders for a center block or panel when I want the finished piece to be a specific size. This is how the blocks came out.
I have avoided making quilts with diamonds in them because they look hard to do! I can’t imagine how I will line up all those seams and points. I have seen three different techniques for creating diamond quilts.
The first technique involves cutting out each diamond and sewing them together one by one. Obviously this works but I was looking for a less labor-intensive and error-prone technique.
I saw the second technique in the “Make a Simple Diamond Quilt with Jenny Doan of Missouri Star” youtube video (https://youtu.be/ncBPCHzliRI). In this, Jenny creates the diamonds using two triangles, sewn along the shortest edge.
The third technique involves sewing strips together and then cutting sets of diamonds, which are then sewn together. This is the technique I’m going to try out.
I’m sure there are other techniques and, if you know of them, I hope you’ll put information about them in the comments for this post.
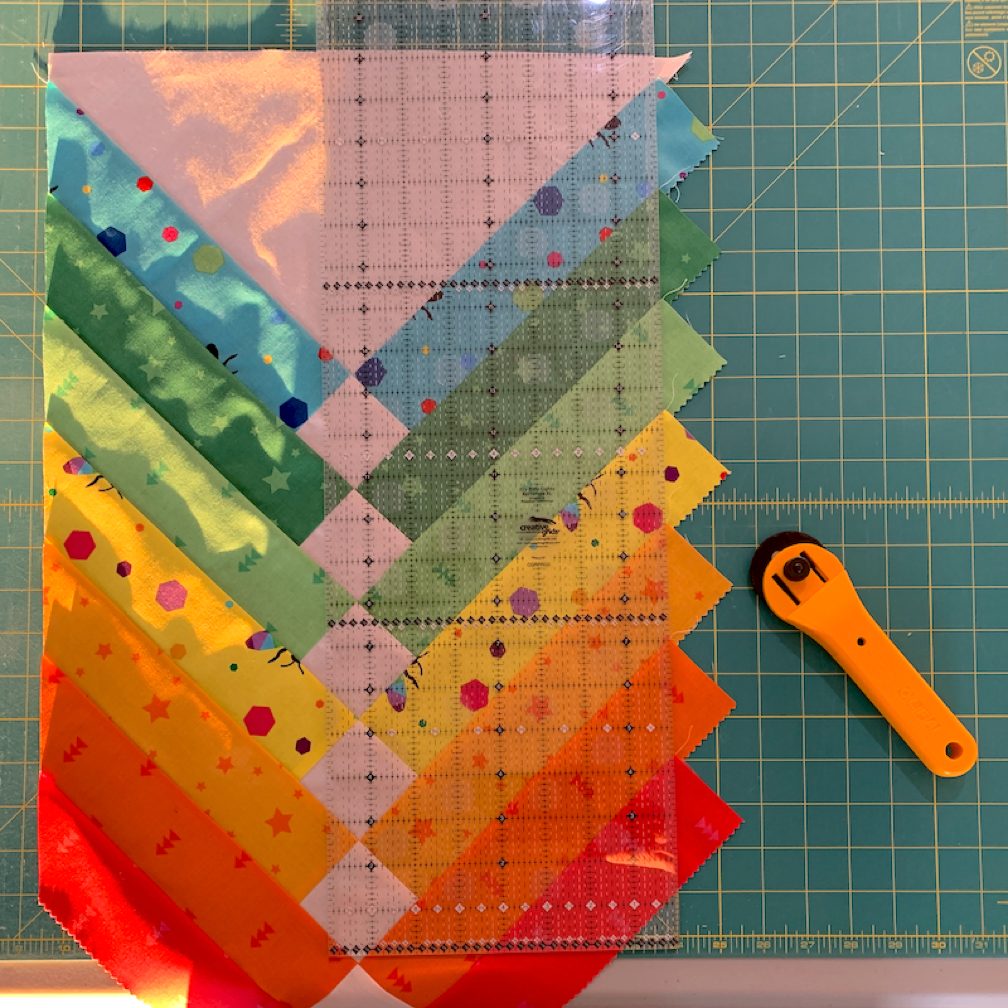
For my experiment, I am going for the traditional harlequin design, which has horizontal rows that are the same color.
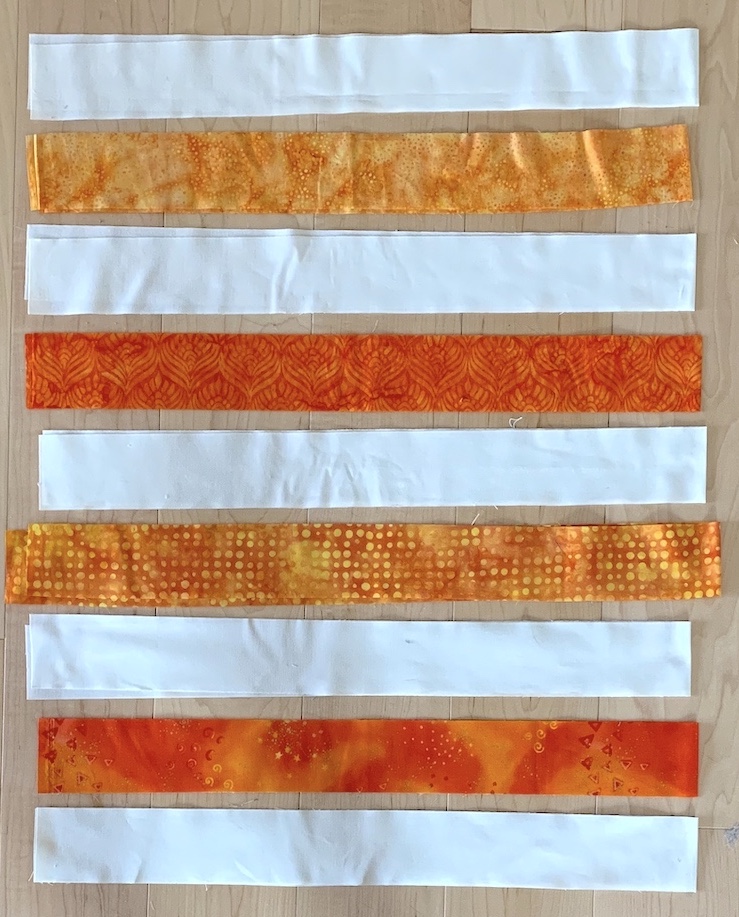
Cut nine 2-1/2 inch strips by width of fabric of two or more different colors. Lay out the strips in whatever order you want the colors to be across the panel.
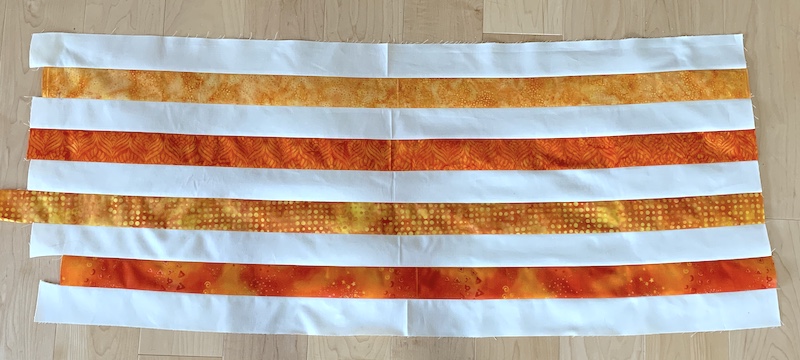
2. Sew the strips together, along the long edges, in that same order. Press the seams open, either as you go or all at once.
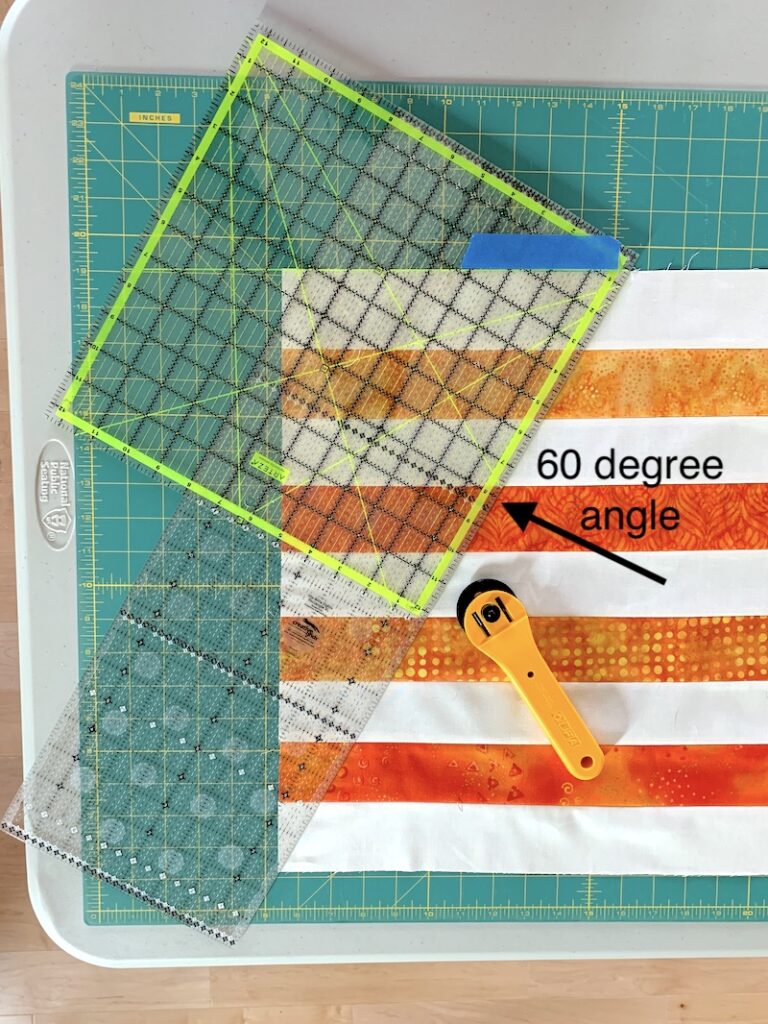
3. Line up and make a cut along a 60 degree angle, ending at the lower left corner of the strip set. I don’t have a ruler that has a 60 degree line and is long enough so I put a longer ruler underneath it and lined up the edges. You only need to do this once for the panel. (The blue tape is to remind me where the 60 degree line is.)
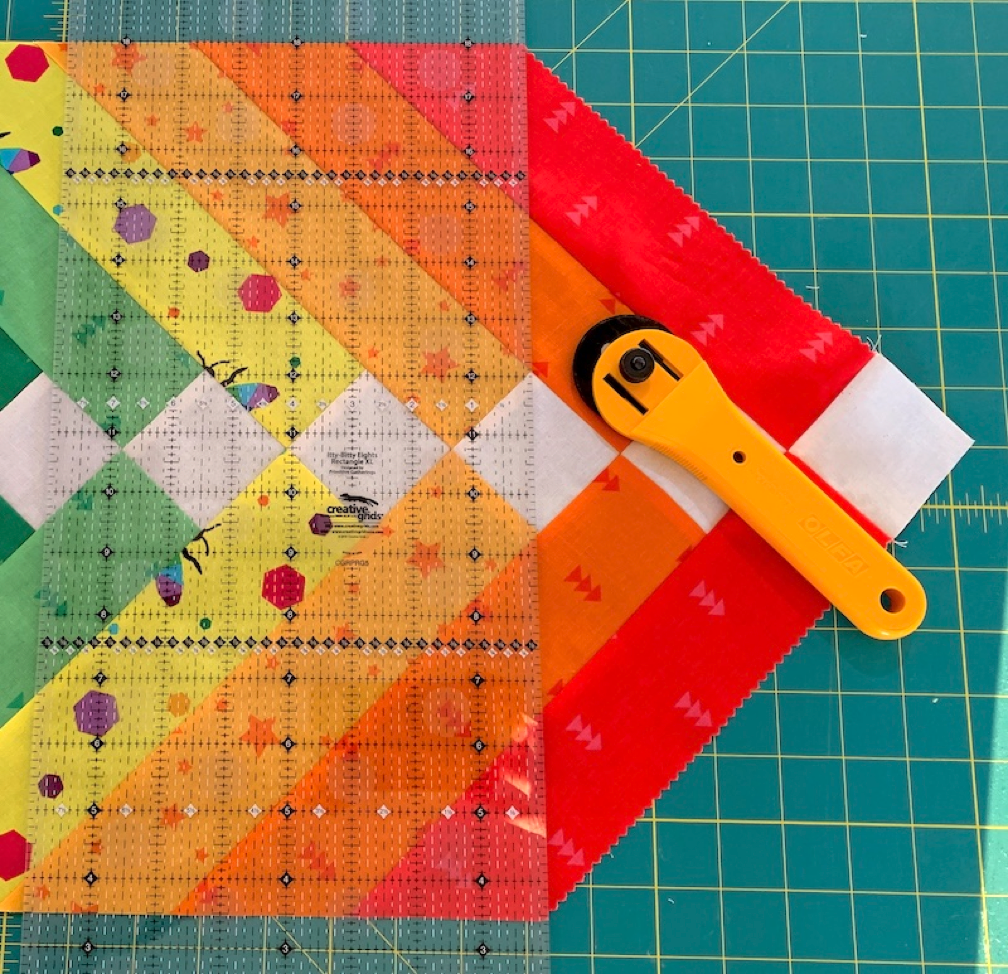
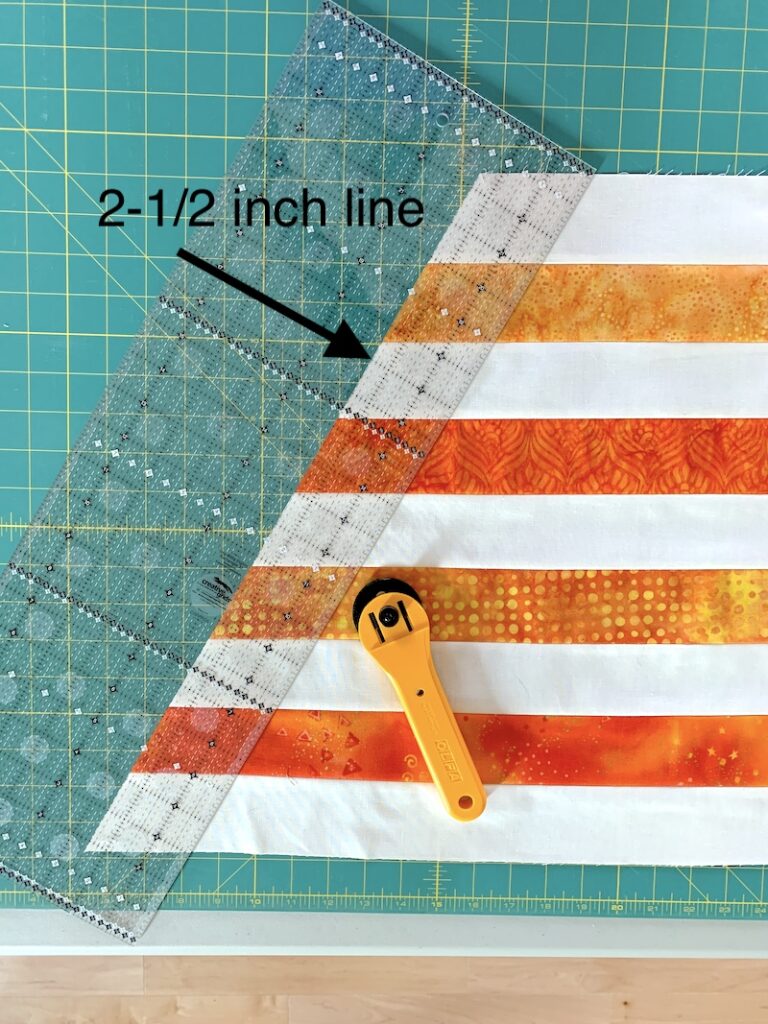
4. Since the strips are 2-1/2 inches wide, make your next cut 2-1/2 inches wide, parallel to the 60 degree cut you already made.
5. Repeat to cut 10 strip sets total.
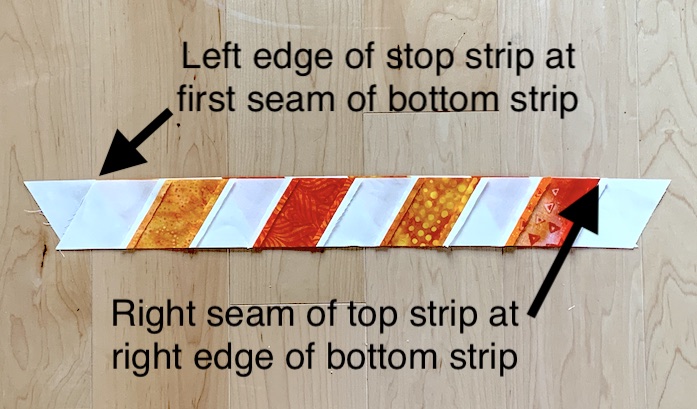
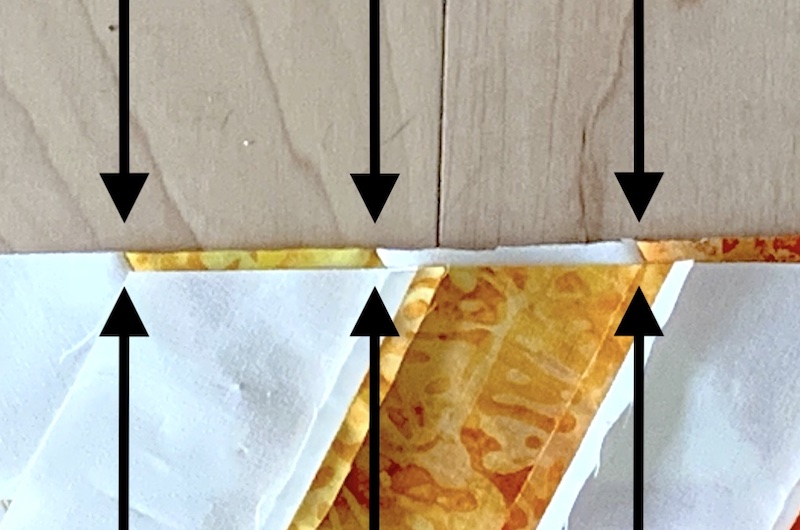
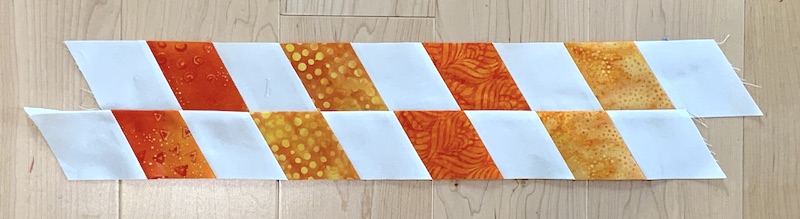
6. Stitch the first two cut strip sets as follows, making sure you line up the edges as shown in the diagram.
Here is a closer view.
7. Press seam towards the strip you just added.
8. Repeat steps 6 and 7 until you have sewn together all 10 strips sets.
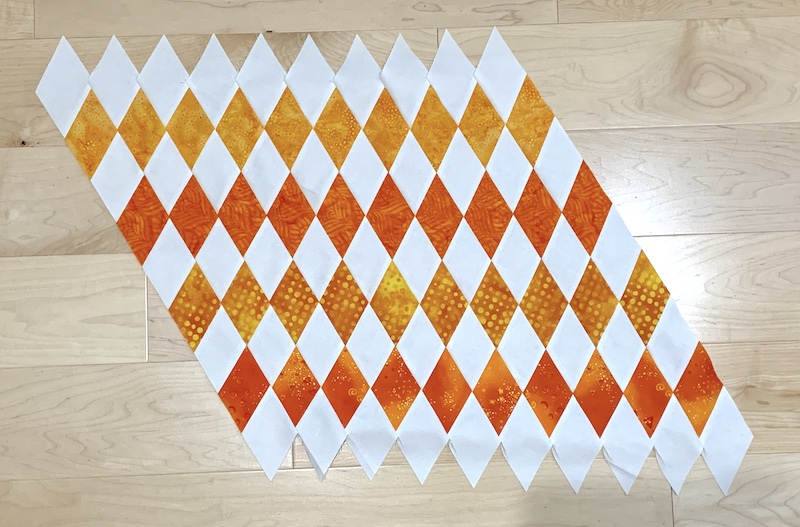
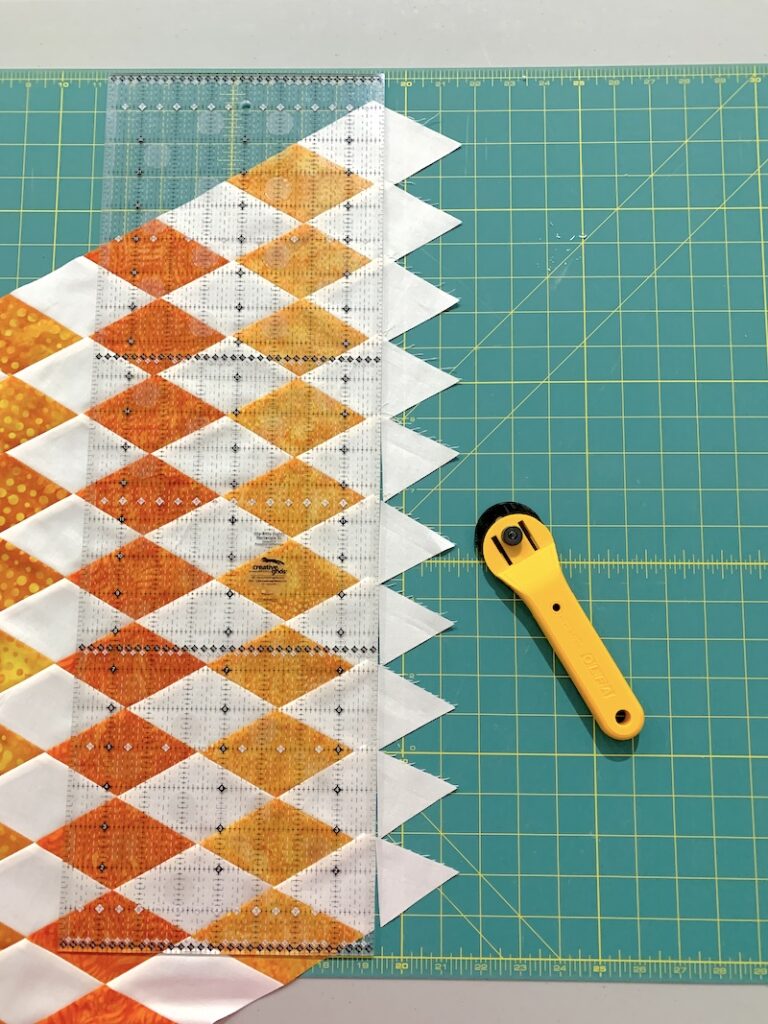
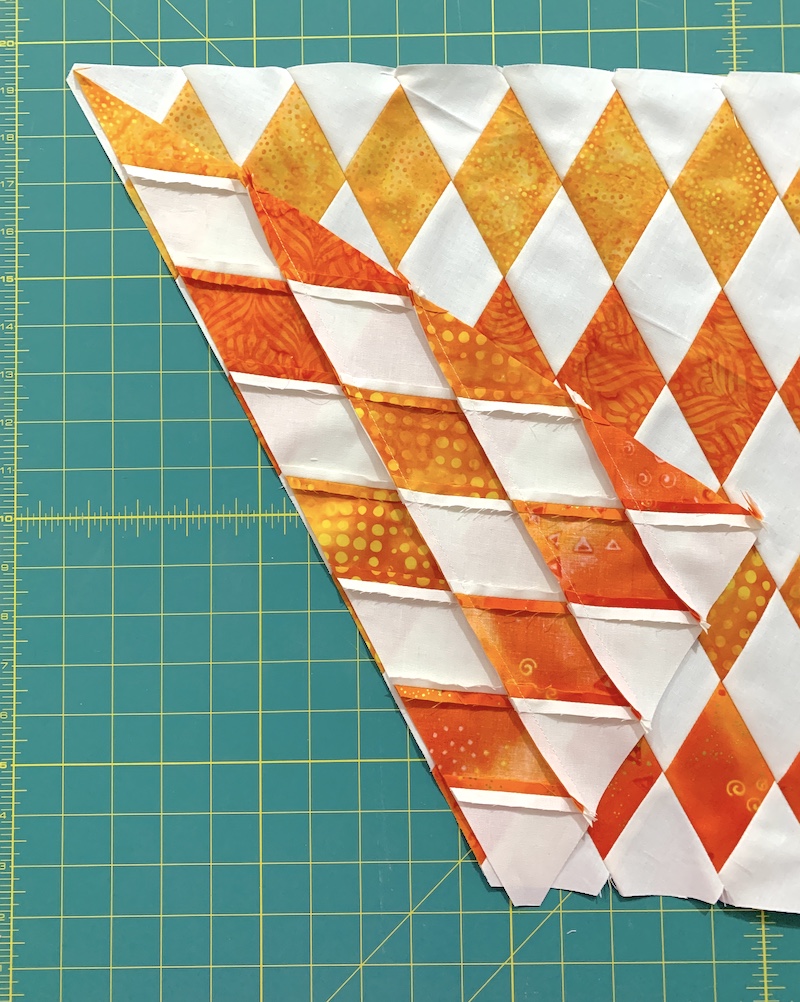
9. Trim the overhanging points on both sides, leaving 1/4 inch from the point of the next row of diamonds.
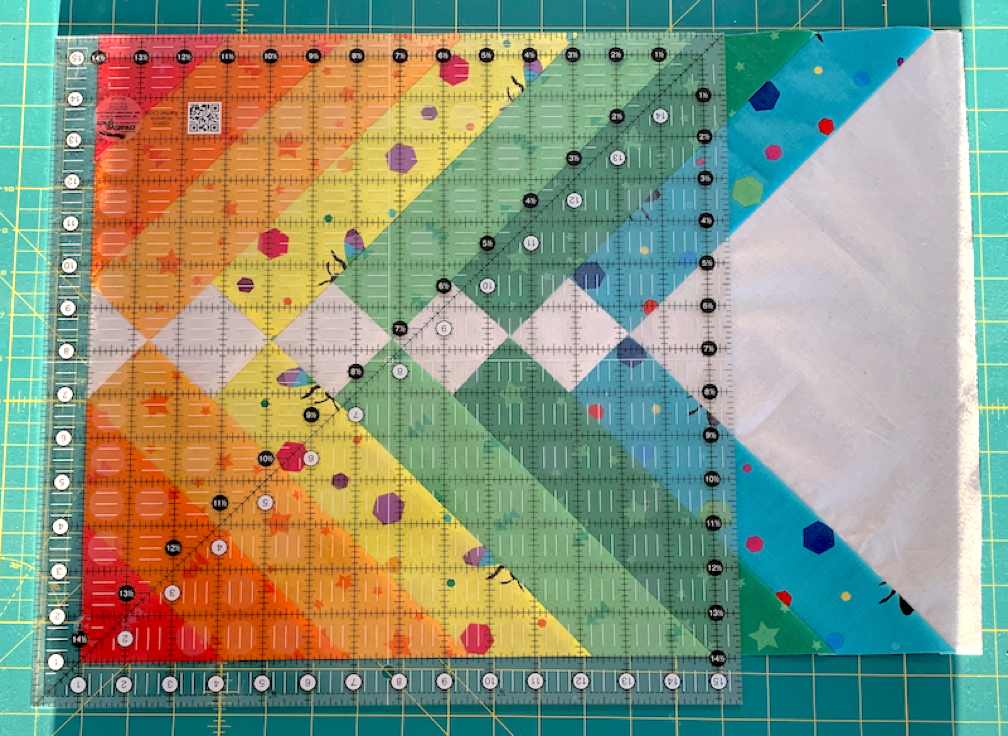
10. Trim the the side on the right, lining up 1/4 inch to the right of the last point on the upper edge and the corresponding point on the bottom edge. Keep the part you cut off!
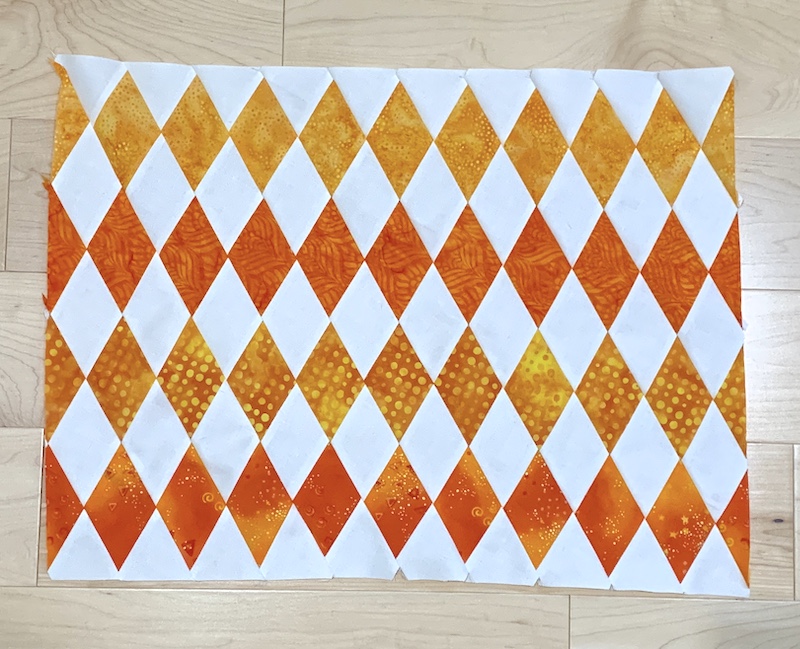
11. Flip around the piece you cut off and line up the color rows on the other end of your panel.
12. Flip the extra piece over to be right sides together with your panel. Stitch a 1/4 inch seam along the edge. Press towards the piece you just added.
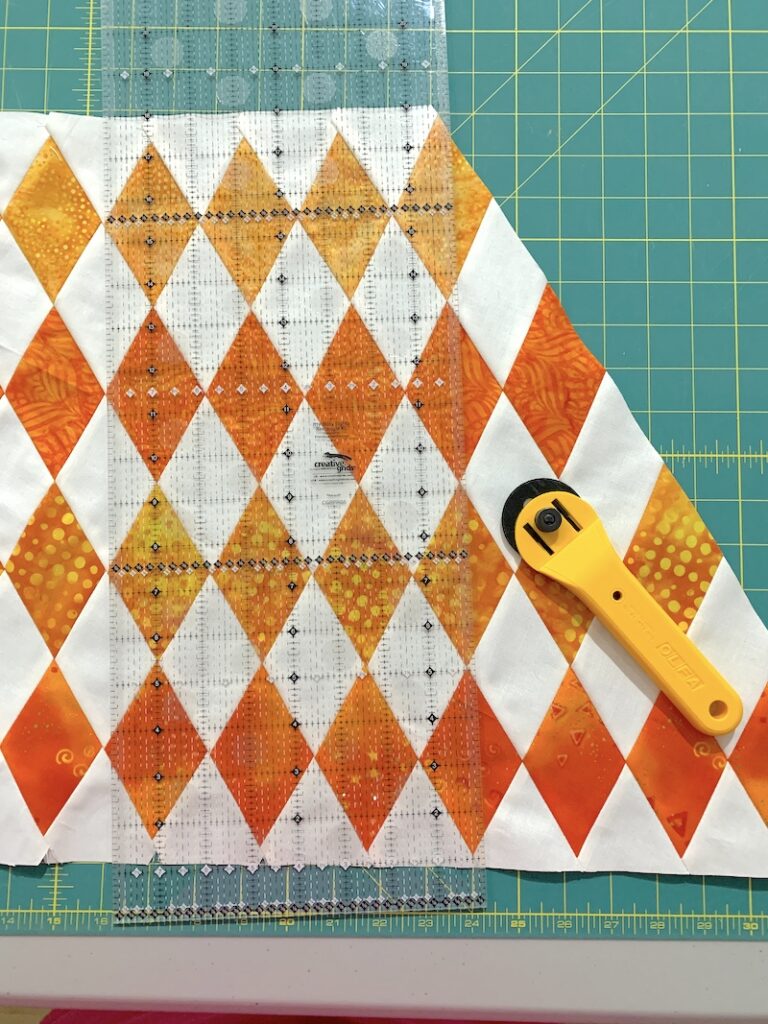
13. You now have a panel that is about 16-1/2 by 22-1/2 inches in size.
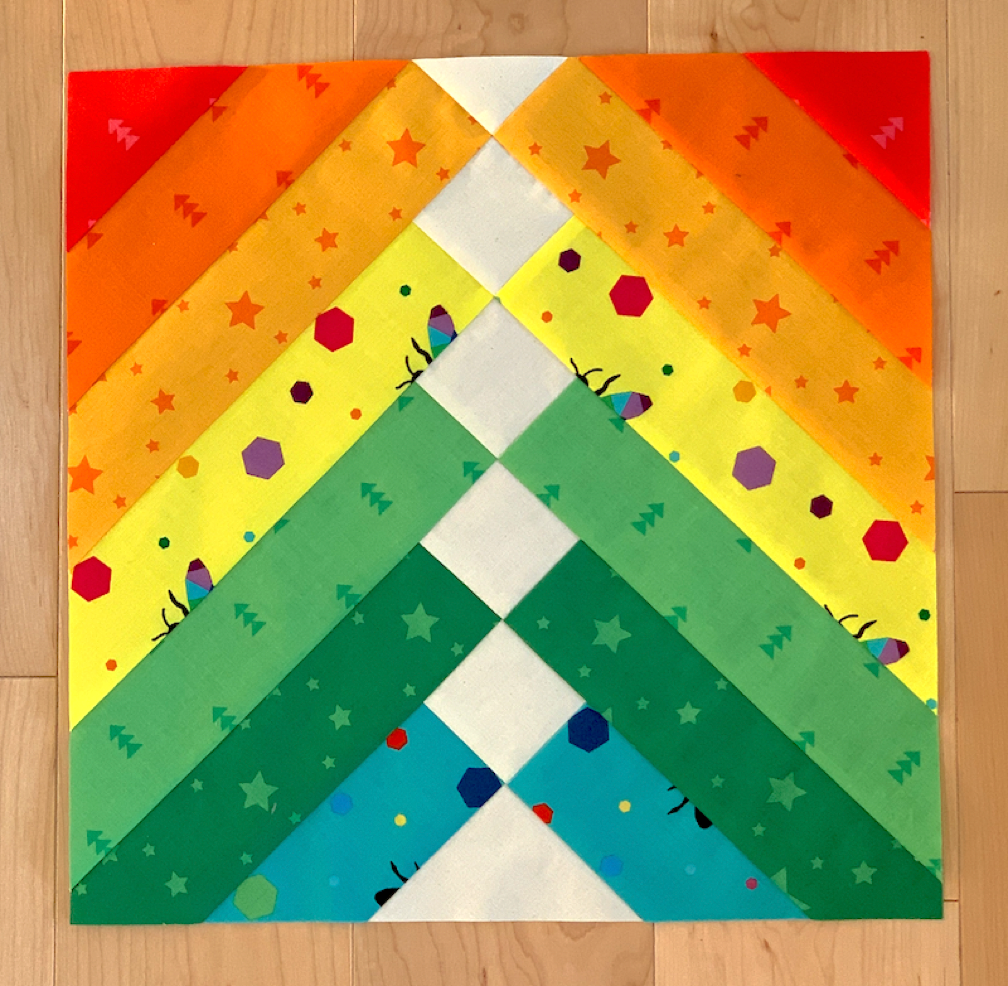
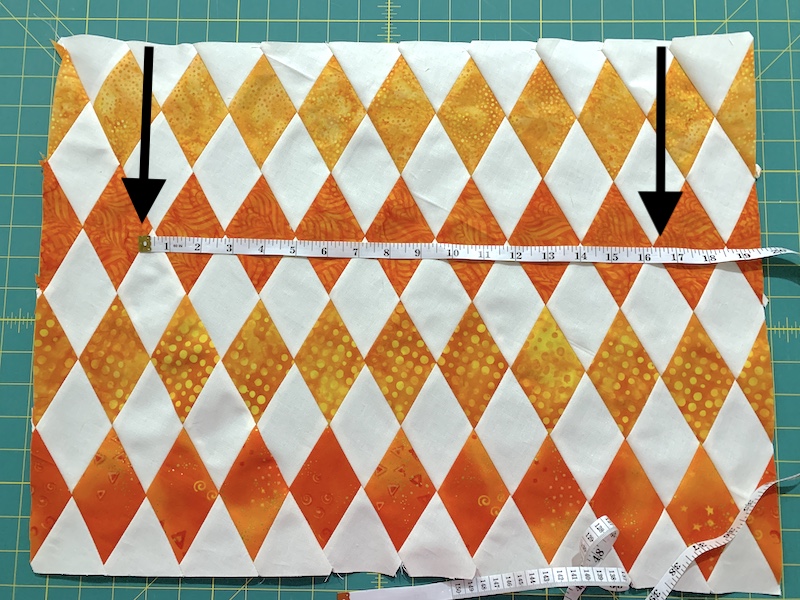
14. For my tote bag, I want my panel to be 16-1/2 by 16-1/2 so I will trim this panel to that size, paying attention to the edges of the diamonds I am cutting through.
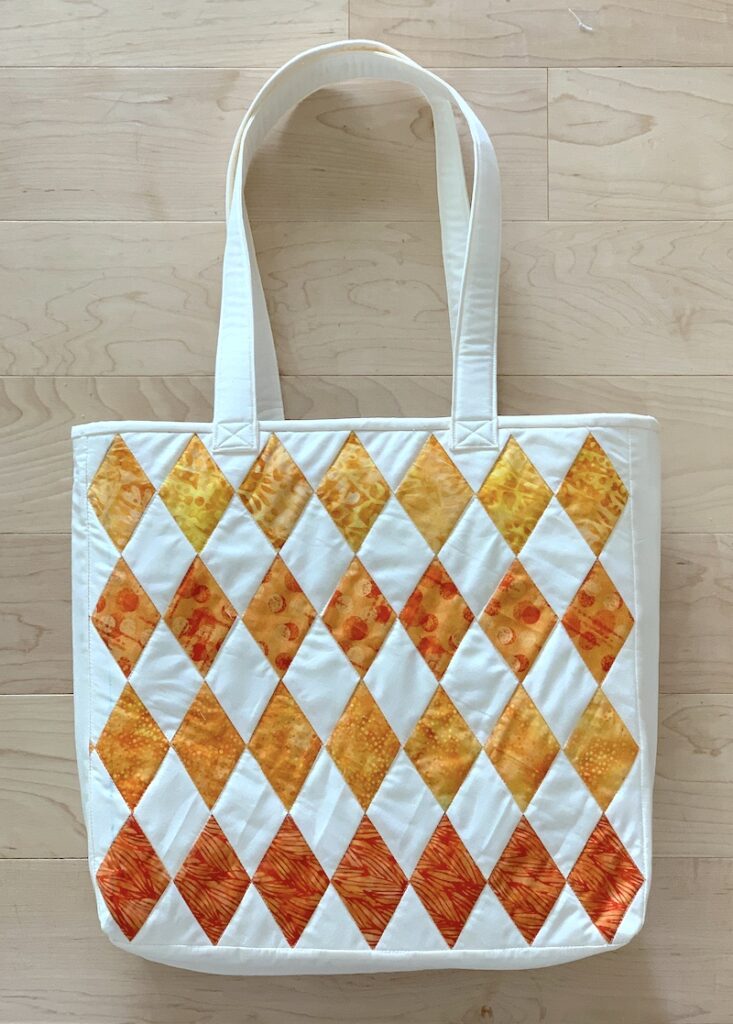
I created a second panel, the same design as the first with different orange fabric selections, and used the two panels to create a tote bag.
If you, like me, have been afraid of working with diamonds in quilting, fear no more! Give this technique a try. I think you’ll like it. I hope so!
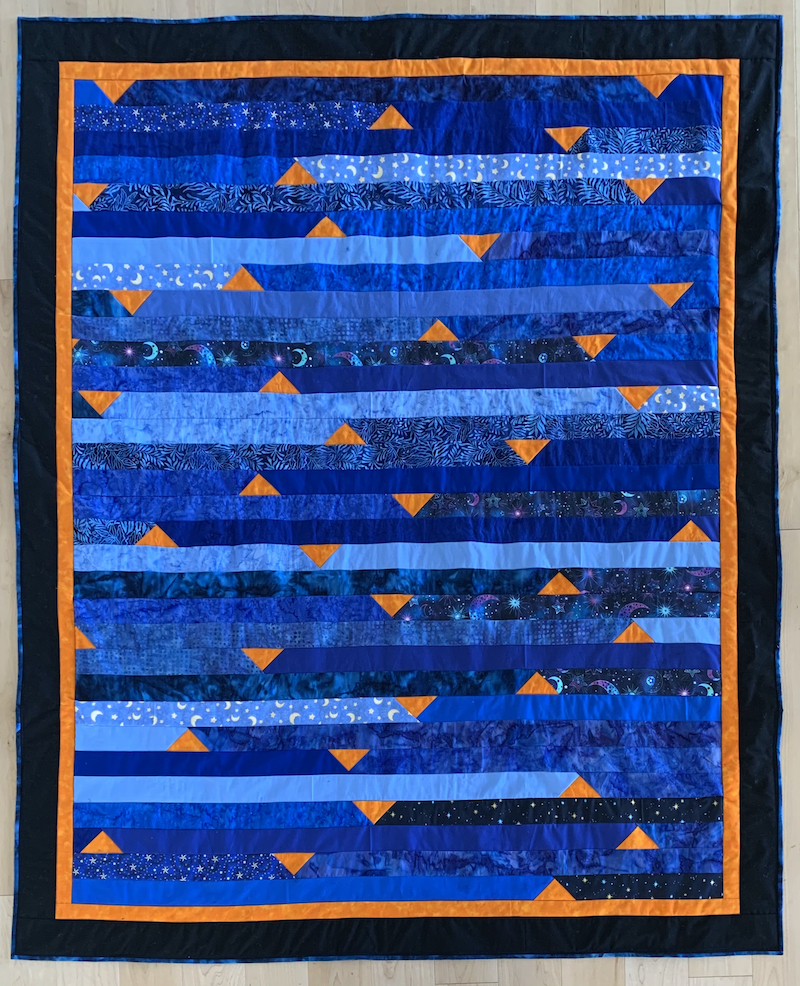
When I first saw one of the Jelly Roll Race designs (original, 2, and 3) from Missouri Star Quilt Company (MSQC), I was intrigued. When I saw the video of how it goes together, I was even more intrigued. So I knew I had to try it out.
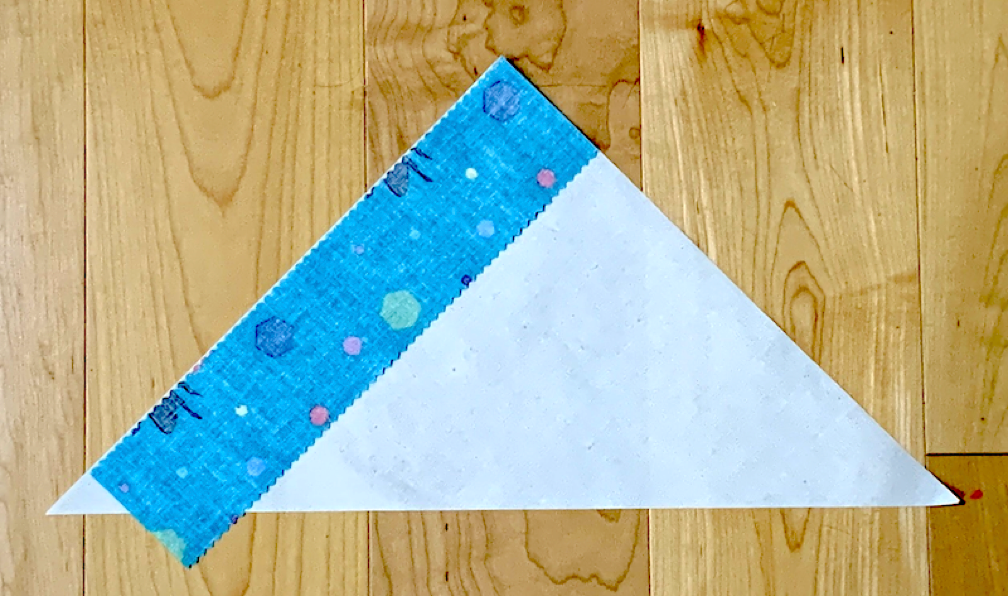
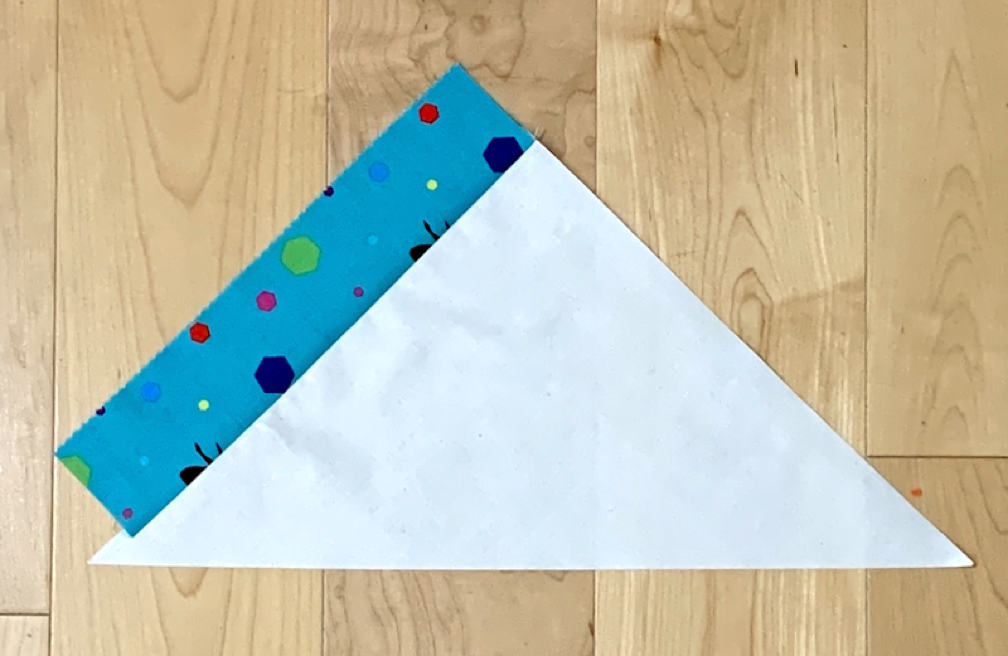
The first Jelly Roll Race quilt I made was Jelly Roll Race 3. I was pretty pleased with how it came out. I like the blue and orange together. I didn’t use a jelly roll but instead cut strips from different blue prints and solids from my stash. Sewing on the triangles took a bit of time but overall it was a quick quilt to make.
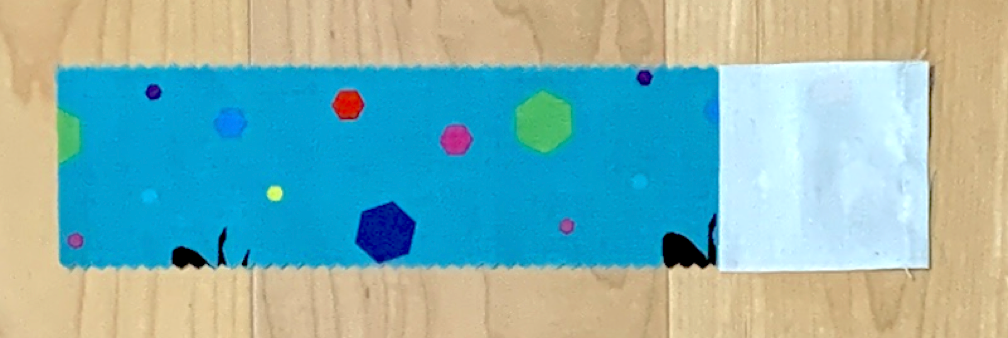
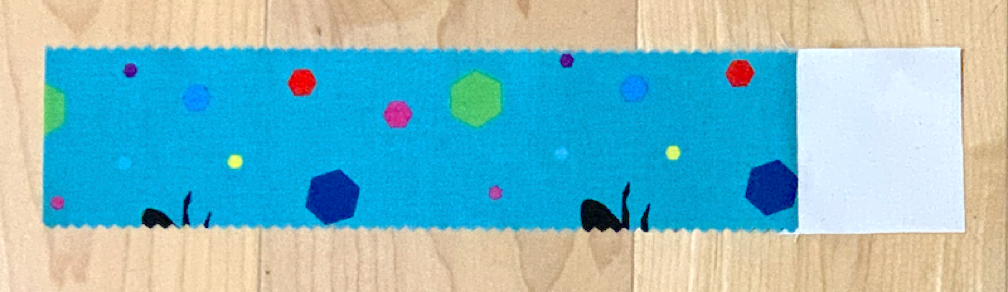
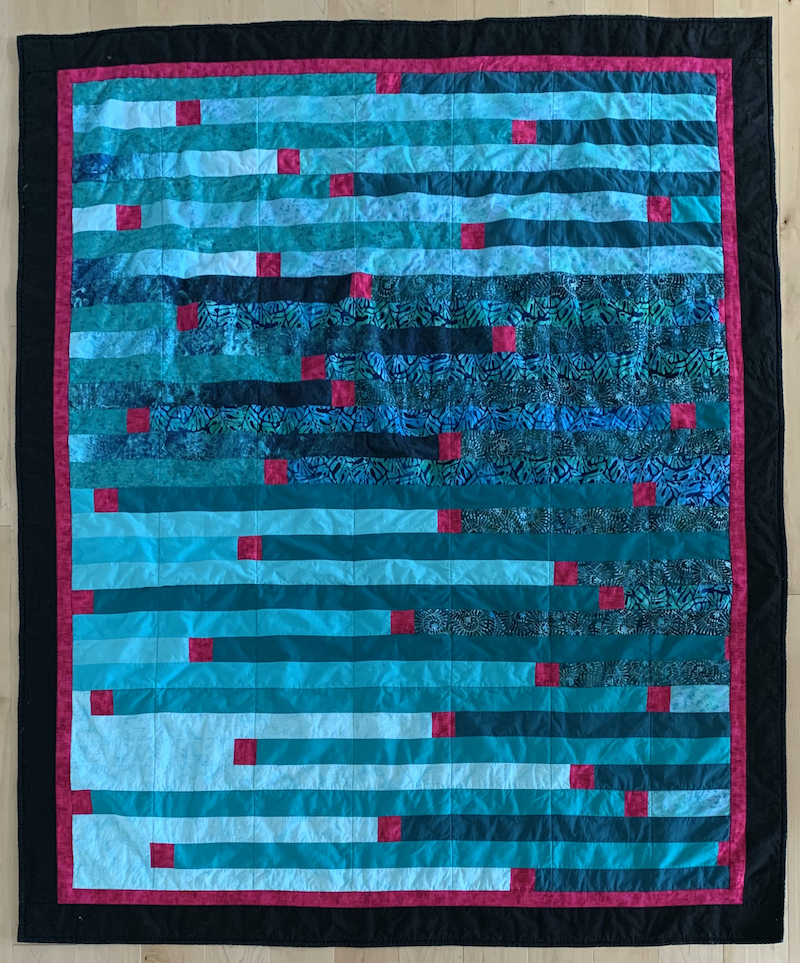
The second quilt I made from this series was Jelly Roll Race 2. I was pretty pleased with how this one came out too. I like the aqua and magenta together. Once again, I didn’t use a jelly roll but instead cut strips from different aqua prints and solids from my stash. Sewing on the squares was much quicker than sewing on the triangles and it was a quick quilt to make.
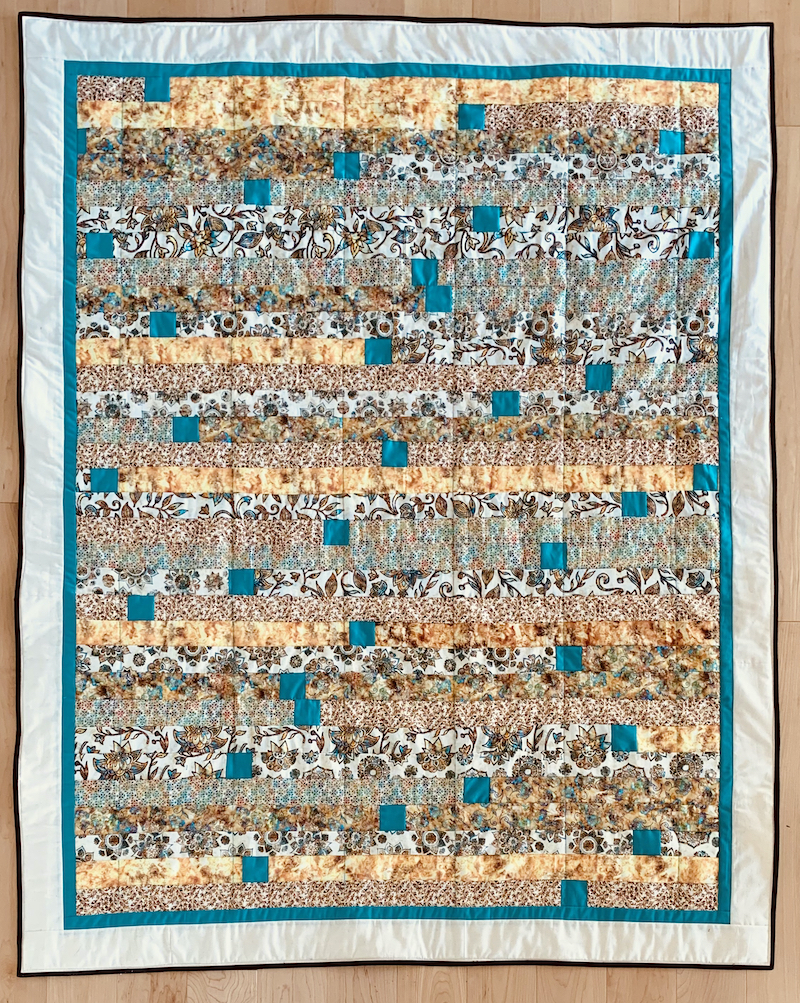
The third quilt I made from this series was also Jelly Roll Race 2. This time I did use a jelly roll,“Kashmir” by Dan Morris. I like the feel of this quilt but it seems too busy to me. I’m thinking now I wonder what it would have been like if I had alternated cream solid strips with the print strips.
I did a bunch of experiments to see if you could control color placement by how you sew the sections together after you have sewn all the strips together. The construction of this design makes it really hard to figure out what is going to end up where. Unfortunately I didn’t save the photos from those experiments and I didn’t end up with any definitive answer. Now it occurs to me that I can do those experiments on a smaller scale for tote bag panels so here we go.
Experiment 1 — Tote Bag Panel Sizing
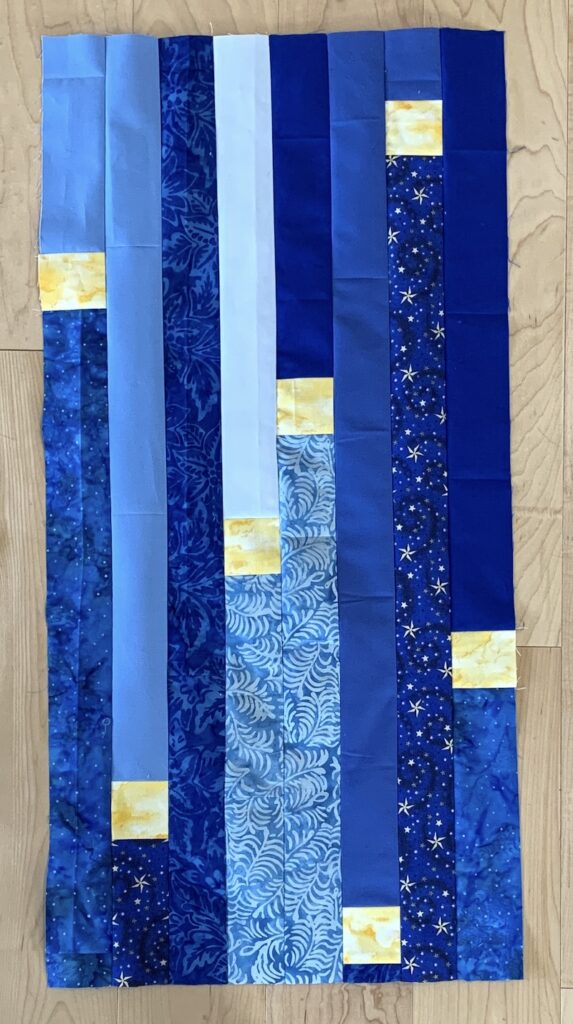
For my first experiment, I decided to do Jelly Roll Race 2, with colors from my stash. My goal is a panel that is 20 inches wide by 32 inches high.
Version 1: 6 jelly roll strips with 2-1/2 inch divider squares. It ended up 17 by 32 inches. I like the strips vertical. I could manually add a strip on each side to make it 20 inches wide but that would kind of defeat the purpose of the Jelly Roll Race technique.
Version 2: 7 jelly roll strips with 2-1/2 inch divider squares. It ended up 18 by 32 inches. Because of the additional fold from 8 to 16 strips across, the strips ended up horizontal, which is fine for quilts but I think I prefer vertical for tote bags.
Version 3: 8 jelly roll strips with 2-1/2 inch divider squares. It ended up 21 by 32 inches so the size is good but again with the horizontal strips. If you like the strips horizontal, this would be a great way to make a tote bag panel.
Version 4: 10 jelly roll strips with 2-1/2 inch divider squares. It ended up 25 by 32 inches. Definitely more horizontal than vertical. I can see this isn’t going where I want it to. I could cut down the edges to 20 inches but there’s really no point since using 8 jelly roll strips got to the right size.
Conclusion: If you’re okay with horizontal strips for your tote bag, then Version 3 would work well. If, like me, you prefer the vertical strips, then Version 1 with a strip added to each edge after the fact would work. Those strips would end up being the sides of the bag so you could plan the color accordingly. Not a bad idea actually.
Experiment 2 — Jelly Roll Race 2 and Tote Bag Colors
For my second experiment, I decided to do Jelly Roll Race 2 again. This time I am going to try out prints, solids, and color hues, and see how placement affects the outcome.
Note: One thing I noticed in my previous experiments is that, since it’s really hard to control what ends up where, it’s not a good idea to use more than one strip of any one color or print.
Version 1: I’m going to use equal parts prints and solids and see how that goes. I’m doing the 6 jelly roll strip version in terms of size. However, I feel like there weren’t enough divider pieces in that version so I can going to use 8 slightly shorter strips, 4 print and 4 solid.
With 6 strips that are 45 inches long, you end up with about 270 inches (not including the divider squares). So for 8 shorter strips, they should be about 34 inches long. Since I’m using scraps for my testing, this worked out really well for me. It would also work well with fat quarter precuts (with some piecing).
This is how it came out. I think I would prefer less solids and perhaps a bit more divider pieces, but it’s not bad. Remember that this is both the front and the back of the tote bag so that’s why it seems so tall.
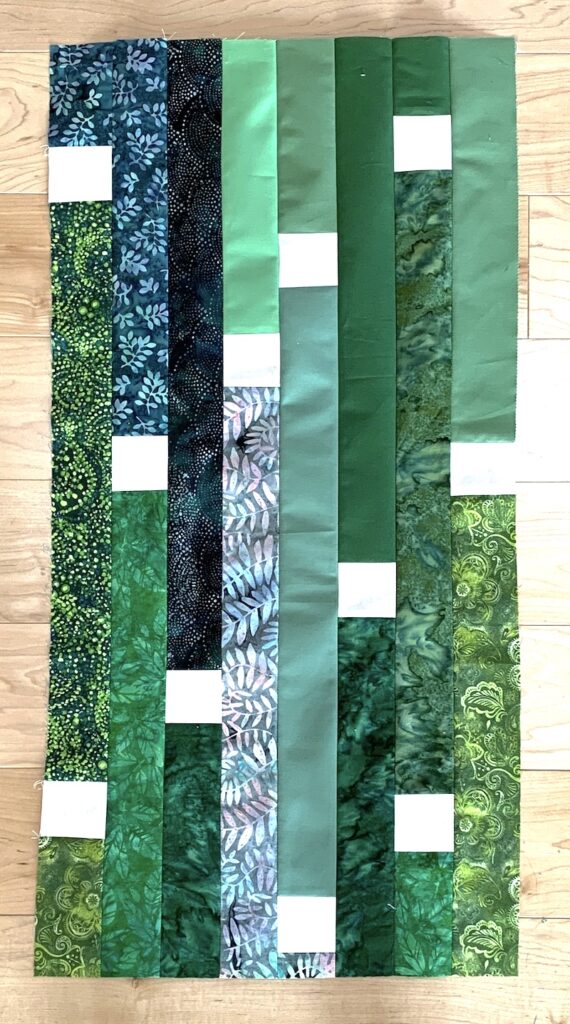
Version 2: I’m going to try two thirds prints and one third solids next and and see how that goes. I’m still doing the 6 jelly roll strip version in terms of size. I want even more divider pieces in that version so I am going to use 12 shorter strips, 8 print and 4 solid.
With 6 strips that are 45 inches long, you end up with about 270 inches (not including the divider squares). So for 12 shorter strips, they should be about 22 inches long. This is a great use for fat eighth precuts.
I decided to try one more color experiment. I wanted to lay out and sew my strips from lightest to darkest hue. So I took a photo of my strips laid out, saved it, and then changed the photo to monochrome to see how the layout was in terms of hues. I moved things around until I came to this, lightest on the left to darkest on the right.
This is how the panel came out. Happy dance! This is everything I hoped it would be:
I like the balance of prints versus solids.
I like the number of divider squares.
I like that with the shorter strips I started with, there ended up with no big stretches of color or print that ended up side by side.
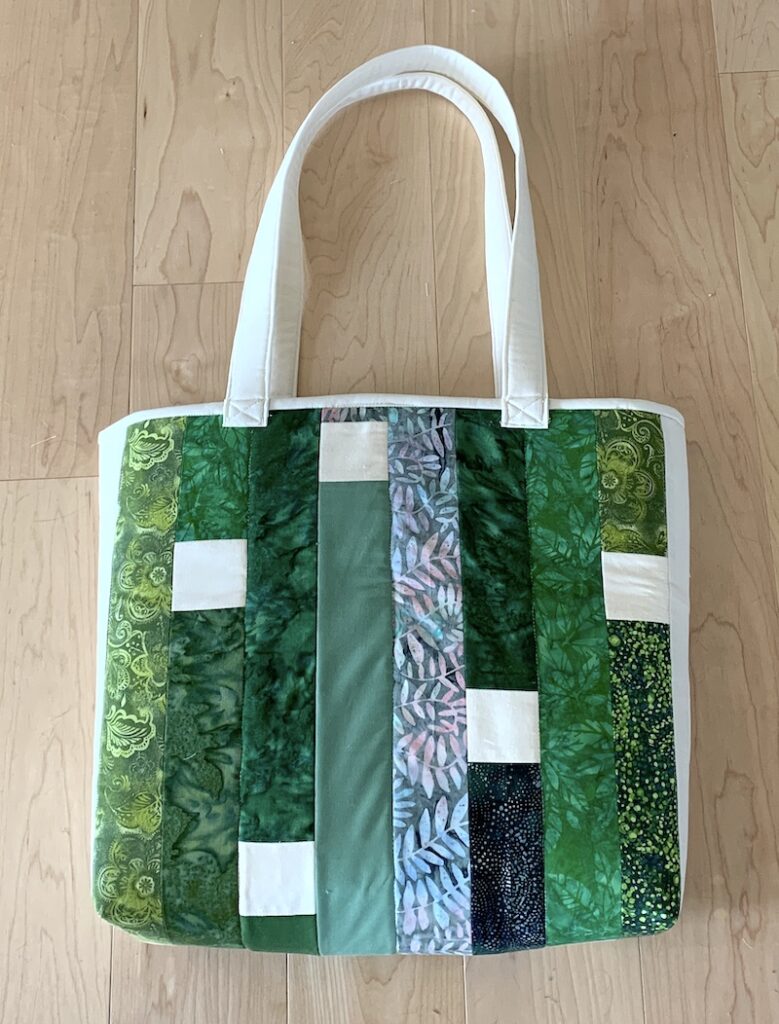
To truly convince myself that I had succeeded in finding a layout I like for making a tote bag, I added side panel strips and made a tote bag. This is how it came out. I like it! I hope you do too.