Update 11/14/2021: I found that I really like using stabilizer instead of batting for these small tote bags so I updated the tutorial to reflect that.
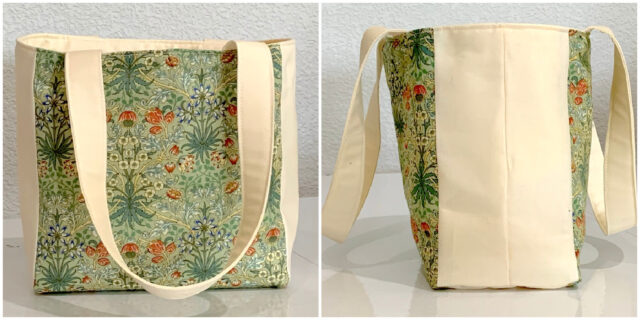
I decided I wanted to make a smaller version of my full-size tote bag. Below are the results of the experiments I did, numbered as I went through them. The final bag is 8 inches tall by 7-1/2 inches wide by 4 inches deep. This compares to my larger tote bag which is 16 inches tall by 16 inches wide by 3 inches deep.

Experiment 1
I started with a 10 inch by 8 inch paper tote I had as a guide and used the same technique as I had used on my larger tote bag, just on a smaller scale.
I liked that the bag stood up on its own and keep its shape. I did not like:
- The exposed seams. They stand out a lot more in the smaller tote.
- The binding on the top. It seems like overkill on the smaller tote.
- The straps were 4 layers of fabric (like double fold bias tape) but they still seemed floppy to me.
Experiment 2
- Reduced the depth of the bag.
- Used interfacing in the straps.
- Used the inside out method for stitching the bag and lining together instead of quilting them together like I do in my larger tote bag.
- Used batting on the outer body of the bag but no interfacing.
I liked the more streamlined inside (no exposed seams) and top (no binding). I did not like:
- Because the batting was attached to the outside, the lining was floppy and didn’t look good.
- Although the depth is better, the bag seems kind of tall to be a small tote bag.
Experiment 3
- Decided to try all one piece instead of side and bottom panels.
- Shortened the bag a bit.
- Attached the batting to the lining instead of the body.
It was much easier to put the bag together without the side and bottom panels. And the lining looked much tidier. However…
- I did not like the less structured look on the outside.
- I prefer the look of the different color on the side panels.
Experiment 4
- Went back to the side and bottom panels.
- Made it a teeny bit shorter to make less fabric waste during cutting.
I am happy with the look and structure. However, it now seems too deep on the sides.
Experiment 5
Bingo! I realized that I didn’t need to change the height so it’s back up 1/2 inch taller and I reduced the depth a bit more. I am very happy with the look and feel of this bag.
I wrote a tutorial for those who are interested in instructions for this bag. You can download it using the button below. You can find my larger tote bag tutorial, including a fun design, at https://www.etsy.com/listing/1061546252/quilted-tote-bag-tutorial-pdf
Looking forward to making this!
Excellent! I made it again with interfacing instead of batting for lining and I liked it that way too.