When I first saw one of the Jelly Roll Race designs (original, 2, and 3) from Missouri Star Quilt Company (MSQC), I was intrigued. When I saw the video of how it goes together, I was even more intrigued. So I knew I had to try it out.
MSQC patterns are available from https://www.missouriquiltco.com/
MSQC videos are available at https://www.youtube.com/user/MissouriQuiltCo
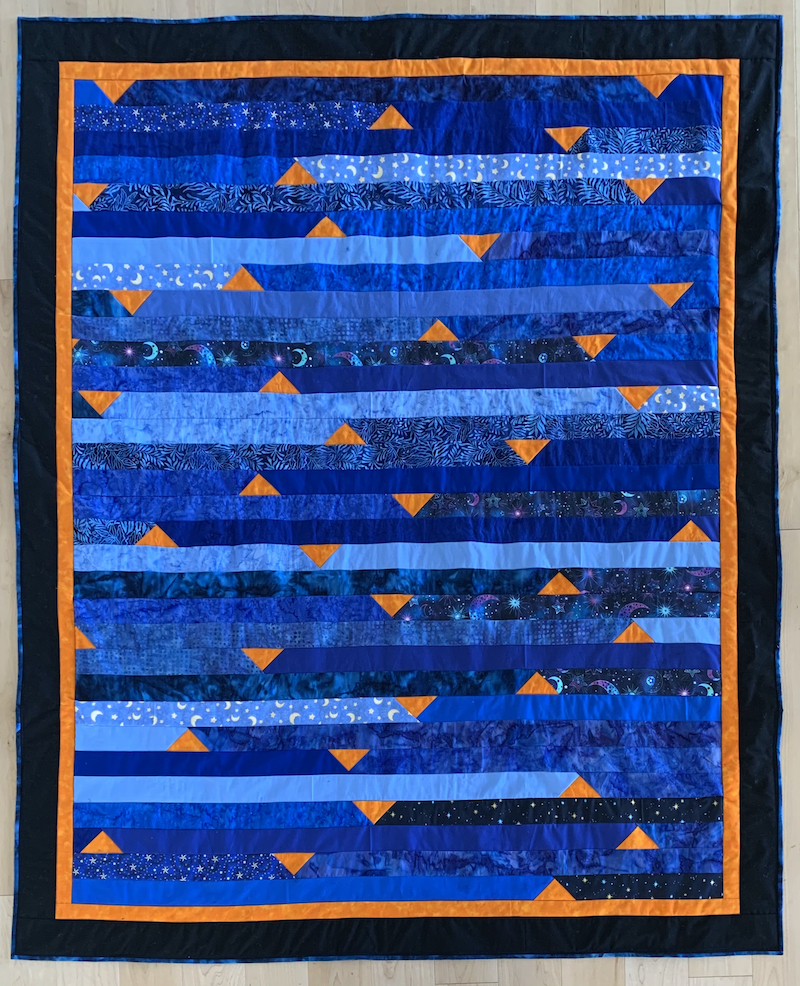
The first Jelly Roll Race quilt I made was Jelly Roll Race 3. I was pretty pleased with how it came out. I like the blue and orange together. I didn’t use a jelly roll but instead cut strips from different blue prints and solids from my stash. Sewing on the triangles took a bit of time but overall it was a quick quilt to make.
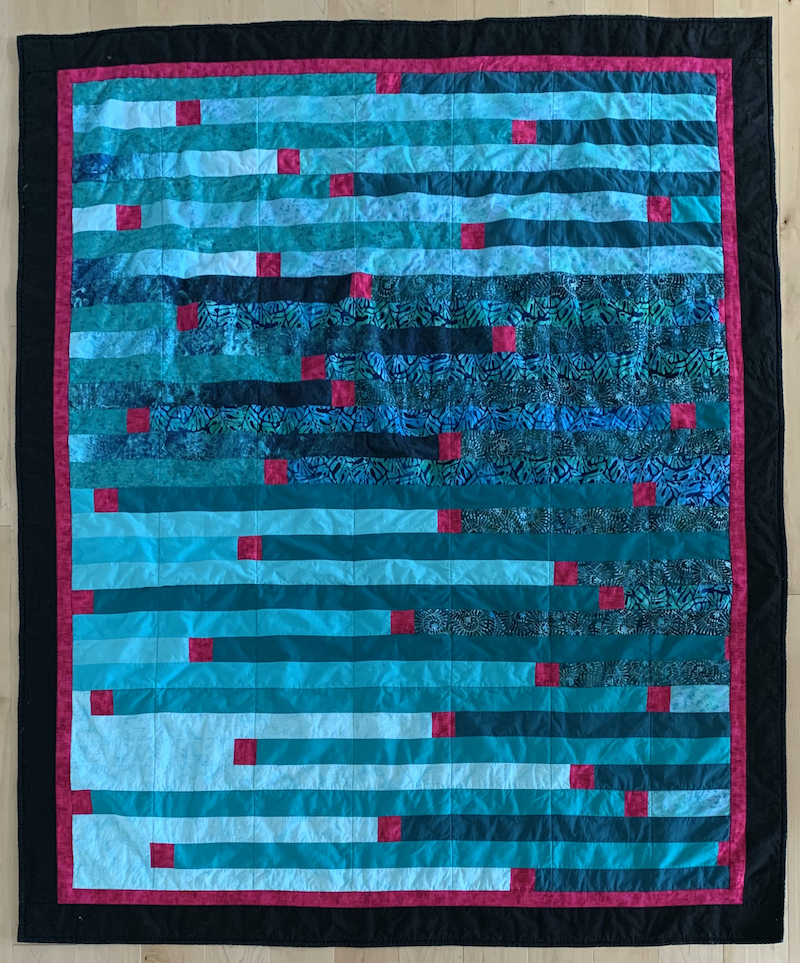
The second quilt I made from this series was Jelly Roll Race 2. I was pretty pleased with how this one came out too. I like the aqua and magenta together. Once again, I didn’t use a jelly roll but instead cut strips from different aqua prints and solids from my stash. Sewing on the squares was much quicker than sewing on the triangles and it was a quick quilt to make.
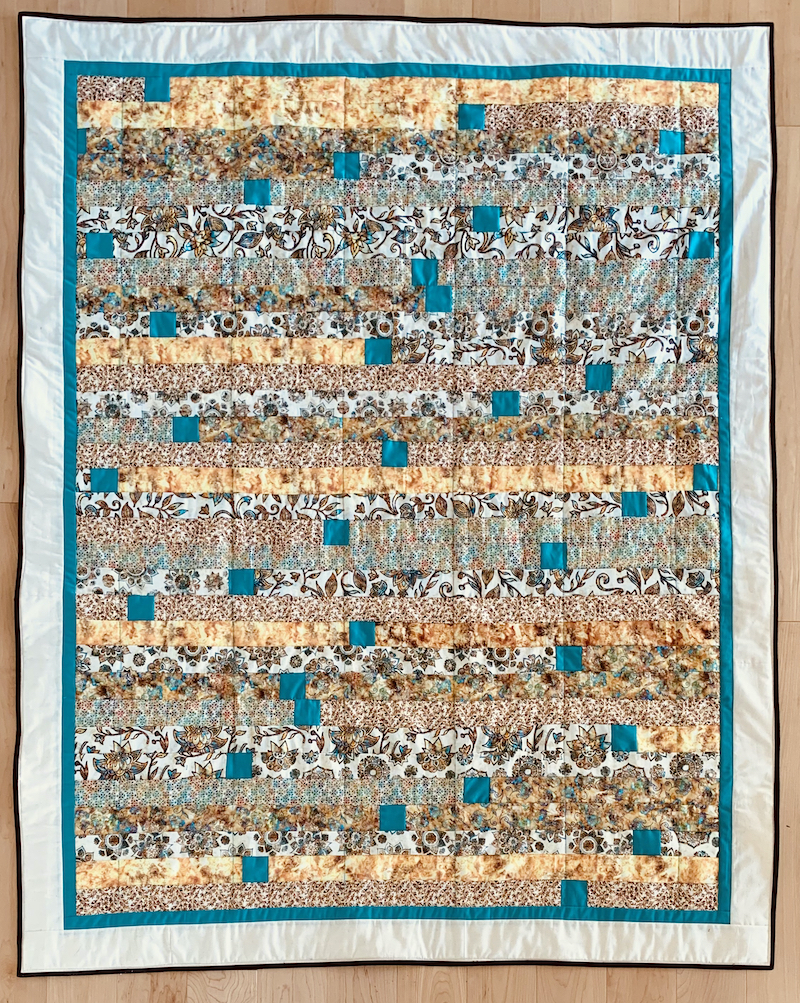
The third quilt I made from this series was also Jelly Roll Race 2. This time I did use a jelly roll,“Kashmir” by Dan Morris. I like the feel of this quilt but it seems too busy to me. I’m thinking now I wonder what it would have been like if I had alternated cream solid strips with the print strips.
I did a bunch of experiments to see if you could control color placement by how you sew the sections together after you have sewn all the strips together. The construction of this design makes it really hard to figure out what is going to end up where. Unfortunately I didn’t save the photos from those experiments and I didn’t end up with any definitive answer. Now it occurs to me that I can do those experiments on a smaller scale for tote bag panels so here we go.
Experiment 1 — Tote Bag Panel Sizing
For my first experiment, I decided to do Jelly Roll Race 2, with colors from my stash. My goal is a panel that is 20 inches wide by 32 inches high.
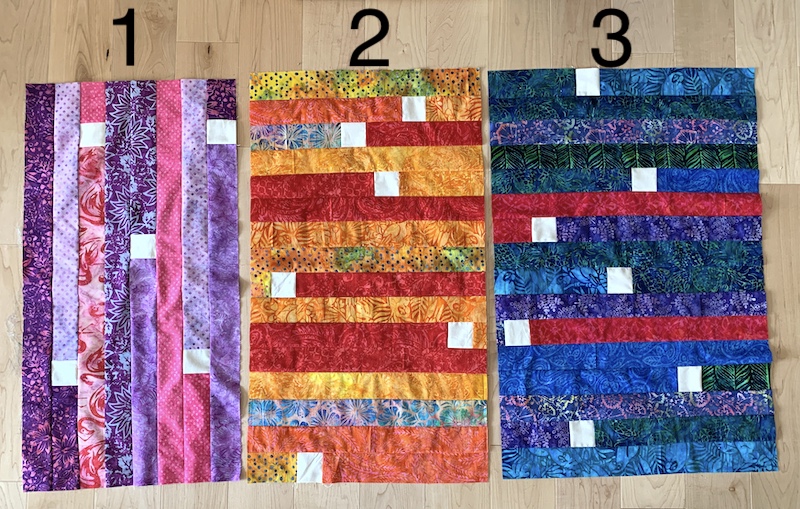
Version 1: 6 jelly roll strips with 2-1/2 inch divider squares. It ended up 17 by 32 inches. I like the strips vertical. I could manually add a strip on each side to make it 20 inches wide but that would kind of defeat the purpose of the Jelly Roll Race technique.
Version 2: 7 jelly roll strips with 2-1/2 inch divider squares. It ended up 18 by 32 inches. Because of the additional fold from 8 to 16 strips across, the strips ended up horizontal, which is fine for quilts but I think I prefer vertical for tote bags.
Version 3: 8 jelly roll strips with 2-1/2 inch divider squares. It ended up 21 by 32 inches so the size is good but again with the horizontal strips. If you like the strips horizontal, this would be a great way to make a tote bag panel.
Version 4: 10 jelly roll strips with 2-1/2 inch divider squares. It ended up 25 by 32 inches. Definitely more horizontal than vertical. I can see this isn’t going where I want it to. I could cut down the edges to 20 inches but there’s really no point since using 8 jelly roll strips got to the right size.

Conclusion: If you’re okay with horizontal strips for your tote bag, then Version 3 would work well. If, like me, you prefer the vertical strips, then Version 1 with a strip added to each edge after the fact would work. Those strips would end up being the sides of the bag so you could plan the color accordingly. Not a bad idea actually.
Experiment 2 — Jelly Roll Race 2 and Tote Bag Colors
For my second experiment, I decided to do Jelly Roll Race 2 again. This time I am going to try out prints, solids, and color hues, and see how placement affects the outcome.
Note: One thing I noticed in my previous experiments is that, since it’s really hard to control what ends up where, it’s not a good idea to use more than one strip of any one color or print.
Version 1: I’m going to use equal parts prints and solids and see how that goes. I’m doing the 6 jelly roll strip version in terms of size. However, I feel like there weren’t enough divider pieces in that version so I can going to use 8 slightly shorter strips, 4 print and 4 solid.
With 6 strips that are 45 inches long, you end up with about 270 inches (not including the divider squares). So for 8 shorter strips, they should be about 34 inches long. Since I’m using scraps for my testing, this worked out really well for me. It would also work well with fat quarter precuts (with some piecing).
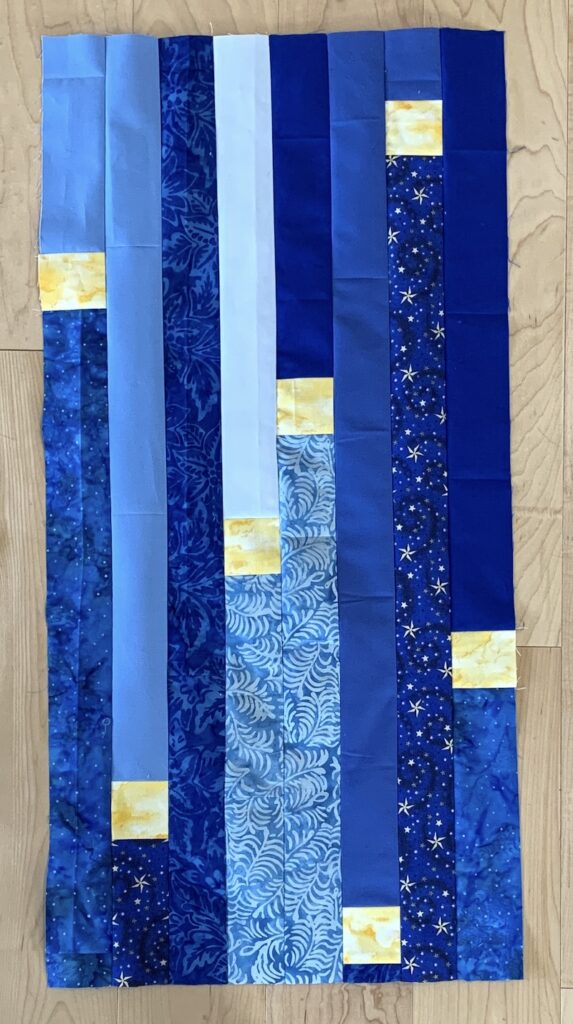
This is how it came out. I think I would prefer less solids and perhaps a bit more divider pieces, but it’s not bad. Remember that this is both the front and the back of the tote bag so that’s why it seems so tall.
Version 2: I’m going to try two thirds prints and one third solids next and and see how that goes. I’m still doing the 6 jelly roll strip version in terms of size. I want even more divider pieces in that version so I am going to use 12 shorter strips, 8 print and 4 solid.
With 6 strips that are 45 inches long, you end up with about 270 inches (not including the divider squares). So for 12 shorter strips, they should be about 22 inches long. This is a great use for fat eighth precuts.
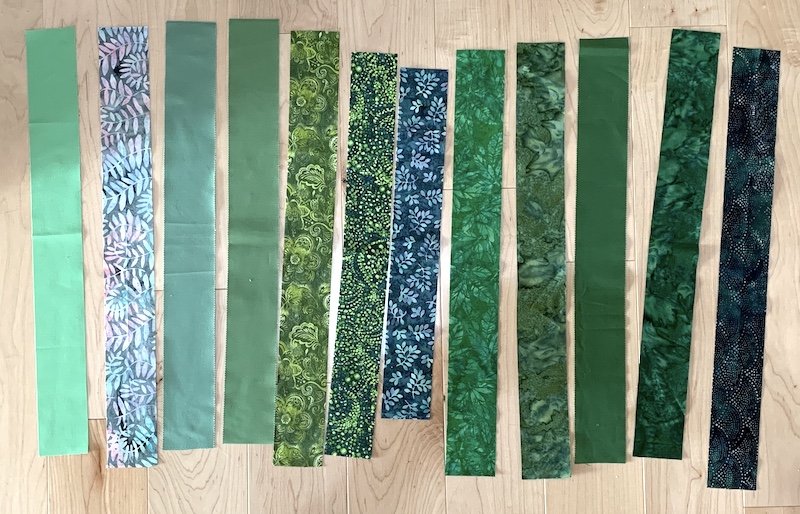
I decided to try one more color experiment. I wanted to lay out and sew my strips from lightest to darkest hue. So I took a photo of my strips laid out, saved it, and then changed the photo to monochrome to see how the layout was in terms of hues. I moved things around until I came to this, lightest on the left to darkest on the right.

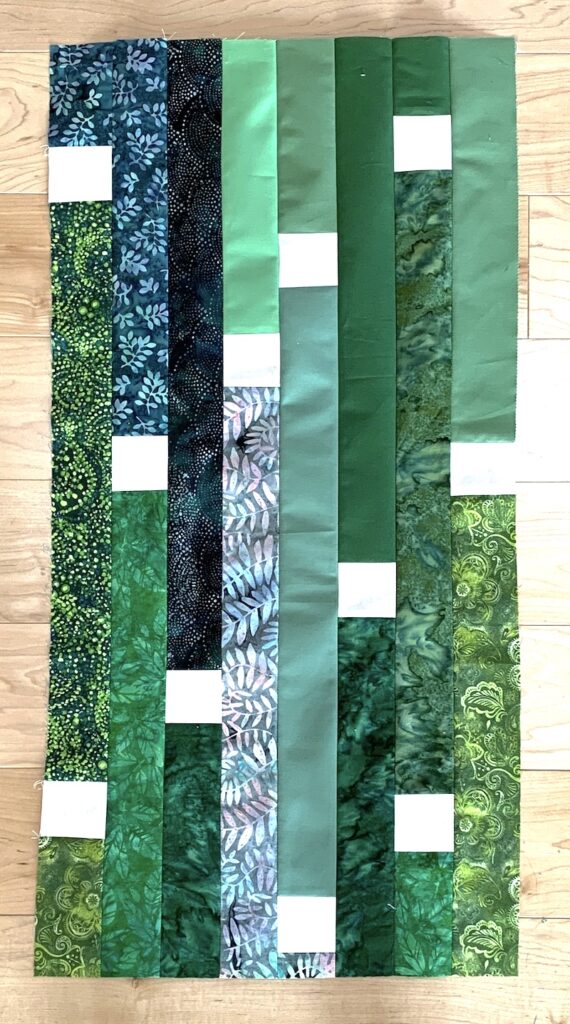
This is how the panel came out. Happy dance! This is everything I hoped it would be:
- I like the balance of prints versus solids.
- I like the number of divider squares.
- I like that with the shorter strips I started with, there ended up with no big stretches of color or print that ended up side by side.
To truly convince myself that I had succeeded in finding a layout I like for making a tote bag, I added side panel strips and made a tote bag. This is how it came out. I like it! I hope you do too.
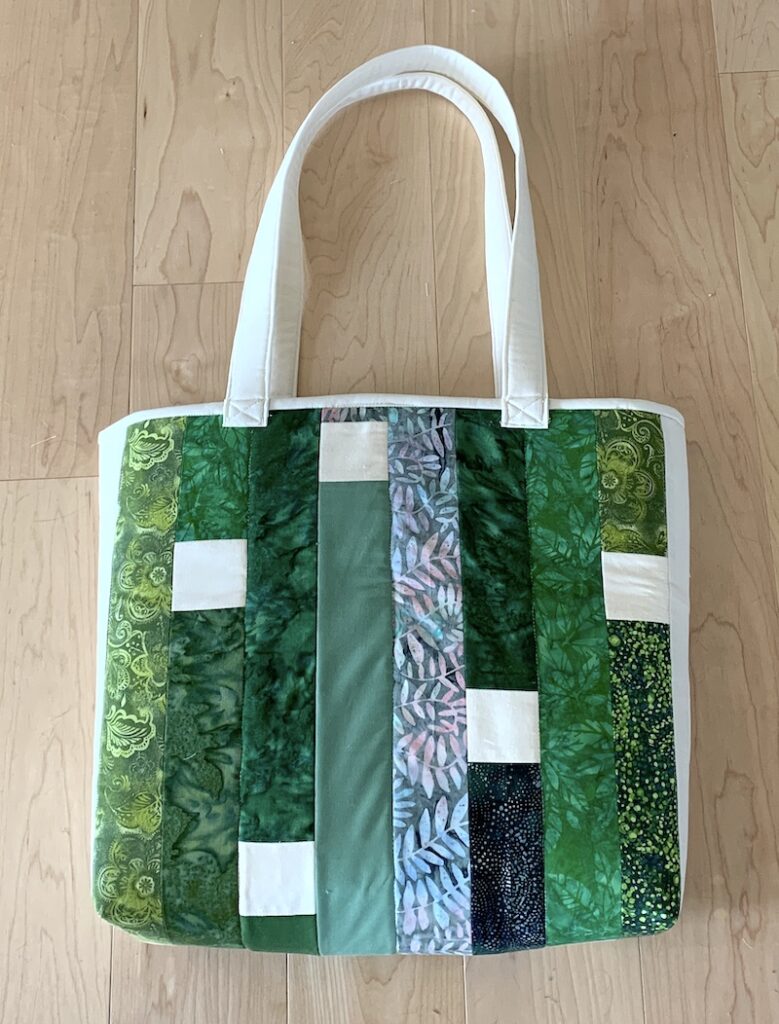
My instructions for making the complete tote bag are available at https://www.etsy.com/listing/1061546252/quilted-tote-bag-tutorial-pdf .
My son-in-law is coming to put up shelvesin my sewing room so I can get re-organized and start sewing again. I am so excited to have a start date to make your great items.
Sounds great Helen!
Another very interesting and entertaining post. I had no idea so much went into how they are assembled.
Thank you Lidia!